前言
个人感觉比较磨心态,要坐住,因为细节太多,建议:一遍看个大概,二遍回来细品,不要当成任务,把握零碎时间
一、k8s安装
1、配置准备
硬件要求
内存:2GB或更多RAMCPU: 2核CPU或更多CPU硬盘: 30GB或更多本次环境说明:
操作系统:CentOS 7.9内核版本:3.10.0-1160master: 192.168.68.106node01: 192.168.68.107node02: 192.168.68.108
2、系统准备
2.1.关闭防火墙和selinux
关闭防火墙systemctl stop firewalld && systemctl disable firewalld && iptables -F关闭selinuxsed -i 's/enforcing/disabled/' /etc/selinux/config && setenforce 02.2. 关闭swap分区
临时关闭swapoff -a永久关闭swapsed -ri 's/.*swap.*/#&/' /etc/fstab2.3.修改hosts文件
设置主机名(不设置也可以,但是要保证主机名不相同)
master服务配置:
hostnamectl set-hostname k8s-master01
node01服务配置:
hostnamectl set-hostname k8s-node01
node02服务配置:
hostnamectl set-hostname k8s-node02
修改本地hosts文件
vi /etc/hosts 添加如下内容
192.168.68.106 k8s-master01
192.168.68.107 k8s-node01
192.168.68.108 k8s-node02
2.4.修改内核参数
cat > /etc/sysctl.d/k8s.conf << EOF
net.bridge.bridge-nf-call-ip6tables = 1
net.bridge.bridge-nf-call-iptables = 1
net.ipv4.ip_forward = 1
EOFsysctl --system
2.5.安装docker
配置yum源(这里使用阿里云的源)
wget https://mirrors.aliyun.com/docker-ce/linux/centos/docker-ce.repo -O /etc/yum.repos.d/docker-ce.repo安装docker
列出所有docker版本yum list docker-ce.x86_64 --showduplicates |sort
选择版本安装,这里安装docker 19.03.9版本yum -y install docker-ce-19.03.9-3.el7 docker-ce-cli-19.03.9-3.el7
也可以直接安装最新版本yum install docker-ce docker-ce-cli -y
编辑docker配置文件:/etc/docker/daemon.json
mkdir /etc/docker/
cat > /etc/docker/daemon.json << EOF
{
"registry-mirrors": ["https://gqs7xcfd.mirror.aliyuncs.com","https://hub-mirror.c.163.com"],
"exec-opts": ["native.cgroupdriver=systemd"],
"log-driver": "json-file",
"log-opts": {
"max-size": "100m"
},
"storage-driver": "overlay2"
}
EOF
启动docker服务
systemctl daemon-reload && systemctl enable docker && systemctl start docker3、安装
3.1.配置yum源(这里使用阿里云的源)
cat > /etc/yum.repos.d/kubernetes.repo << EOF
[kubernetes]
name=Kubernetes
baseurl=https://mirrors.aliyun.com/kubernetes/yum/repos/kubernetes-el7-x86_64/
enabled=1
gpgcheck=1
repo_gpgcheck=1
gpgkey=https://mirrors.aliyun.com/kubernetes/yum/doc/yum-key.gpg https://mirrors.aliyun.com/kubernetes/yum/doc/rpm-package-key.gpg
EOF
3.2.安装指定版本的kubeadm,kubelet,kubectl
yum install -y kubelet-1.23.0 kubeadm-1.23.0 kubectl-1.23.0【注:】
- 由于不知道默认安装的最新版,国内的阿里云镜像站同步会有延迟,导致无法拉取镜像。如果你可以拉去到最新的镜像那请随意。
- 后期安装需要kubesphere,k8s需要>=1.19
- 由于k8s支持了 cri 协议,1.24版本以后不再支持docker,因此k8s安装版本不能>=1.24
3.3.设置开机自启
systemctl enable kubelet3.4.列出所有版本
yum list kubelet --showduplicates4、部署Kubernetes Master节点
4.1.master节点初始化
kubeadm init \--kubernetes-version 1.23.0 \--apiserver-advertise-address=master机器分配的真实ip \--service-cidr=10.96.0.0/12 \--pod-network-cidr=10.244.0.0/16 \--image-repository registry.aliyuncs.com/google_containers 参数说明
--kubernetes-version v1.23.0 指定版本
--apiserver-advertise-address 为通告给其它组件的IP,一般应为master节点的IP地址
--service-cidr 指定service网络,不能和node网络冲突
--pod-network-cidr 指定pod网络,不能和node网络、service网络冲突
--image-repository registry.aliyuncs.com/google_containers 指定镜像源,由于默认拉取镜像地址k8s.gcr.io国内无法访问,这里指定阿里云镜像仓库地址,注意这里设置的是后缀,前缀是/etc/docker/daemon.json设置的镜像源。
如果k8s版本比较新,可能阿里云没有对应的镜像,就需要自己从其它地方获取镜像了。
--control-plane-endpoint 标志应该被设置成负载均衡器的地址或 DNS 和端口(可选)
【注:】
版本必须和上边安装的kubelet,kubead,kubectl保持一致
4.2.等待拉取镜像
也可用自己提前给各个节点拉取镜像 ,查看所需镜像命令: kubeadm --kubernetes-version 1.23.0 config images list

等待镜像拉取成功后,会继续初始化集群,等到初始化完成后,会看到类似如下信息,保留最后两行的输出后边会用到

4.3. 配置kubectl
就是执行初始化成功后输出的那三条命令
mkdir -p $HOME/.kube
cp -i /etc/kubernetes/admin.conf $HOME/.kube/config
chown $(id -u):$(id -g) $HOME/.kube/config
4.4.查看节点信息
kubectl get nodes
此时只能看到master节点,等待其他节点加入进来后即可看到。
4.5、node节点加入集群
每个 node 执行一遍下面操作
kubeadm join 192.168.68.106:6443 --token 1quyaw.xa7yel3xla129kfw \--discovery-token-ca-cert-hash sha256:470410e1180b119ebe8ee3ae2842e7a4a852e590896306ec0dab26b168d99197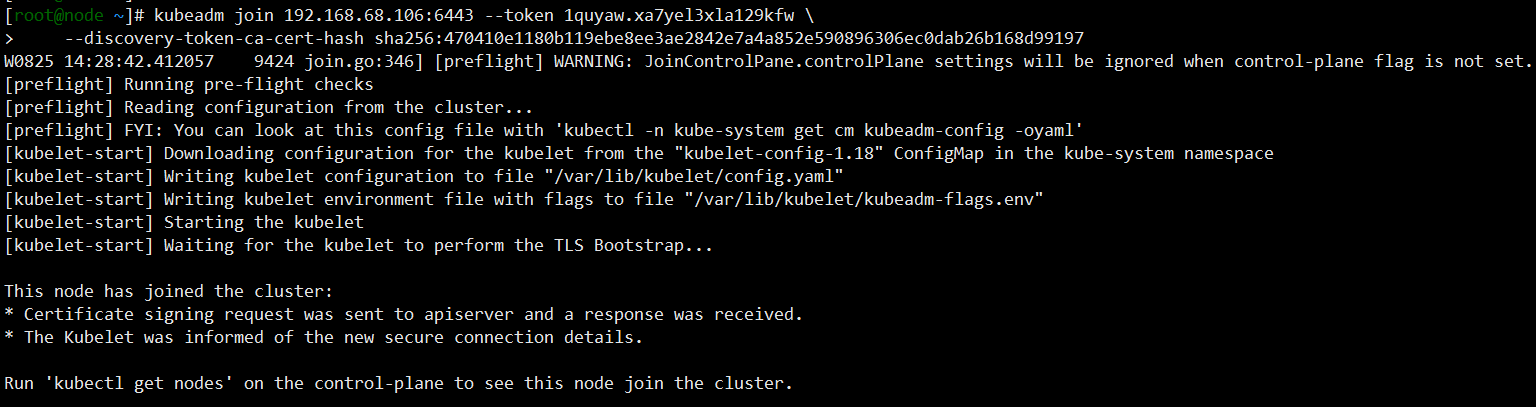
4.6.master节点上查看集群节点
kubectl get nodes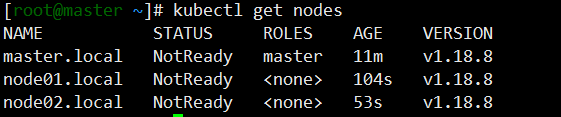
可以看到 STATUS状态都是NotReady, 这是因为确实网络插件导致的,等安装好网络插件就好了
4.7.安装cni插件
这里用的是 'calico',直接创建文件calico.yaml并复制下面内容,然后建议修改 CALICO_IPV4POOL_CIDR 配置,修改为与初始化的 pod-network-cidr 相同,然后master节点执行:kubectl apply -f calico.yaml 即可,正常情况下会创建处于running状态的calico相关的pod,最后执行:kubectl get nodes 会发现各个节点已处于ready状态
---
# Source: calico/templates/calico-config.yaml
# This ConfigMap is used to configure a self-hosted Calico installation.
kind: ConfigMap
apiVersion: v1
metadata:name: calico-confignamespace: kube-system
data:# Typha is disabled.typha_service_name: "none"# Configure the backend to use.calico_backend: "bird"# Configure the MTU to useveth_mtu: "1440"# The CNI network configuration to install on each node.  The special# values in this config will be automatically populated.cni_network_config: |-{"name": "k8s-pod-network","cniVersion": "0.3.1","plugins": [{"type": "calico","log_level": "info","datastore_type": "kubernetes","nodename": "__KUBERNETES_NODE_NAME__","mtu": __CNI_MTU__,"ipam": {"type": "calico-ipam"},"policy": {"type": "k8s"},"kubernetes": {"kubeconfig": "__KUBECONFIG_FILEPATH__"}},{"type": "portmap","snat": true,"capabilities": {"portMappings": true}}]}---
# Source: calico/templates/kdd-crds.yaml
apiVersion: apiextensions.k8s.io/v1beta1
kind: CustomResourceDefinition
metadata:name: felixconfigurations.crd.projectcalico.org
spec:scope: Clustergroup: crd.projectcalico.orgversion: v1names:kind: FelixConfigurationplural: felixconfigurationssingular: felixconfiguration
---apiVersion: apiextensions.k8s.io/v1beta1
kind: CustomResourceDefinition
metadata:name: ipamblocks.crd.projectcalico.org
spec:scope: Clustergroup: crd.projectcalico.orgversion: v1names:kind: IPAMBlockplural: ipamblockssingular: ipamblock---apiVersion: apiextensions.k8s.io/v1beta1
kind: CustomResourceDefinition
metadata:name: blockaffinities.crd.projectcalico.org
spec:scope: Clustergroup: crd.projectcalico.orgversion: v1names:kind: BlockAffinityplural: blockaffinitiessingular: blockaffinity---apiVersion: apiextensions.k8s.io/v1beta1
kind: CustomResourceDefinition
metadata:name: ipamhandles.crd.projectcalico.org
spec:scope: Clustergroup: crd.projectcalico.orgversion: v1names:kind: IPAMHandleplural: ipamhandlessingular: ipamhandle---apiVersion: apiextensions.k8s.io/v1beta1
kind: CustomResourceDefinition
metadata:name: ipamconfigs.crd.projectcalico.org
spec:scope: Clustergroup: crd.projectcalico.orgversion: v1names:kind: IPAMConfigplural: ipamconfigssingular: ipamconfig---apiVersion: apiextensions.k8s.io/v1beta1
kind: CustomResourceDefinition
metadata:name: bgppeers.crd.projectcalico.org
spec:scope: Clustergroup: crd.projectcalico.orgversion: v1names:kind: BGPPeerplural: bgppeerssingular: bgppeer---apiVersion: apiextensions.k8s.io/v1beta1
kind: CustomResourceDefinition
metadata:name: bgpconfigurations.crd.projectcalico.org
spec:scope: Clustergroup: crd.projectcalico.orgversion: v1names:kind: BGPConfigurationplural: bgpconfigurationssingular: bgpconfiguration---apiVersion: apiextensions.k8s.io/v1beta1
kind: CustomResourceDefinition
metadata:name: ippools.crd.projectcalico.org
spec:scope: Clustergroup: crd.projectcalico.orgversion: v1names:kind: IPPoolplural: ippoolssingular: ippool---apiVersion: apiextensions.k8s.io/v1beta1
kind: CustomResourceDefinition
metadata:name: hostendpoints.crd.projectcalico.org
spec:scope: Clustergroup: crd.projectcalico.orgversion: v1names:kind: HostEndpointplural: hostendpointssingular: hostendpoint---apiVersion: apiextensions.k8s.io/v1beta1
kind: CustomResourceDefinition
metadata:name: clusterinformations.crd.projectcalico.org
spec:scope: Clustergroup: crd.projectcalico.orgversion: v1names:kind: ClusterInformationplural: clusterinformationssingular: clusterinformation---apiVersion: apiextensions.k8s.io/v1beta1
kind: CustomResourceDefinition
metadata:name: globalnetworkpolicies.crd.projectcalico.org
spec:scope: Clustergroup: crd.projectcalico.orgversion: v1names:kind: GlobalNetworkPolicyplural: globalnetworkpoliciessingular: globalnetworkpolicy---apiVersion: apiextensions.k8s.io/v1beta1
kind: CustomResourceDefinition
metadata:name: globalnetworksets.crd.projectcalico.org
spec:scope: Clustergroup: crd.projectcalico.orgversion: v1names:kind: GlobalNetworkSetplural: globalnetworksetssingular: globalnetworkset---apiVersion: apiextensions.k8s.io/v1beta1
kind: CustomResourceDefinition
metadata:name: networkpolicies.crd.projectcalico.org
spec:scope: Namespacedgroup: crd.projectcalico.orgversion: v1names:kind: NetworkPolicyplural: networkpoliciessingular: networkpolicy---apiVersion: apiextensions.k8s.io/v1beta1
kind: CustomResourceDefinition
metadata:name: networksets.crd.projectcalico.org
spec:scope: Namespacedgroup: crd.projectcalico.orgversion: v1names:kind: NetworkSetplural: networksetssingular: networkset
---
# Source: calico/templates/rbac.yaml# Include a clusterrole for the kube-controllers component,
# and bind it to the calico-kube-controllers serviceaccount.
kind: ClusterRole
apiVersion: rbac.authorization.k8s.io/v1
metadata:name: calico-kube-controllers
rules:# Nodes are watched to monitor for deletions.- apiGroups: [""]resources:- nodesverbs:- watch- list- get# Pods are queried to check for existence.- apiGroups: [""]resources:- podsverbs:- get# IPAM resources are manipulated when nodes are deleted.- apiGroups: ["crd.projectcalico.org"]resources:- ippoolsverbs:- list- apiGroups: ["crd.projectcalico.org"]resources:- blockaffinities- ipamblocks- ipamhandlesverbs:- get- list- create- update- delete# Needs access to update clusterinformations.- apiGroups: ["crd.projectcalico.org"]resources:- clusterinformationsverbs:- get- create- update
---
kind: ClusterRoleBinding
apiVersion: rbac.authorization.k8s.io/v1
metadata:name: calico-kube-controllers
roleRef:apiGroup: rbac.authorization.k8s.iokind: ClusterRolename: calico-kube-controllers
subjects:
- kind: ServiceAccountname: calico-kube-controllersnamespace: kube-system
---
# Include a clusterrole for the calico-node DaemonSet,
# and bind it to the calico-node serviceaccount.
kind: ClusterRole
apiVersion: rbac.authorization.k8s.io/v1
metadata:name: calico-node
rules:# The CNI plugin needs to get pods, nodes, and namespaces.- apiGroups: [""]resources:- pods- nodes- namespacesverbs:- get- apiGroups: [""]resources:- endpoints- servicesverbs:# Used to discover service IPs for advertisement.- watch- list# Used to discover Typhas.- get- apiGroups: [""]resources:- nodes/statusverbs:# Needed for clearing NodeNetworkUnavailable flag.- patch# Calico stores some configuration information in node annotations.- update# Watch for changes to Kubernetes NetworkPolicies.- apiGroups: ["networking.k8s.io"]resources:- networkpoliciesverbs:- watch- list# Used by Calico for policy information.- apiGroups: [""]resources:- pods- namespaces- serviceaccountsverbs:- list- watch# The CNI plugin patches pods/status.- apiGroups: [""]resources:- pods/statusverbs:- patch# Calico monitors various CRDs for config.- apiGroups: ["crd.projectcalico.org"]resources:- globalfelixconfigs- felixconfigurations- bgppeers- globalbgpconfigs- bgpconfigurations- ippools- ipamblocks- globalnetworkpolicies- globalnetworksets- networkpolicies- networksets- clusterinformations- hostendpointsverbs:- get- list- watch# Calico must create and update some CRDs on startup.- apiGroups: ["crd.projectcalico.org"]resources:- ippools- felixconfigurations- clusterinformationsverbs:- create- update# Calico stores some configuration information on the node.- apiGroups: [""]resources:- nodesverbs:- get- list- watch# These permissions are only requried for upgrade from v2.6, and can# be removed after upgrade or on fresh installations.- apiGroups: ["crd.projectcalico.org"]resources:- bgpconfigurations- bgppeersverbs:- create- update# These permissions are required for Calico CNI to perform IPAM allocations.- apiGroups: ["crd.projectcalico.org"]resources:- blockaffinities- ipamblocks- ipamhandlesverbs:- get- list- create- update- delete- apiGroups: ["crd.projectcalico.org"]resources:- ipamconfigsverbs:- get# Block affinities must also be watchable by confd for route aggregation.- apiGroups: ["crd.projectcalico.org"]resources:- blockaffinitiesverbs:- watch# The Calico IPAM migration needs to get daemonsets. These permissions can be# removed if not upgrading from an installation using host-local IPAM.- apiGroups: ["apps"]resources:- daemonsetsverbs:- get
---
apiVersion: rbac.authorization.k8s.io/v1
kind: ClusterRoleBinding
metadata:name: calico-node
roleRef:apiGroup: rbac.authorization.k8s.iokind: ClusterRolename: calico-node
subjects:
- kind: ServiceAccountname: calico-nodenamespace: kube-system---
# Source: calico/templates/calico-node.yaml
# This manifest installs the calico-node container, as well
# as the CNI plugins and network config on
# each master and worker node in a Kubernetes cluster.
kind: DaemonSet
apiVersion: apps/v1
metadata:name: calico-nodenamespace: kube-systemlabels:k8s-app: calico-node
spec:selector:matchLabels:k8s-app: calico-nodeupdateStrategy:type: RollingUpdaterollingUpdate:maxUnavailable: 1template:metadata:labels:k8s-app: calico-nodeannotations:# This, along with the CriticalAddonsOnly toleration below,# marks the pod as a critical add-on, ensuring it gets# priority scheduling and that its resources are reserved# if it ever gets evicted.scheduler.alpha.kubernetes.io/critical-pod: ''spec:nodeSelector:beta.kubernetes.io/os: linuxhostNetwork: truetolerations:# Make sure calico-node gets scheduled on all nodes.- effect: NoScheduleoperator: Exists# Mark the pod as a critical add-on for rescheduling.- key: CriticalAddonsOnlyoperator: Exists- effect: NoExecuteoperator: ExistsserviceAccountName: calico-node# Minimize downtime during a rolling upgrade or deletion; tell Kubernetes to do a "force# deletion": https://kubernetes.io/docs/concepts/workloads/pods/pod/#termination-of-pods.terminationGracePeriodSeconds: 0priorityClassName: system-node-criticalinitContainers:# This container performs upgrade from host-local IPAM to calico-ipam.# It can be deleted if this is a fresh installation, or if you have already# upgraded to use calico-ipam.- name: upgrade-ipamimage: calico/cni:v3.8.9command: ["/opt/cni/bin/calico-ipam", "-upgrade"]env:- name: KUBERNETES_NODE_NAMEvalueFrom:fieldRef:fieldPath: spec.nodeName- name: CALICO_NETWORKING_BACKENDvalueFrom:configMapKeyRef:name: calico-configkey: calico_backendvolumeMounts:- mountPath: /var/lib/cni/networksname: host-local-net-dir- mountPath: /host/opt/cni/binname: cni-bin-dirsecurityContext:privileged: true# This container installs the CNI binaries# and CNI network config file on each node.- name: install-cniimage: calico/cni:v3.8.9command: ["/install-cni.sh"]env:# Name of the CNI config file to create.- name: CNI_CONF_NAMEvalue: "10-calico.conflist"# The CNI network config to install on each node.- name: CNI_NETWORK_CONFIGvalueFrom:configMapKeyRef:name: calico-configkey: cni_network_config# Set the hostname based on the k8s node name.- name: KUBERNETES_NODE_NAMEvalueFrom:fieldRef:fieldPath: spec.nodeName# CNI MTU Config variable- name: CNI_MTUvalueFrom:configMapKeyRef:name: calico-configkey: veth_mtu# Prevents the container from sleeping forever.- name: SLEEPvalue: "false"volumeMounts:- mountPath: /host/opt/cni/binname: cni-bin-dir- mountPath: /host/etc/cni/net.dname: cni-net-dirsecurityContext:privileged: true# Adds a Flex Volume Driver that creates a per-pod Unix Domain Socket to allow Dikastes# to communicate with Felix over the Policy Sync API.- name: flexvol-driverimage: calico/pod2daemon-flexvol:v3.8.9volumeMounts:- name: flexvol-driver-hostmountPath: /host/driversecurityContext:privileged: truecontainers:# Runs calico-node container on each Kubernetes node.  This# container programs network policy and routes on each# host.- name: calico-nodeimage: calico/node:v3.8.9env:# Use Kubernetes API as the backing datastore.- name: DATASTORE_TYPEvalue: "kubernetes"# Wait for the datastore.- name: WAIT_FOR_DATASTOREvalue: "true"# Set based on the k8s node name.- name: NODENAMEvalueFrom:fieldRef:fieldPath: spec.nodeName# Choose the backend to use.- name: CALICO_NETWORKING_BACKENDvalueFrom:configMapKeyRef:name: calico-configkey: calico_backend# Cluster type to identify the deployment type- name: CLUSTER_TYPEvalue: "k8s,bgp"# Auto-detect the BGP IP address.- name: IPvalue: "autodetect"# Enable IPIP- name: CALICO_IPV4POOL_IPIPvalue: "Always"# Set MTU for tunnel device used if ipip is enabled- name: FELIX_IPINIPMTUvalueFrom:configMapKeyRef:name: calico-configkey: veth_mtu# The default IPv4 pool to create on startup if none exists. Pod IPs will be# chosen from this range. Changing this value after installation will have# no effect. This should fall within `--cluster-cidr`.- name: CALICO_IPV4POOL_CIDRvalue: "192.168.0.0/16"# Disable file logging so `kubectl logs` works.- name: CALICO_DISABLE_FILE_LOGGINGvalue: "true"# Set Felix endpoint to host default action to ACCEPT.- name: FELIX_DEFAULTENDPOINTTOHOSTACTIONvalue: "ACCEPT"# Disable IPv6 on Kubernetes.- name: FELIX_IPV6SUPPORTvalue: "false"# Set Felix logging to "info"- name: FELIX_LOGSEVERITYSCREENvalue: "info"- name: FELIX_HEALTHENABLEDvalue: "true"securityContext:privileged: trueresources:requests:cpu: 250mlivenessProbe:exec:command:- /bin/calico-node- -felix-live- -bird-liveperiodSeconds: 10initialDelaySeconds: 10failureThreshold: 6readinessProbe:exec:command:- /bin/calico-node- -bird-ready- -felix-readyperiodSeconds: 10volumeMounts:- mountPath: /lib/modulesname: lib-modulesreadOnly: true- mountPath: /run/xtables.lockname: xtables-lockreadOnly: false- mountPath: /var/run/caliconame: var-run-calicoreadOnly: false- mountPath: /var/lib/caliconame: var-lib-calicoreadOnly: false- name: policysyncmountPath: /var/run/nodeagentvolumes:# Used by calico-node.- name: lib-moduleshostPath:path: /lib/modules- name: var-run-calicohostPath:path: /var/run/calico- name: var-lib-calicohostPath:path: /var/lib/calico- name: xtables-lockhostPath:path: /run/xtables.locktype: FileOrCreate# Used to install CNI.- name: cni-bin-dirhostPath:path: /opt/cni/bin- name: cni-net-dirhostPath:path: /etc/cni/net.d# Mount in the directory for host-local IPAM allocations. This is# used when upgrading from host-local to calico-ipam, and can be removed# if not using the upgrade-ipam init container.- name: host-local-net-dirhostPath:path: /var/lib/cni/networks# Used to create per-pod Unix Domain Sockets- name: policysynchostPath:type: DirectoryOrCreatepath: /var/run/nodeagent# Used to install Flex Volume Driver- name: flexvol-driver-hosthostPath:type: DirectoryOrCreatepath: /usr/libexec/kubernetes/kubelet-plugins/volume/exec/nodeagent~uds
---apiVersion: v1
kind: ServiceAccount
metadata:name: calico-nodenamespace: kube-system---
# Source: calico/templates/calico-kube-controllers.yaml# See https://github.com/projectcalico/kube-controllers
apiVersion: apps/v1
kind: Deployment
metadata:name: calico-kube-controllersnamespace: kube-systemlabels:k8s-app: calico-kube-controllers
spec:# The controllers can only have a single active instance.replicas: 1selector:matchLabels:k8s-app: calico-kube-controllersstrategy:type: Recreatetemplate:metadata:name: calico-kube-controllersnamespace: kube-systemlabels:k8s-app: calico-kube-controllersannotations:scheduler.alpha.kubernetes.io/critical-pod: ''spec:nodeSelector:beta.kubernetes.io/os: linuxtolerations:# Mark the pod as a critical add-on for rescheduling.- key: CriticalAddonsOnlyoperator: Exists- key: node-role.kubernetes.io/mastereffect: NoScheduleserviceAccountName: calico-kube-controllerspriorityClassName: system-cluster-criticalcontainers:- name: calico-kube-controllersimage: calico/kube-controllers:v3.8.9env:# Choose which controllers to run.- name: ENABLED_CONTROLLERSvalue: node- name: DATASTORE_TYPEvalue: kubernetesreadinessProbe:exec:command:- /usr/bin/check-status- -r---apiVersion: v1
kind: ServiceAccount
metadata:name: calico-kube-controllersnamespace: kube-system
---
# Source: calico/templates/calico-etcd-secrets.yaml---
# Source: calico/templates/calico-typha.yaml---
# Source: calico/templates/configure-canal.yaml
二、 命令行工具kubectl
1.多节点环境搭建
默认只有master可以执行kubectl,如果要node也可以执行kubectl需要如下配置
1. 将 master 节点中 /etc/kubernetes/admin.conf 拷贝到需要运行的服务器的 /etc/kubernetes 目录中
scp /etc/kubernetes/admin.conf root@k8s-node1:/etc/kubernetes
2. 在对应的服务器上配置环境变量
echo "export KUBECONFIG=/etc/kubernetes/admin.conf" >> ~/.bash_profile
source ~/.bash_profile
2.资源操作
以下对资源的各类操作属于示例,不代表方法的全部,无使用场景的划分,仅用于表达使用方式的多样性
2.1.创建对象
这个对象是按照资源分类的,比如service,deploy,po,statefulset,serviceaccount...
# 通过配置文件创建资源对象
$ kubectl create -f ./my-manifest.yaml           # 创建资源
$ kubectl create -f ./my1.yaml -f ./my2.yaml     # 使用多个文件创建资源
$ kubectl create -f ./dir                        # 使用目录下所有清单文件创建资源
$ kubectl create -f https://git.io/vPieo         # 使用 url 来创建资源
$ kubectl run nginx --image=nginx                # 不清楚配什么,只想创建pod实例,,不指定命名空间默认指定到default命名空间,如果要指定加上--namespace=xxx
$ kubectl expose po nginx --port=80 --type=NodePort      # 创建对应的svc,暴露pods端口,不指定命名空间默认指定到default命名空间,如果要指定加上--namespace=xxx
$ kubectl create deploy nginx --image=nginx      # 不清楚配什么,只想创建deploy实例
$ kubectl expose deploy nginx --port=80 --type=NodePort  #创建对应的svc,暴露deploy端口
$ kubectl explain pods,svc                       # 获取 pod 和 svc 的文档
......
# 自定义配置信息来创建一个自定义对象,下面用终端简单演示创建多个 YAML 对象
$ cat <<EOF | kubectl create -f -
apiVersion: v1
kind: Pod
metadata:name: busybox-sleep
spec:containers:- name: busyboximage: busyboxargs:- sleep- "1000000"
---
apiVersion: v1
kind: Pod
metadata:name: busybox-sleep-less
spec:containers:- name: busyboximage: busyboxargs:- sleep- "1000"
EOF# 创建包含几个 key 的 Secret
$ cat <<EOF | kubectl create -f -
apiVersion: v1
kind: Secret
metadata:name: mysecret
type: Opaque
data:password: $(echo "s33msi4" | base64)username: $(echo "jane" | base64)
EOF
2.2.显示和查找资源
# Get commands with basic output
$ kubectl get services                          # 列出所有 namespace 中的所有 service
$ kubectl get pods --all-namespaces             # 列出所有 namespace 中的所有 pod
$ kubectl get pods -o wide                      # 列出所有 pod 并显示详细信息
$ kubectl get deployment my-dep                 # 列出指定 deployment
$ kubectl get pods --include-uninitialized      # 列出该 namespace 中的所有 pod 包括未初始化的# 使用详细输出来描述命令
$ kubectl describe nodes my-node
$ kubectl describe pods my-pod$ kubectl get services --sort-by=.metadata.name # List Services Sorted by Name# 根据重启次数排序列出 pod
$ kubectl get pods --sort-by='.status.containerStatuses[0].restartCount'# 获取所有具有 app=cassandra 的 pod 中的 version 标签
$ kubectl get pods --selector=app=cassandra rc -o \jsonpath='{.items[*].metadata.labels.version}'# 获取所有节点的 ExternalIP
$ kubectl get nodes -o jsonpath='{.items[*].status.addresses[?(@.type=="ExternalIP")].address}'# 列出属于某个 PC 的 Pod 的名字
# “jq”命令用于转换复杂的 jsonpath,参考 https://stedolan.github.io/jq/
$ sel=${$(kubectl get rc my-rc --output=json | jq -j '.spec.selector | to_entries | .[] | "\(.key)=\(.value),"')%?}
$ echo $(kubectl get pods --selector=$sel --output=jsonpath={.items..metadata.name})# 查看哪些节点已就绪
$ JSONPATH='{range .items[*]}{@.metadata.name}:{range @.status.conditions[*]}{@.type}={@.status};{end}{end}' \&& kubectl get nodes -o jsonpath="$JSONPATH" | grep "Ready=True"# 列出当前 Pod 中使用的 Secret
$ kubectl get pods -o json | jq '.items[].spec.containers[].env[]?.valueFrom.secretKeyRef.name' | grep -v null | sort | uniq
2.3.更新资源
$ kubectl rolling-update frontend-v1 -f frontend-v2.json           # 滚动更新 pod frontend-v1
$ kubectl rolling-update frontend-v1 frontend-v2 --image=image:v2  # 更新资源名称并更新镜像
$ kubectl rolling-update frontend --image=image:v2                 # 更新 frontend pod 中的镜像
$ kubectl rolling-update frontend-v1 frontend-v2 --rollback        # 退出已存在的进行中的滚动更新
$ cat pod.json | kubectl replace -f -                              # 基于 stdin(标准流,即终端) 输入的 JSON 替换 pod# 强制替换,删除后重新创建资源。会导致服务中断。
$ kubectl replace --force -f ./pod.json# 为 nginx RC 创建服务,启用本地 80 端口连接到容器上的 8000 端口
$ kubectl expose rc nginx --port=80 --target-port=8000# 更新单容器 pod 的镜像版本(tag)到 v4
$ kubectl get pod mypod -o yaml | sed 's/\(image: myimage\):.*$/\1:v4/' | kubectl replace -f -$ kubectl label pods my-pod new-label=awesome                      # 添加标签
$ kubectl annotate pods my-pod icon-url=http://goo.gl/XXBTWq       # 添加注解
$ kubectl autoscale deployment foo --min=2 --max=10                # 自动扩展 deployment “foo”
2.4.修补资源
$ kubectl patch node k8s-node-1 -p '{"spec":{"unschedulable":true}}' # 部分更新节点# 更新容器镜像; spec.containers[*].name 是必须的,因为这是合并的关键字
$ kubectl patch pod valid-pod -p '{"spec":{"containers":[{"name":"kubernetes-serve-hostname","image":"new image"}]}}'# 使用具有位置数组的 json 补丁更新容器镜像
$ kubectl patch pod valid-pod --type='json' -p='[{"op": "replace", "path": "/spec/containers/0/image", "value":"new image"}]'# 使用具有位置数组的 json 补丁禁用 deployment 的 livenessProbe
$ kubectl patch deployment valid-deployment  --type json   -p='[{"op": "remove", "path": "/spec/template/spec/containers/0/livenessProbe"}]'
2.5.编辑资源
$ kubectl edit svc/docker-registry                      # 编辑名为 docker-registry 的 service
$ KUBE_EDITOR="nano" kubectl edit svc/docker-registry   # 使用其它编辑器
2.6.scale 资源(资源扩容和缩容)
$ kubectl scale --replicas=3 rs/foo                                 # Scale a replicaset named 'foo' to 3
$ kubectl scale --replicas=3 -f foo.yaml                            # Scale a resource specified in "foo.yaml" to 3
$ kubectl scale --current-replicas=2 --replicas=3 deployment/mysql  # If the deployment named mysql's current size is 2, scale mysql to 3
$ kubectl scale --replicas=5 rc/foo rc/bar rc/baz                   # Scale multiple replication controllers
2.7.删除资源
$ kubectl delete -f ./pod.json                                              # 删除 pod.json 文件中定义的类型和名称的 pod
$ kubectl delete pod,service baz foo                                        # 删除名为“baz”的 pod 和名为“foo”的 service
$ kubectl delete pods,services -l name=myLabel                              # 删除具有 name=myLabel 标签的 pod 和 serivce
$ kubectl delete pods,services -l name=myLabel --include-uninitialized      # 删除具有 name=myLabel 标签的 pod 和 service,包括尚未初始化的
$ kubectl -n my-ns delete po,svc --all                                      # 删除 my-ns namespace 下的所有 pod 和 serivce,包括尚未初始化的
3.pod与集群
3.1.和运行的pod交互
$ kubectl logs my-pod                                 # dump 输出 pod 的日志(stdout)
$ kubectl logs my-pod -c my-container                 # dump 输出 pod 中容器的日志(stdout,pod 中有多个容器的情况下使用)
$ kubectl logs -f my-pod                              # 流式输出 pod 的日志(stdout)
$ kubectl logs -f my-pod -c my-container              # 流式输出 pod 中容器的日志(stdout,pod 中有多个容器的情况下使用)
$ kubectl run -i --tty busybox --image=busybox -- sh  # 交互式 shell 的方式运行 pod
$ kubectl attach my-pod -i                            # 连接到运行中的容器
$ kubectl port-forward my-pod 5000:6000               # 转发 pod 中的 6000 端口到本地的 5000 端口
$ kubectl exec my-pod -- ls /                         # 在已存在的容器中执行命令(只有一个容器的情况下)
$ kubectl exec my-pod -c my-container -- ls /         # 在已存在的容器中执行命令(pod 中有多个容器的情况下)
$ kubectl top pod POD_NAME --containers               # 显示指定 pod 和容器的指标度量
3.2.与节点和集群交互
$ kubectl cordon my-node                                                # 标记 my-node 不可调度
$ kubectl drain my-node                                                 # 清空 my-node 以待维护
$ kubectl uncordon my-node                                              # 标记 my-node 可调度
$ kubectl top node my-node                                              # 显示 my-node 的指标度量
$ kubectl cluster-info                                                  # 显示 master 和服务的地址
$ kubectl cluster-info dump                                             # 将当前集群状态输出到 stdout
$ kubectl cluster-info dump --output-directory=/path/to/cluster-state   # 将当前集群状态输出到 /path/to/cluster-state# 如果该键和影响的污点(taint)已存在,则使用指定的值替换
$ kubectl taint nodes foo dedicated=special-user:NoSchedule
3.3.资源类型的别名
pods:po
deployments:deploy
services:svc
namespace:ns
nodes:no
3.4.格式化输出
输出 json 格式:-o json
仅打印资源名称:-o name
以纯文本格式输出所有信息:-o wide
输出 yaml 格式:-o yaml
4.pod
4.1.pod配置文件
apiVersion: v1 # api 文档版本
kind: Pod # 资源对象类型,也可以配置为像Deployment、StatefulSet这一类的对象
metadata: # Pod 相关的元数据,用于描述 Pod 的数据
name: nginx-pod # Pod 的名称
labels: # 定义 Pod 的标签
type: app # 自定义 label 标签,名字为 type,值为 app
app: nginx-1.7.9
test: 1.0.0 # 自定义 label 标签,描述 Pod 版本号
namespace: 'default' # 命名空间的配置
spec: # 期望 Pod 按照这里面的描述进行创建
containers: # 对于 Pod 中的容器描述
- name: nginx # 容器的名称
image: nginx:1.7.9 # 指定容器的镜像
imagePullPolicy: IfNotPresent # 镜像拉取策略,指定如果本地有就用本地的,如果没有就拉取远程的
command: # 指定容器启动时执行的命令
- nginx
- -g
- 'daemon off;' # nginx -g 'daemon off;'
workingDir: /usr/share/nginx/html # 定义容器启动后的工作目录
ports:
- name: http # 端口名称
containerPort: 80 # 描述容器内要暴露什么端口
protocol: TCP # 描述该端口是基于哪种协议通信的
env: # 环境变量
- name: JVM_OPTS # 环境变量名称
value: '-Xms128m -Xmx128m' # 环境变量的值
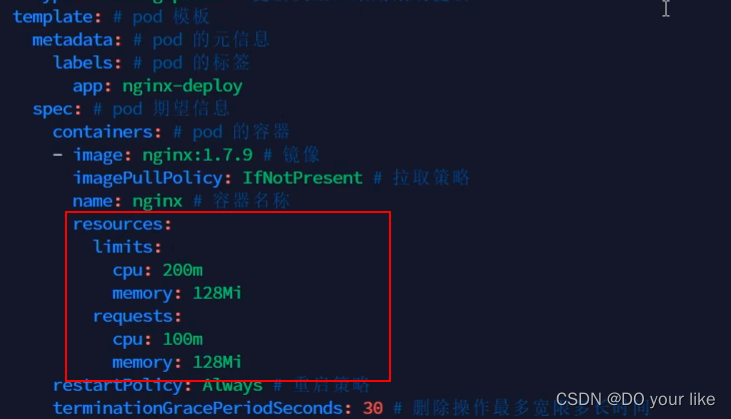
resources:
requests: # 最少需要多少资源
cpu: 100m # 限制 cpu 最少使用 0.1 个核心
memory: 128Mi # 限制内存最少使用 128兆
limits: # 最多可以用多少资源
cpu: 200m # 限制 cpu 最多使用 0.2 个核心
memory: 256Mi # 限制 最多使用 256兆
restartPolicy: OnFailure # 重启策略,只有失败的情况才会重启
4.2.探针(probe)
容器内应用的监测机制,根据不同的探针来判断容器应用当前的状态好文推荐1![]() https://blog.csdn.net/qq_39680564/article/details/106650301好文推荐2
https://blog.csdn.net/qq_39680564/article/details/106650301好文推荐2![]() https://zhuanlan.zhihu.com/p/326972239
https://zhuanlan.zhihu.com/p/326972239
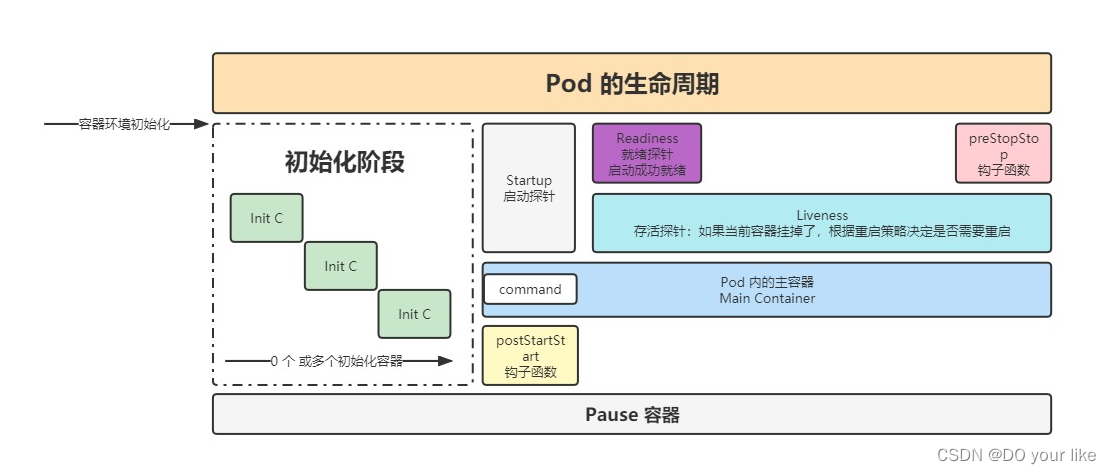 pod的生命周期
- 类型
- StartupProbe
k8s 1.16 版本新增的探针。当配置了 startupProbe 后,会先禁用其他探针,直到 startupProbe 成功后,其他探针才会继续。
作用:由于有时候不能准确预估应用一定是多长时间启动成功,因此配置另外两种方式不方便配置初始化时长来检测,而配置了 statupProbe 后,只有在应用启动成功了,才会执行另外两种探针,可以更加方便的结合使用另外两种探针使用。# 格式描述
spec: # 期望 Pod 按照这里面的描述进行创建
containers: # 对于 Pod 中的容器描述
- name: nginx # 容器的名称
image: nginx:1.7.9 # 指定容器的镜像
imagePullPolicy: IfNotPresent # 镜像拉取策略,指定如果本地有就用本地的,如果没有就拉取远程的
startupProbe:
httpGet:
path: /api/startup
port: 80 - ReadinessProbe
用于探测容器内的程序是否健康,它的返回值如果返回 success,那么就认为该容器已经完全启动,并且该容器是可以接收外部流量的。
# 格式描述
spec: # 期望 Pod 按照这里面的描述进行创建
containers: # 对于 Pod 中的容器描述
- name: nginx # 容器的名称
image: nginx:1.7.9 # 指定容器的镜像
imagePullPolicy: IfNotPresent # 镜像拉取策略,指定如果本地有就用本地的,如果没有就拉取远程的
readinessProbe:
failureThreshold: 3 # 错误次数
httpGet:
path: /ready
port: 8181
scheme: HTTP
periodSeconds: 10 # 间隔时间
successThreshold: 1
timeoutSeconds: 1 - LivenessProbe
用于探测容器中的应用是否运行,如果探测失败,kubelet 会根在startup探测成功后开启,跟据配置的重启策略进行重启,若没有配置,默认就认为容器启动成功,不会执行重启策略。
livenessProbe:enabled: true # 可不加,默认是true
failureThreshold: 5
httpGet:
path: /health
port: 8080
scheme: HTTP # 可不加,默认是HTTP,也可配置HTTPS
initialDelaySeconds: 60
periodSeconds: 10
successThreshold: 1
timeoutSeconds: 5 - 三者关系
如果配置了startup,则先执行startup探针,后二者会处于禁用状态;
startup探针返还成功,后二者关闭禁用开始并发执行,当然read和live探针的执行开始也会因initialDelaySeconds的不同设置而有先后
总结:
read、live探针各自独立,没有依赖;
readness是反馈是否准备好接受外部路由请求,只需要按照策略判断是否完成就绪即可,如果就绪失败直接容器启动失败;
liveness是反馈容器在服务过程中是否正常,如果发现异常宕机要执行对应的重启策略
- StartupProbe
- 探测方式
- ExecAction
在容器内部执行一个命令,如果返回值为 0,则任务容器时健康的。
livenessProbe:
exec:
command:
- cat
- /health - TCPSocketAction
通过 tcp 连接监测容器内端口是否开放,如果开放则证明该容器健康
livenessProbe:
tcpSocket:
port: 80 - HTTPGetAction
生产环境用的较多的方式,发送 HTTP 请求到容器内的应用程序,如果接口返回的状态码在 200~400 之间,则认为容器健康。
livenessProbe:
failureThreshold: 5
httpGet:
path: /health
port: 8080
scheme: HTTP
httpHeaders:
- name: xxx
value: xxx
- ExecAction
- 参数配置
initialDelaySeconds: 60 # 初始化时间,时间结束后开始执行liveness和readness探针,是给这两个探针专用,目的在于简单场景下替带startup探针
timeoutSeconds: 2 # 超时时间
periodSeconds: 5 # 监测间隔时间
successThreshold: 1 # 检查 1 次成功就表示成功
failureThreshold: 2 # 监测失败 2 次就表示失败
4.3.生命周期
pod 执行删除操作kubectl delete po poname -n ns,退出流程如下
- 首先找到对应的 Endpoint:删除里面配置的该 pod ip 地址
- pod 变成 Terminating 状态:会给 pod 一个宽限期,让 pod 去执行一些清理或销毁操作,配置参数:
# 和containers平级设置,如果不加默认是30s
terminationGracePeriodSeconds: 60
containers: - 执行 钩子函数 preStop :用于实现注册中心下线、数据清理、数据销毁等final操作
【注:】
1、如果设置了terminationGracePeriodSeconds(准备时间),要参考preStop的执行时间,一定要确保可以覆盖到,因为pod可能未执行完preStop就被提前释放掉
2、一般不使用postStart,主要因为此函数运行在pod内容器初始化阶段之后,也就是会和容器的启动阶段并行执行(可参考上图),这种情况下如果双方共用一些资源且有改动行为可能会导致启动异常问题,一般情况下会把postStart要执行的内容放到初始化容器阶段执行
三、资源调度
1.标签 & 选择器(labels & selectors)
1.1.labels
如下所示:labels需要设置在metadata属性下
apiVersion: v1 # api 文档版本
kind: Pod  # 资源对象类型,也可以配置为像Deployment、StatefulSet这一类的对象
metadata: # Pod 相关的元数据,用于描述 Pod 的数据name: nginx-livecycle-pod # Pod 的名称labels: # 定义 Pod 的标签type: app # 自定义 label 标签,名字为 type,值为 appapp: nginx-1.7.9test: 1.0.0 # 自定义 label 标签,描述 Pod 版本号namespace: 'default' # 命名空间的配置
可以给资源实例实时设置labels
# 查询当前运行的pod实例[root@k8s pod]# kubectl get po -o wide
NAME                     READY   STATUS    RESTARTS   AGE     IP             NODE         NOMINATED NODE   READINESS GATES
nginx-85b98978db-xjvkn   1/1     Running   0          5d4h    10.244.43.7    k8s.node02   <none>           <none>
nginx-livecycle-pod      1/1     Running   0          4d23h   10.244.64.72   k8s.node01   <none>           <none>
nginx-pod                1/1     Running   0          5d3h    10.244.64.71   k8s.node01   <none>           <none>
nginx-probe-pod          1/1     Running   0          5d      10.244.43.8    k8s.node02   <none>           <none># 尝试为其中一个资源实例nginx-livecycle-pod新增一个label[root@k8s pod]# kubectl label po nginx-livecycle-pod owner=songyahui
pod/nginx-livecycle-pod labeled
[root@k8s pod]# kubectl get po nginx-livecycle-pod --show-labels
NAME                  READY   STATUS    RESTARTS   AGE     LABELS
nginx-livecycle-pod   1/1     Running   0          4d23h   app=nginx-1.7.9,owner=songyahui,test=1.0.0,type=app
[root@k8s pod]#
根据label查找匹配的资源
# 单label条件查询[root@k8s pod]# kubectl get po -l owner=songyahui
NAME                  READY   STATUS    RESTARTS   AGE
nginx-livecycle-pod   1/1     Running   0          4d23h# 多条件查询 in[root@k8s pod]# kubectl get po -l 'type in (app, app2, app3)'
NAME                  READY   STATUS    RESTARTS   AGE
nginx-livecycle-pod   1/1     Running   0          4d23h
nginx-pod             1/1     Running   0          5d3h
nginx-probe-pod       1/1     Running   0          5d# 多条件查询 &&[root@k8s pod]# kubectl get po -l type=app,owner=songyahui
NAME                  READY   STATUS    RESTARTS   AGE
nginx-livecycle-pod   1/1     Running   0          4d23h# 多条件查询 !=[root@k8s pod]# kubectl get po -l type=app,owner!=songyahui
NAME              READY   STATUS    RESTARTS   AGE
nginx-pod         1/1     Running   0          5d3h
nginx-probe-pod   1/1     Running   0          5d
1.2.selector
编辑在spec属性下
apiVersion: v1
kind: Service
metadata:name: nginx-podnamespace: default
spec:selector:app: nginx-1.7.9test: 1.0.0type: appsessionAffinity: Nonetype: NodePort
2.deployment
官方推荐deployment来管理无状态资源,在rs之上

ReplicaSet(副本集)可以自动管理下面分配的pod,我们通过管理副本集来实现多pod资源的创建,而且即使delete分配的pod,replicaset也会立刻恢复被删除的pod
Deployment 是 ReplicaSet的资源上层封装,即不但ReplicaSet功能,还支持自动扩容缩容,滚动更新和回滚等机制,也就是说Deployment是新一代无状态管理资源,功能丰富
Deployment & ReplicaSet关系:创建deploy后,还会自动创建一个相应的rs资源,最后rs会根据template属性创建pod
2.1.创建和配置文件解析
主要描述deploy的配置信息、展示配置信息修改后的自动更新效果
2.1.1.可以通过资源创建来展示使用,首先创建deploy
kubectl create deploy nginx --image=nginx
kubectl expose deploy nginx --port=80 --type=NodePort
2.1.2.获取deploy的启动信息
# 查询deploy资源信息
[root@k8s pod]# kubectl get deploy nginx -o yaml
# deploy资源信息
apiVersion: apps/v1 # deployment资源调用的api版本
kind: Deployment # 资源类型
metadata: # 元数据labels: # 标签属性app: nginx-deploy # 标签 key: valuename: nginx-deploy # deploy namenamespace: default # 命名空间
spec: # 规格设置,如果修改该属性下的值会触发自动更新replicas: 1 # 副本数量,即部署的pod数量revisionHistoryLimit: 10 # 保留版本个数,即最多记录最近的10个版本,供版本回退等操作调用selector: # 选择器,选择资源类型是replica setmatchLabels: # 匹配下面template.metadata.labels,随之创建的rs也会添加这些labelsapp: nginx-deploystrategy: # 策略rollingUpdate: # 滚动更新策略maxSurge: 25% # 最多更新到replicas属性要求的1.25倍,这要看机器性能,也可设置个数maxUnavailable: 25% # 更新失败的机器最多不能超过replicas属性要求的0.25type: RollingUpdate # 滚动更新,即先创建一个新副本再删除一个旧副本,直至更新所有template: # pod副本模板metadata:labels: # 创建pod标签app: nginx-deployspec:containers:- image: nginx:1.7.9imagePullPolicy: IfNotPresent name: nginxrestartPolicy: Always terminationGracePeriodSeconds: 30 # 关闭pod的结束容忍值
2.1.3.可以修改spec.template声明的pod资源模板,或者修改spec.replicas副本集。此处演示修改spec.replicas
[root@k8s pod]# kubectl edit deploy nginx然后修改replicas为3
wq保存之后,deploy就开始自动更新了;
查询deploy:kubectl get deploy nginx [-n xxx]
发现pod副本由原来的1/1个变为1/3,这表示正在重新启动3个pod
可以查询deploy的描述:kubectl describe deploy nginx
发现已经创了新的replica set资源实例(nginx-85b98978db)且已经启动了3个pod副本,再次查询deploy,发现已经变成了3/3
查询replica set发现desired也是变成了3


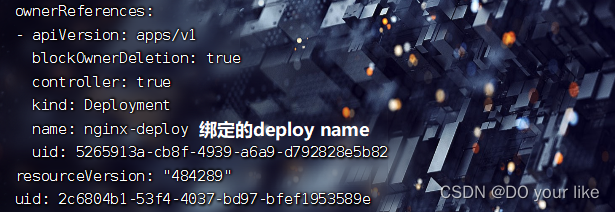
【注:】
rs通过metadata.ownerReferences属性来匹配和绑定deploy资源
2.2.滚动更新
修改spec.template声明的pod资源模板
[root@k8s pod]# kubectl edit deploy nginx
wq保存后自动更新deploy
查看deploy:kubectl get deploy,发现已经更新完毕

要注意的是修改template意味着replica set也要更新;
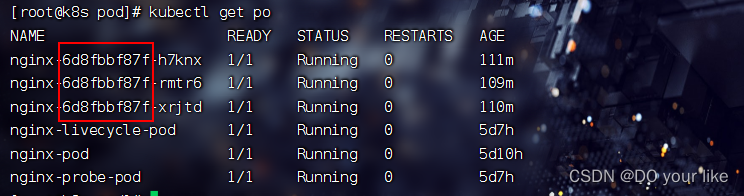
查看rs:kubectl get rs,发现启用了6d8f的新rs
kubectl get po
那么问题来了,虽然更新了,但是如何判断是滚动更新?
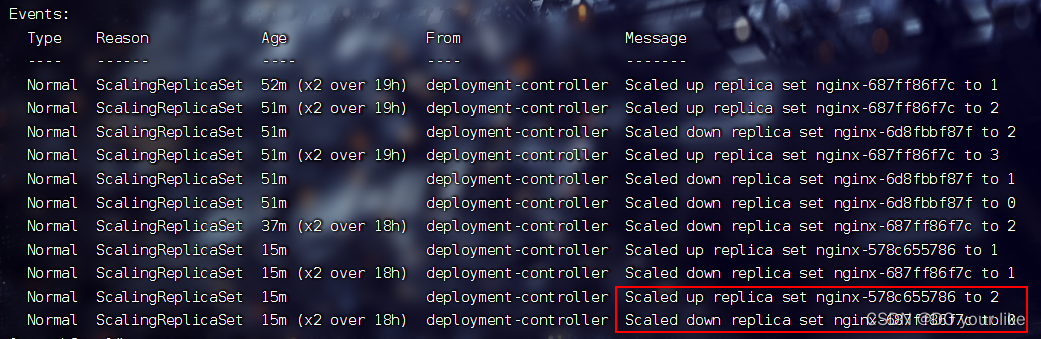
kubectl describe deploy nginx
scaled up rs nginx-6d8fbbf87f to 3:新rs nginx-6d8fbbf87f 成功滚动更新了3个pod副本
scaled up rs nginx-687ff86f7c to 0:旧rs nginx-687ff86f7c 成功滚动撤销所有pod副本


2.3.回滚/回退版本
比如滚动更新时出现异常卡住不动,比如deploy一直显示ready:1/3,uptodate:1,这种情况下就要把版本先回退到上一个版本,保障稳定
回滚操作
#查看 资源/资源名 的更新版本记录
[root@k8s ~]# kubectl rollout history deploy/nginx
deployment.apps/nginx
REVISION  CHANGE-CAUSE
1         <none>
2         <none>
3         <none>
4         <none>#查看版本详细信息
[root@k8s ~]# kubectl rollout history deploy/nginx --revision=3
deployment.apps/nginx with revision #4
Pod Template:Labels:       app=nginxpod-template-hash=6d8fbbf87fContainers:nginx:Image:      nginx:1.9.1Port:       <none>Host Port:  <none>Environment:        <none>Mounts:     <none>Volumes:      <none>#回滚到期望版本 版本越大越新
kubectl rollout undo deployment/nginx [--to-revision=2] 回退上一个版本[或指定回退版本]
回滚完成后查看rs,可以发现 rs 已经由 6d8fbbf87f 变更为旧的 687ff86f7c,而且是滚动性质的版本回退

2.4.扩容 & 缩容
目前可以用的scale策略是kubectl edit deployment deploy的方法更新spec.replica的值,但是过于沉重
另一种轻量化方式就是kubectl scale --replicas=num命令,演示一下
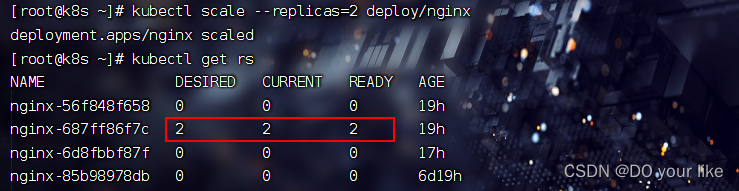
kubectl scale --replicas=2 deploy/<name>
[root@k8s ~]# kubectl scale --replicas=2 deploy/nginx
deployment.apps/nginx scaled
查看rs:kubectl get rs,可以发现部署的pod副本已经由3->2
2.5. 更新暂停 & 恢复
由于每次 deployment 的 template 发生修改后,都会触发更新 deployment 操作,但是频繁修改信息会产生多次更新,实际上只需要最后一次更新即可,当出现此类情况时我们就可以暂停 deployment 的 rollout。通过 kubectl rollout pause deployment <name> 就可以实现暂停,直到你下次恢复后才会继续进行滚动更新
演示
1.首先执行pause操作,然后尝试修改spec属性
kubectl rollout pause deployment <name>
# 对容器进行修改,查看是否发生更新操作
kubectl set image deploy <name> nginx=nginx:1.17.9 --record
# --record 可以使本次轻量修改记录到revision
2.通过 kubectl get po/deploy/rs 可以发现都没有变动
3.再次进行一些属性修改,如限制 nginx 容器的最大cpu为 0.2 核,最大内存为 128M,最小内存为 64M,最小 cpu 为 0.1 核
kubectl set resources deploy <deploy_name> -c <template_container_name> --limits=cpu=200m,memory=128Mi --requests=cpu=100m,memory=64Mi [--record] 4.此时通过命令 kubectl rollout resume deploy <name> 恢复后,我们再次查看 rs 和 po 信息,可以看到立即开始了滚动更新
查看 kubectl get rs & kubectl get po,resume之后立即开始了rs更新

kubectl describe deploy nginx
3.statefulset
statefulset有别于deployment的就是多了一块数据卷挂载;再一个就是sts直接管理pod,不像deploy调用rs管理

3.1.创建sts资源实例
1.编辑sts资源的yaml文件(创建svc、sts和pod)
--- # 嵌套的子yaml文件
apiVersion: v1
kind: Service
metadata:name: nginxlabels:app: nginx
spec:ports:- port: 80name: webclusterIP: Noneselector:app: nginx
---
apiVersion: apps/v1
kind: StatefulSet
metadata:name: web
spec:serviceName: "nginx-sts"replicas: 3selector:matchLabels:app: nginxtemplate:metadata:labels:app: nginx # 要和上面的matchLabels匹配spec:containers:- name: nginximage: nginx:1.7.9ports:- containerPort: 80name: web
2.执行sts创建命令
kubectl create -f web.yaml
# 查看 service(svc) 和 statefulset(sts)
kubectl get service nginx
kubectl get statefulset web 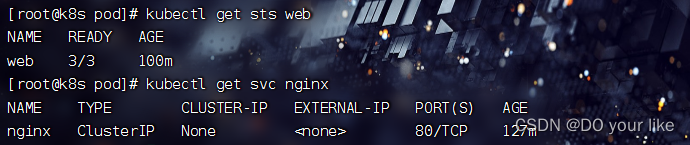
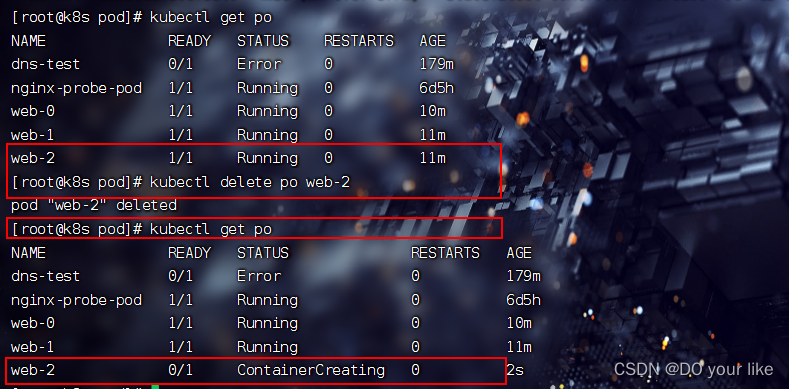
3.而且只有删除掉sts,才能真正删除pod
3.2.扩容 & 缩容
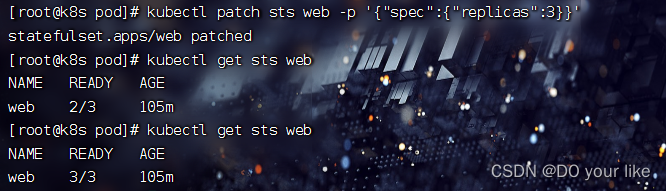
缩容:kubectl scale sts web --replicas=2

扩容:kubectl patch sts web -p '{"spec":{"replicas":3}}'
3.3.更新
spec.updateStrategy.type默认是RollingUpdate(滚动更新),官方文档
3.3.1.RollingUpdate
可以使用kubectl edit sts web 的更新方式,这里演示终端轻量更新:sts不支持kubectl set sts 命令,要使用kubectl patch sts <name> --type='json' -p='[{...}]'
kubectl patch sts web --type='json' -p='[{"op": "replace", "path": "/spec/template/spec/containers/0/image", "value": "nginx:1.7.9"}]' --recordkubectl get po 可以发现正在更新
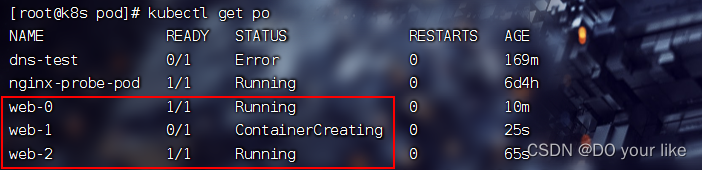
kubectl get sts web 可以发现仍然滚动更新,而且sts 的pod是有序更新(倒序)

3.3.2.On Delete
OnDelete 策略实现了 StatefulSet 的遗留版本(kuberentes 1.6及以前的版本)的行为。如果 StatefulSet 的 spec.updateStrategy.type 被设置为 OnDelete,当您修改spec.template 的内容时,StatefulSet Controller 将不会自动更新其 Pod。您必须手工删除 Pod,此时 StatefulSet Controller 在重新创建 Pod 时,使用修改过的 spec.template 的内容创建新 Pod。
3.4.灰度
利用滚动更新中的 partition 属性,可以实现简易的灰度发布的效果。例如我们有 5 个 pod,如果当前 partition 设置为 3,那么此时滚动更新时,只会更新那些 序号 >= 3 的 pod,利用该机制,我们可以通过控制 partition 的值,来决定只更新其中一部分 pod,确认正常再逐渐增大 pod 的更新数量,最终实现 pod 全部更新
演示
[root@k8s pod]#kubectl edit sts web
将spec.updateStrategy.rollingUpdate.rollingUpdate设置为3
查看pod资源发现:web后缀编号>=3的完成了更新

如果使用没有问题,再设置partition为1,最后再更新为0,这就是灰度发布
3.5. 级联和非级联删除
由于statefulset是一个有状态资源,因此为了保存状态信息设置了额外的非级联删除,默认是级联删除
非级联删除操作:kubectl delete sts name --cascade=false,这样便不会自动删除管理的pod资源
4.daemonset
服务守护进程,它的主要作用是在Kubernetes集群的所有节点中运行我们部署的守护进程,相当于在集群节点上分别部署Pod副本,如果有新节点加入集群,Daemonset会自动的在该节点上运行我们需要部署的Pod副本,相反如果有节点退出集群,Daemonset也会移除掉部署在旧节点的Pod副本。

4.1.特征
- 这个 Pod 运行在 Kubernetes 集群里的每一个节点(Node)上;
- 每个节点上只会运行一个这样的 Pod 实例;
- 如果新的节点加入 Kubernetes 集群后,该 Pod 会自动地在新节点上被创建出来;
- 而当旧节点被删除后,它上面的 Pod 也相应地会被回收掉。
4.2.场景
- 网络插件的 Agent 组件,如(Flannel,Calico)需要运行在每一个节点上,用来处理这个节点上的容器网络;
- 存储插件的 Agent 组件,如(Ceph,Glusterfs)需要运行在每一个节点上,用来在这个节点上挂载F远程存储目录;
- 监控系统的数据收集组件,如(Prometheus Node Exporter,Cadvisor)需要运行在每一个节点上,负责这个节点上的监控信息搜集。
- 日志系统的数据收集组件,如(Fluent,Logstash)需要运行在每一个节点上,负责这个节点上的日志信息搜集。
4.3.创建
编辑daemonset资源配置文件 fluentd-by-daemonset.yaml
apiVersion: apps/v1
kind: DaemonSet
metadata:name: fluentd
spec:selector:matchLabels:app: loggingtemplate:metadata:labels:app: logging # 和上的selector.matchLabels下保持一致id: fluentdname: fluentdspec:containers:- name: fluentd-esimage: agilestacks/fluentd-elasticsearch:v1.3.0env:- name: FLUENTD_ARGSvalue: -qqvolumeMounts:- name: containersmountPath: /var/lib/docker/containers- name: varlogmountPath: /varlogvolumes:- hostPath:path: /var/lib/docker/containersname: containers- hostPath:path: /var/logname: varlog
kubectl create -f fluentd-by-daemonset.yaml 可以发现每个node都会运行一个pod

4.4.node匹配
4.4.1.nodeSelector
只调度到匹配指定 label 的 Node 上,先为 Node 打上标签:kubectl label nodes
kubectl label nodes k8s-node1 svc_type=microsvc ![]()
然后在 daemonset 配置中设置 nodeSelector
# 更新配置文件
spec:template:spec:nodeSelector:svc_type: microsvc    # wq保存退出并执行replce命令
kubectl replace -f ds fluentd fluentd-by-daemonset.yaml
kubectl get po 可以发现由于 node02 没有打匹配标签,fluentd资源已经 2 -> 1

4.4.2. nodeAffinity
功能更丰富的 Node 选择器,比如支持集合操作
4.4.3.podAffinity
调度到满足条件的 Pod 所在的 Node 上
4.5.更新
不建议使用 RollingUpdate,建议使用 OnDelete 模式,这样避免频繁更新 ds
5.HPA
即水平自动扩容(Horizontal Pod Autoscaler),根据cpu、内存或自定义指标(metrics)对pod进行扩/缩容,要注意DaemonSet 不适用hpa,因为每个节点必须设置
演示
创建metrics-server:metrics监控服务,所有资源配置的hpa参数由该服务来监控执行
# 下载 metrics-server 组件配置文件
wget https://github.com/kubernetes-sigs/metrics-server/releases/latest/download/components.yaml -O metrics-server-components.yaml
# 修改镜像地址为国内的地址
sed -i 's/k8s.gcr.io\/metrics-server/registry.cn-hangzhou.aliyuncs.com\/google_containers/g' metrics-server-components.yaml
# 修改容器的 tls 配置,不验证 tls,在 containers 的 args 参数中增加 --kubelet-insecure-tls 参数
# 安装组件
kubectl apply -f metrics-server-components.yaml
# 查看 pod 状态
kubectl get pods --all-namespaces | grep metrics
设置deploy的spec.template:资源使用10%<cpu<20%,内存128m
kubectl autoscale deploy nginx-deploy --cpu-percent=20 --min=2 --max=5,即pod占用cpu资源的20%时最大开启5个副本,当逐渐<20%时副本数量也会跟随下降,最低维持到2个副本。
测试自行尝试,再通过硬件资源情况(kubectl top pods)观察 pods 的 autoscale 效果
k8s 手册:autoscale 命令详解 _ Kubernetes(K8S)中文文档_Kubernetes中文社区![]() http://docs.kubernetes.org.cn/486.html
http://docs.kubernetes.org.cn/486.html
四、服务发现
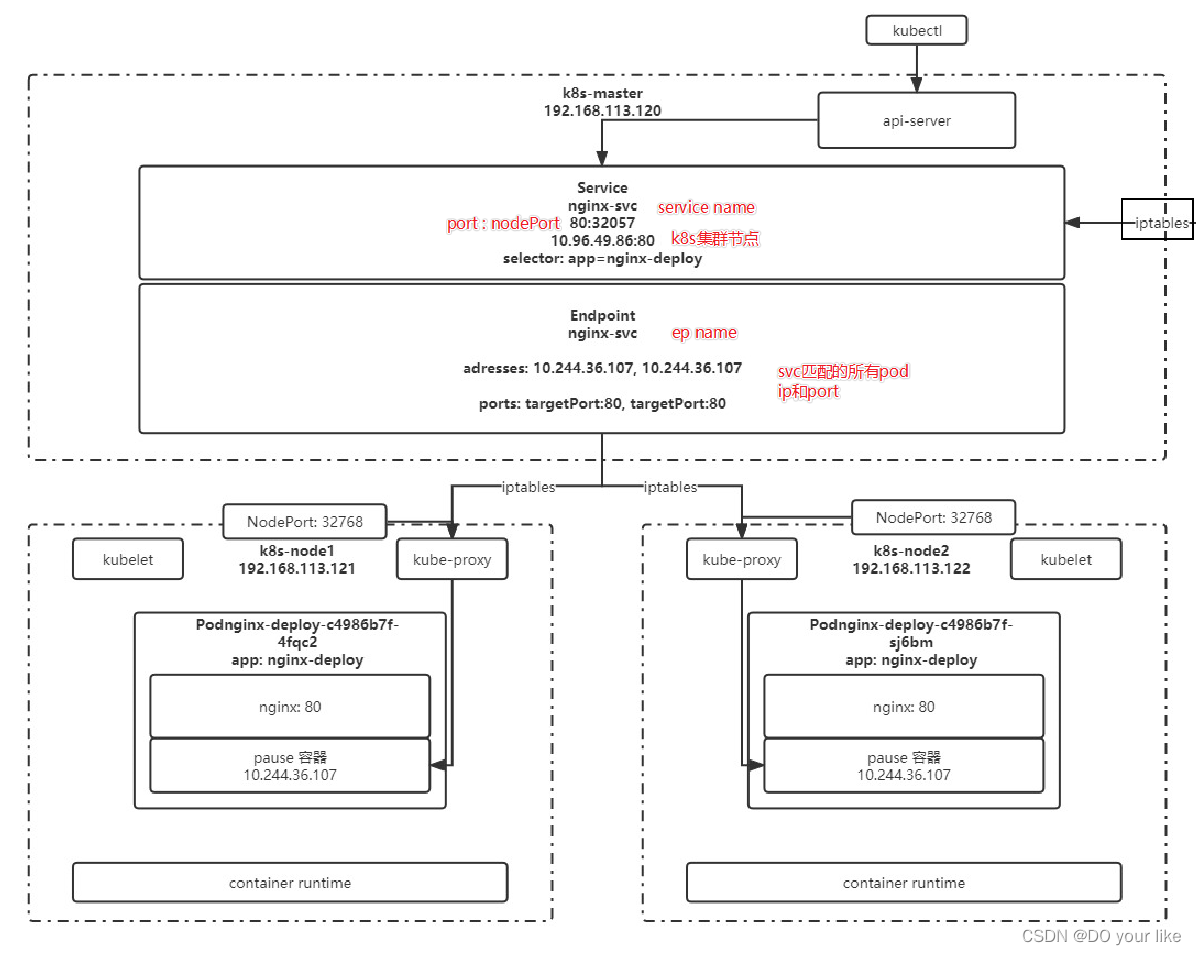
1.service

负责内网流量的通信(k8s集群网络,10.96.0.0/12),service 是管理k8s集群网段下的端口入口,然后转接到对应的endpoint,endpoint管理着对应的pod ip集合和端口集合,通过路由、负载均衡转接到某一个pod。
前面的案例中一直用service进行外部的真实网络通信,但工作中仅用来测试,一个svc只能对接一个外部ip端口,着实有点浪费外部端口,而且时间复杂度是o(n),解决不了svc量大的情况,那工作中如何实现外部网络通信呢,这会用到后面讲的ingress,这里只描述svc
1.1.演示
svc资源配置,其中svc通过配置selector来绑定匹配的pod
# service资源配置
apiVersion: v1
kind: Service
metadata:name: nginx-svclabels:app: nginx-svc
spec:selector: # 注意svc的selector下没有matchLabels,不加selector无法自动创建endpointapp: nginx-1.7.9 # 【重:】绑定label为app=nginx的podports:- name: http # service 端口配置的名称protocol: TCP # 端口绑定的协议,支持 TCP、UDP、SCTP,默认为 TCPport: 80 # service 自己的端口targetPort: 9527 # 目标 pod 的端口- name: httpsport: 443protocol: TCPtargetPort: 443type: NodePort
kubectl create -f yaml && kubectl get svc :创建并通过31556端口检查 svc

还有一类资源会跟随svc而创建,那就是endpoint,kubectl get endpoint :可以发现自动创建了一个和svc同名的ep资源

ep也是资源对象,存储在etcd中,ep的metadata.name和svc的metadata.name进行匹配,匹配到的ep和svc会进行绑定,ep用来记录service通过selector匹配的所有pod的 ip 和 port。service配置selector,endpoint controller会自动创建对应的endpoint对象;否则,不会自动创建,这时需要手动创建endpoint
1.2.代理 k8s 外部服务(适用externalname以外的任意type)
比如公司决定拥抱k8s,开始把服务慢慢地迁移到k8s,那没迁移的服务和迁移进k8s的服务之间如何交互?svc为了解决这个问题设置了手动配置endpoint的功能,你可以自定义访问ip
实现方式:编写 service 配置文件时,不指定 selector 属性,以便自己创建 endpoint,配置endpoint如下
apiVersion: v1
kind: Endpoints
metadata:labels:app: wolfcode-svc-external # 与 service 一致name: wolfcode-svc-external # 与 service 一致namespace: default # 与 service 一致
subsets:
- addresses:- ip: <target ip> # 目标 ip 地址,即可以设置外部ip,也可以设置集群ipports: # 以下配置与 service 一致- name: httpport: 80protocol: TCP
1.3.反向代理外部域名
service资源直接通过域名访问外部网络,而且不用设置endpoint资源
apiVersion: v1
kind: Service
metadata:labels:app: wolfcode-external-domainname: wolfcode-external-domain
spec:type: ExternalNameexternalName: www.wolfcode.cn
svc的常用type
NodePort:绑定并暴露一个外部ip端口
LoadBalancer:这需要绑定一个公网ip,和nodeport一样将svc对外暴露,好文推荐
ClusterIp:内部集群之间通信,可以创建并进入pod dns-test,执行wget http://svc name测试是否正常
ExternalName:内部集群之间通信,svc绑定一个域名即可
2.ingress
Ingress是一种 LB 的抽象,支持 nginx、haproxy 等负载均衡服务,进行内外网络交互官网描述![]() https://kubernetes.io/zh-cn/docs/concepts/services-networking/ingress/#what-is-ingress
https://kubernetes.io/zh-cn/docs/concepts/services-networking/ingress/#what-is-ingress

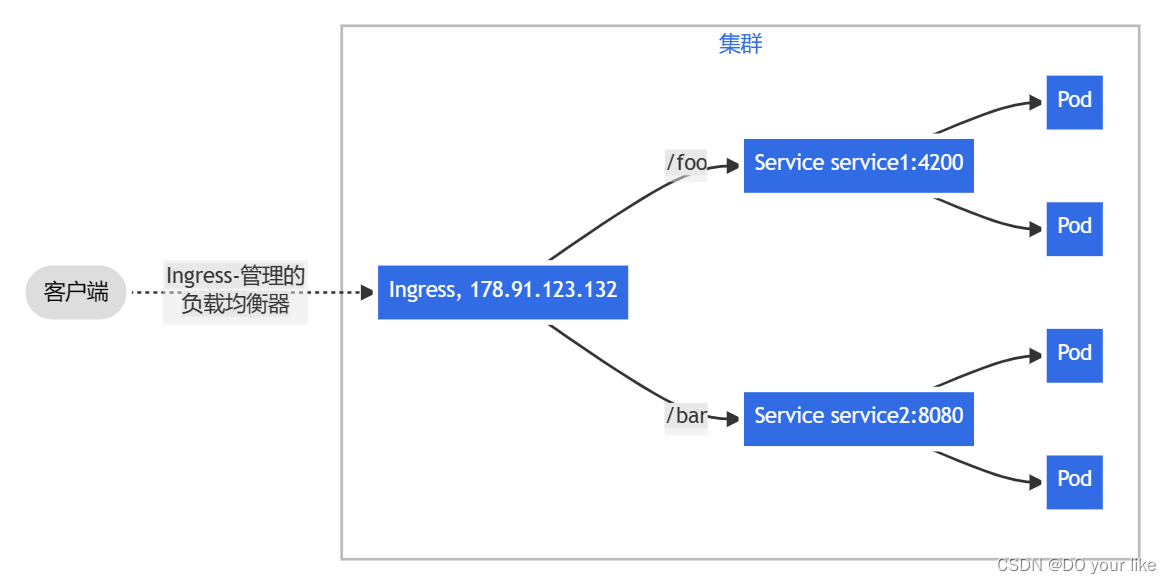
扇出(fanout):根据请求的 HTTP URI 将来自同一 IP 地址的流量路由到多个 Service。 Ingress 允许你将负载均衡器的数量降至最低。例如,这样的设置:
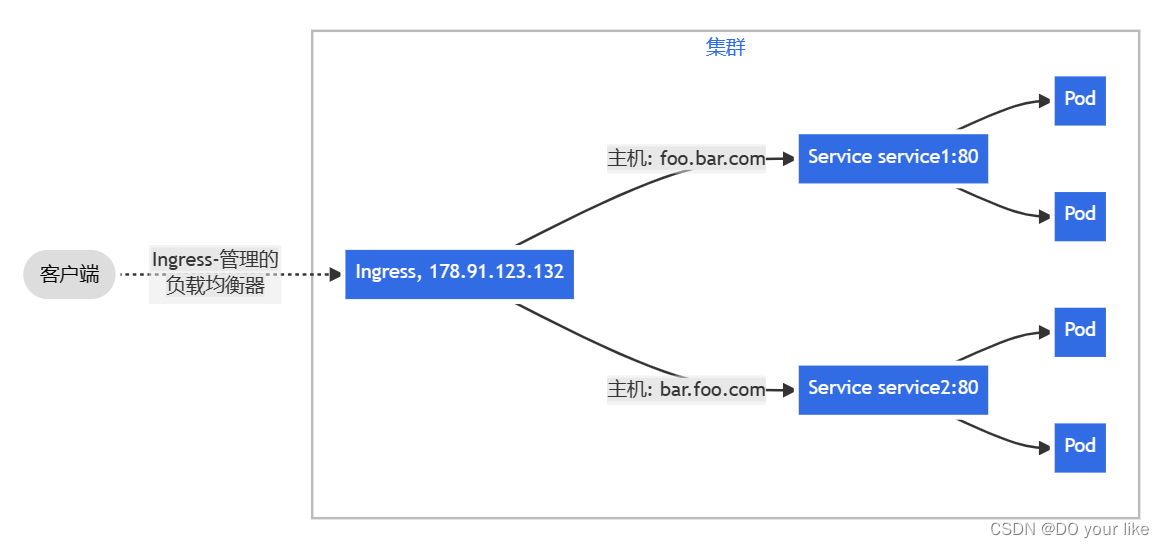
主机名称:识别请求头的主机名称进行路由。
不再演示,太麻烦,以后回来填坑,主要逻辑是ingress资源需要手动配置好才能用,启动一个ingress资源需要配置好要代理的service资源,然后设置好域名,以后外部网络就可以通过域名实现通信
五、配置与存储
1.配置管理
以往的资源配置文件都是直接把内容硬编码进去,虽然简单但是太冗余不利于量大情况下的信息维护,因此可以单独设置一个配置信息维护文件,资源配置文件的内容从这个维护文件中调用获取,就像获取变量的逻辑
1.1.configMap
一般用于存储 Pod 中应用所需的一些配置信息,或者环境变量,将配置与 Pod 分开,避免因修改配置导致镜像与容器重新构建。
1.1.1.创建
使用 kubectl create configmap -h 查看示例,构建 configmap 对象
通过文件构建
创建文件:touch db.properties && vi db.properties
user=root
password=root
database=ele-alsc
然后创建configmap:kubectl create configmap my-config --from-file[=alias-key-name=]=db.properties(不设置别名则db.properties就是configmap资源的key,文件内容就是value)
最后查看configmap:kubectl describe configmap my-config

通过命令构建
创建configmap资源:kubectl create configmap my-config --from-literal=key1=value1 -from-literal=key2=value2
和文件构建不同的是必须要设置key
通过env文件构建
kubectl create configmap my-config --from-env-file=path/to/foo.env --from-env-file=path/to/bar.env
1.2.secret
和configmap相似,主要用来配置加密资源
1.3.subpath
使用 ConfigMap 或 Secret 挂载到目录的时候,会将容器中源目录给覆盖掉,此时我们可能只想覆盖目录中的某一个文件,但是这样的操作会覆盖整个文件,因此需要使用到 SubPath
配置方式:
- 定义 volumes 时需要增加 items 属性,配置 key 和 path,且 path 的值不能从 / 开始
- 在容器内的 volumeMounts 中增加 subPath 属性,该值与 volumes 中 items.path 的值相同
containers:......volumeMounts:- mountPath: /etc/nginx/nginx.conf # 挂载到哪里name: config-volume # 使用哪个 configmap 或 secretsubPath: etc/nginx/nginx.conf # 与 volumes.[0].items.path 相同
volumes:- configMap:name: nginx-conf # configMap 名字items: # subPath 配置key: nginx.conf # configMap 中的文件名path: etc/nginx/nginx.conf # subPath 路径
1.4.热更新
edit
通过 edit 命令直接修改 configmap
replace
由于 configmap 我们创建通常都是基于文件创建,并不会编写 yaml 配置文件,因此修改时我们也是直接修改配置文件,而 replace 是没有 --from-file 参数的,因此无法实现基于源配置文件的替换,此时我们可以利用下方的命令实现
# 该命令的重点在于 --dry-run 参数,该参数的意思打印 yaml 文件,但不会将该文件发送给 apiserver,再结合 -oyaml 输出 yaml 文件就可以得到一个配置好但是没有发给 apiserver 的文件,然后再结合 replace 监听控制台输出得到 yaml 数据即可实现替换
kubectl create cm --from-file=nginx.conf --dry-run -o yaml | kubectl replace -f- 我们通常会将项目的配置文件作为 configmap 然后挂载到 pod,那么如果更新 configmap 中的配置,会不会更新到 pod 中呢?
这得分成几种情况:
默认挂载方式:会更新,更新周期是更新时间 + 缓存时间
subPath挂载:不会更新
变量形式:如果 pod 的一个变量是从 configmap 或 secret 中得到,同样不会更新
对于 subPath 的方式,我们可以取消 subPath 的使用,将配置文件挂载到一个不存在的目录,避免目录的覆盖,然后再利用软连接的形式,将该文件链接到目标位置
但是如果目标位置原本就有文件,可能无法创建软链接,此时可以基于前面讲过的 postStart 操作执行删除命令,将默认的文件删除即可
1.5.设置不可变配置
对于一些敏感服务的配置文件,在线上有时是不允许修改的,此时在配置 configmap 时可以设置 immutable: true 来禁止修改
2.持久化存储
2.1.volumes
2.1.1.hostport
将节点上的文件或目录挂载到 Pod 上,此时该目录会变成持久化存储目录,即使 Pod 被删除后重启,也可以重新加载到该目录,该目录下的文件不会丢失
配置
touch hostPath.yaml && vi hostPath.yaml
apiVersion: v1
kind: Pod
metadata:name: test-pd
spec:containers:- image: nginxname: nginx-volumevolumeMounts:- mountPath: /test-pd # 挂载到容器的哪个目录name: test-volume # 挂载哪个 volumevolumes:- name: test-volumehostPath:path: /data # 节点中的目录type: Directory # 检查类型,在挂载前对挂载目录做什么检查操作,有多种选项,默认为空字符串,不做任何检查类型:
空字符串:默认类型,不做任何检查
DirectoryOrCreate:如果给定的 path 不存在,就创建一个 755 的空目录
Directory:这个目录必须存在
FileOrCreate:如果给定的文件不存在,则创建一个空文件,权限为 644
File:这个文件必须存在
Socket:UNIX 套接字,必须存在
CharDevice:字符设备,必须存在
BlockDevice:块设备,必须存在
kubectl create -f hostPath.yaml
kubectl exec -it pod.name --container container.name -- /bin/bash 并进入volumeMounts.mountPath指定的目录(或者 kubectl exec pod.name --container container.name -- ls mountPath)
2.1.2.emptydir
EmptyDir 主要用于一个 Pod 中不同的 Container 共享数据使用的,由于只是在 Pod 内部使用,因此与其他 volume 比较大的区别是,当 Pod 如果被删除了,那么 emptyDir 也会被删除。
存储介质可以是任意类型,如 SSD、磁盘或网络存储。可以将 emptyDir.medium 设置为 Memory 让 k8s 使用 tmpfs(内存支持文件系统),速度比较快,但是重启 tmpfs 节点时,数据会被清除,且设置的大小会计入到 Container 的内存限制中。
配置empty挂载
touch empty.yaml && vim empty.yamlapiVersion: v1
kind: Pod
metadata:name: test-pd
spec:containers:- image: alpinename: alpine-emptydirvolumeMounts:- mountPath: /cachename: cache-volume- image: alpinename: alpine-emptydir-backvolumeMounts:- mountPath: /optname: cache-volumevolumes:- name: cache-volumeemptyDir: {}
pod配置了两个容器,用来模拟在a容器的mountPath下创建文件,b容器的mountPath也可以共享到的场景
kubectl exec -it test-pd-empty -c alpine-empty-dir -- sh
[root@k8s permanent_manager]# kubectl exec -it test-pd-empty -c alpine-empty-dir -- sh
# cd /cache //进入mountPath
# touch demo.txt && vi demo.txt //创建共享信息
另外一个容器检查下自己的mountPath,可以发现出现了共享信息
[root@k8s permanent_manager]# kubectl exec -it test-pd-empty -c alpine-empty-dir-back -- ls /opt
demo.txt
2.2.nfs挂载
nfs 卷能将 NFS (网络文件系统) 挂载到你的 Pod 中。 不像 emptyDir 那样会在删除 Pod 的同时也会被删除,nfs 卷的内容在删除 Pod 时会被保存,卷只是被卸载。 这意味着 nfs 卷可以被预先填充数据,并且这些数据可以在 Pod 之间共享。
缺点也很明显,由于通过网络实现io传输,稳定性有隐患或者说变得更复杂,要求一致性的服务要避免使用
nfs安装
# 安装 nfs ,集群节点全部安装
yum install nfs-utils -y# 启动 nfs
systemctl start nfs-server# 查看 nfs 版本
cat /proc/fs/nfsd/versions# 指定一个节点操作后续内容
# 创建共享目录
mkdir -p /data/nfs
cd /data/nfs
mkdir rw
mkdir ro# 设置共享目录 export
vim /etc/exports
/data/nfs/rw 192.168.88.0/24(rw,sync,no_subtree_check,no_root_squash)
/data/nfs/ro 192.168.88.0/24(ro,sync,no_subtree_check,no_root_squash)# 重新加载
exportfs -f
systemctl reload nfs-server# 到其他安装有 nfs-utils 节点执行加载测试
mkdir -p /mnt/nfs/rw
mount -t nfs 192.168.113.121:/data/nfs/rw /mnt/nfs/rw
配置pod测试资源
[root@k8s permanent_manager]# cat nfs.yaml
apiVersion: v1
kind: Pod
metadata:name: test-pd-nfs
spec:containers:- image: nginxname: nginx-nfs-volumevolumeMounts:- mountPath: /usr/local/nginx/htmlname: test-volumevolumes:- name: test-volumenfs:server: 192.168.88.128 # 网络存储服务地址path: /data/nfs/rw/nginx-nfs-test # 网络存储路径readOnly: true # 是否只读
查看nfs指定路径是否成功挂载到容器的mountPath(挂载点)
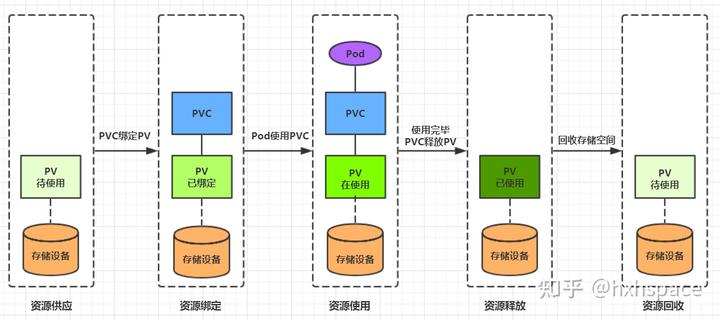
2.3.pv & pvc
持久卷(PersistentVolume,PV) 是集群中的一块存储,可以由管理员事先制备, 或者使用存储类(Storage Class)来动态制备。 持久卷是集群资源,就像节点也是集群资源一样。PV 持久卷和普通的 Volume 一样, 也是使用卷插件来实现的,只是它们拥有独立于任何使用 PV 的 Pod 的生命周期。 此 API 对象中记述了存储的实现细节,无论其背后是 NFS、iSCSI 还是特定于云平台的存储系统。
持久卷申领(PersistentVolumeClaim,PVC) 表达的是用户对存储的请求。概念上与 Pod 类似。 Pod 会耗用节点资源,而 PVC 申领会耗用 PV 资源。Pod 可以请求特定数量的资源(CPU 和内存);同样 PVC 申领也可以请求特定的大小和访问模式 (例如,可以要求 PV 卷能够以 ReadWriteOnce、ReadOnlyMany 或 ReadWriteMany 模式之一来挂载,参见访问模式)。
pv、pvc绑定
2.4.静态构建pv
配置(设置存储服务) & 创建 pv 资源
apiVersion: v1
kind: PersistentVolume
metadata:name: pv0001
spec:capacity:storage: 5Gi # pv 的容量volumeMode: Filesystem # 存储类型为文件系统accessModes: # 访问模式:ReadWriteOnce、ReadWriteMany、ReadOnlyMany- ReadWriteOnce # 可被单节点独写persistentVolumeReclaimPolicy: Recycle # 回收策略storageClassName: slow # 创建 PV 的存储类名,需要与 pvc 的相同mountOptions: # 加载配置- hard- nfsvers=4.1nfs: # 连接到 nfspath: /data/nfs/rw/test-pv # 存储路径server: 192.168.113.121 # nfs 服务地址
配置(绑定pv) & 创建 pvc 资源
apiVersion: v1
kind: PersistentVolumeClaim
metadata:name: nfs-pvc
spec:accessModes:- ReadWriteOnce # 权限需要与对应的 pv 相同volumeMode: Filesystemresources:requests:storage: 8Gi # 资源可以小于 pv 的,但是不能大于,如果大于就会匹配不到 pvstorageClassName: slow # 名字需要与对应的 pv 相同
#  selector: # 使用选择器选择对应的 pv
#    matchLabels:
#      release: "stable"
#    matchExpressions:
#      - {key: environment, operator: In, values: [dev]}
配置(绑定pvc) & 创建 pod 资源
apiVersion: v1
kind: Pod
metadata:name: test-pd-pvc
spec:containers:- image: nginxname: nginx-volume-pvcvolumeMounts:- mountPath: /test-pd-pvcname: test-volume-pvcvolumes:- name: test-volume-pvcpersistentVolumeClaim: # 关联pvcclaimName: nfs-pvc # 指定要关联的pvc
最后测试pv的持久卷路径是否成功挂载到容器中,例如你可以尝试到持久卷路径创建一个新文件,然后查看容器的挂载点是否成功更新或者加载
2.5.动态构建pv
k8s 中提供了一套自动创建 PV 的机制,即 PVC 设置 StorageClass。如果监听 PVC 没有绑定到符合条件的 PV,交由 StorageClass 根据 PVC 的需求动态创建 PV。
如图所示,StorageClass 也是需要一个复杂流程来创建 PV,因此还需要为 StorageClass 配置一个 Provisioner 
这里不再走演示案例,太tm麻烦,优质视频推荐:3.5.14_配置与存储-存储类:动态创建NFS-PV案例_哔哩哔哩_bilibili![]() https://www.bilibili.com/video/BV1MT411x7GH?p=67&spm_id_from=pageDriver&vd_source=8be621c052fd9f705308579363b67881
https://www.bilibili.com/video/BV1MT411x7GH?p=67&spm_id_from=pageDriver&vd_source=8be621c052fd9f705308579363b67881
六、高级调度
1.cronjob
linux自带一个定时任务 crontab
[root@k8s ~]# cat tab.txt
test
[root@k8s ~]# crontab -e
# 编辑任务
* * * * * date > /root/tab.txt # 每分钟执行一次
[root@k8s ~]# cat tab.txt
Sat Jul 29 19:45:01 PDT 2023 # 定时任务生效
定时任务crontab使用细节:Linux crontab 命令 | 菜鸟教程 (runoob.com)![]() https://www.runoob.com/linux/linux-comm-crontab.html
https://www.runoob.com/linux/linux-comm-crontab.html
k8s也提供了这种定时任务 cronjob,实际也是依赖了crontab,官网文档:
CronJob | Kubernetes![]() https://kubernetes.io/zh-cn/docs/reference/kubernetes-api/workload-resources/cron-job-v1/
https://kubernetes.io/zh-cn/docs/reference/kubernetes-api/workload-resources/cron-job-v1/
1.1.创建资源
apiVersion: batch/v1
kind: CronJob
metadata:name: cron-test-job
spec:concurrencyPolicy: Allow # 并发调度策略:Allow 允许并发调度,Forbid:不允许并发执行,Replace:如果之前的任务还没执行完,就直接执行新的,放弃上一个任务failedJobsHistoryLimit: 1 # 保留多少个失败的任务,默认是1successfulJobsHistoryLimit: 3 # 保留多少个成功的任务,默认是3suspend: false # 是否挂起任务,若为 true 则该任务不会执行
#  startingDeadlineSeconds: 30 # 间隔多长时间检测失败的任务并重新执行,时间不能小于 10schedule: "* * * * *" # 调度策略jobTemplate:spec:template:spec:containers:- name: helloimage: busybox:1.28imagePullPolicy: IfNotPresentcommand:- /bin/sh- -c- date; echo Hello from the Kubernetes clusterrestartPolicy: OnFailure
查看运行的job情况,active=1,说明任务正在执行
[root@k8s schedule_manager]# kubectl get cj
NAME            SCHEDULE    SUSPEND   ACTIVE   LAST SCHEDULE   AGE
cron-test-job   * * * * *   False     1        5s              7s
查看运行的pod情况,successfulJobsHistoryLimit=3对应了任务成功完成的次数
[root@k8s schedule_manager]# kubectl get po
NAME                           READY   STATUS              RESTARTS       AGE
cron-test-job-28178167-9nb7z   0/1     Completed           0              3m2s
cron-test-job-28178168-7hx56   0/1     Completed           0              2m2s
cron-test-job-28178169-gfxdp   0/1     Completed           0              62s
cron-test-job-28178170-5s846   0/1     ContainerCreating   0              2s
fluentd-5lsc8                  1/1     Running             1 (11d ago)    13d
fluentd-5s98d                  1/1     Running             1 (2d1h ago)   13d
nginx-deploy-5b646b65b-njp67   1/1     Running             0              3d2h
test-pd-pvc                    1/1     Running             0              19h
再次查看运行的job情况,active=0,说明任务结束,正在等待下一轮
[root@k8s schedule_manager]# kubectl get cj
NAME            SCHEDULE    SUSPEND   ACTIVE   LAST SCHEDULE   AGE
cron-test-job   * * * * *   False     0        49s             3m51s
1.2.卸载资源
直接delete掉cronjob即可
2.初始化容器initContainer
在真正的容器启动之前,先启动 InitContainer,在初始化容器中完成真实容器所需的初始化操作,然后卸载初始容器 & 启动真实容器。
相对于 postStart 来说,首先 InitController 能够保证一定在 EntryPoint 之前执行,而 postStart 不能,其次 postStart 更适合去执行一些命令操作,而 InitController 实际就是一个容器,可以在其他基础容器环境下执行更复杂的初始化功能。
2.1.创建资源
在 pod 中配置 initContainers 参数:
apiVersion: v1
kind: Pod
metadata:name: init-demo
spec:containers:- name: nginximage: nginxports:- containerPort: 80volumeMounts:- name: workdirmountPath: /usr/share/nginx/html# 这些容器在 Pod 初始化期间运行initContainers:- name: installimage: busybox:1.28command:- wget- "-O"- "/work-dir/index.html"- http://info.cern.chvolumeMounts:- name: workdirmountPath: "/work-dir"dnsPolicy: Defaultvolumes:- name: workdiremptyDir: {}
2.2.使用场景
一种是利用持久卷技术同步初始化数据,一种是监听某些服务可用后再启动自身容器
官网文档:配置 Pod 初始化 | Kubernetes![]() https://kubernetes.io/zh-cn/docs/tasks/configure-pod-container/configure-pod-initialization/Kubernetes 模式:InitContainer模式 - 知乎 (zhihu.com)
https://kubernetes.io/zh-cn/docs/tasks/configure-pod-container/configure-pod-initialization/Kubernetes 模式:InitContainer模式 - 知乎 (zhihu.com)![]() https://zhuanlan.zhihu.com/p/403778561
https://zhuanlan.zhihu.com/p/403778561
2.3.注意事项
初始化容器卸掉会导致一个问题,即初始化数据也因卸载而丢失,因此建议对初始化容器进行持久卷处理
3.污点和容忍
k8s 集群中可能管理着非常庞大的服务器,这些服务器可能是各种各样不同类型的,比如机房、地理位置、配置等,有些是计算型节点,有些是存储型节点,此时我们希望能更好的将 pod 调度到与之需求更匹配的节点上。
此时就需要用到污点(Taint)和容忍(Toleration),这些配置都是 key: value 类型的。
3.1.污点
是标注在节点上的,当我们在一个节点上打上污点以后,k8s 会认为尽量不要将 pod 调度到该节点上,除非该 pod 上面表示可以容忍该污点,且一个节点可以打多个污点,此时则需要 pod 容忍所有污点才会被调度该节点。
# 为节点打上污点
kubectl taint node k8s-master key=value:NoSchedule# 移除污点
kubectl taint node k8s-master key=value:NoSchedule-# 查看污点
kubectl describe no k8s-master
污点的影响类型
NoSchedule:
不能容忍的 pod 不能被调度到该节点,但是已经存在的节点不会被驱逐
NoExecute:
不能容忍的节点会被立即清除,已经存在的节点会被驱逐
能容忍的且没有配置 tolerationSeconds 属性,则可以一直运行,设置了 tolerationSeconds: 3600 属性,则该 pod 还能继续在该节点运行 3600 秒
3.2.容忍
是标注在 pod 上的,当 pod 被调度时,如果没有配置容忍,则该 pod 不会被调度到有污点的节点上,只有该 pod 上标注了满足某个节点的所有污点,则会被调度到这些节点
# pod 的 spec 下面配置容忍
tolerations:
- key: "污点的 key"value: "污点的 value"offect: "NoSchedule" # 污点产生的影响operator: "Equal" # 表示key、value 与污点的key、value 要相等;如果设置为 Exists 表示key 与污点的key相等即可,不关系value
4.亲和力
和污点相反,污点是指禁止节点部署,而亲和力是指欢迎节点部署(限制节点仅能或者优先部署某些服务)
按照资源分类:
node:NodeAffinity(node的反亲和使用污点)
pod:PodAffinity & PodAntiAffinity(pod的亲和 & 反亲和)
按照程度分类:
硬亲和:RequiredDuringSchedulingIgnoredDuringExecution 即必须部署上去
软亲和:PreferredDuringSchedulingIgnoredDuringExecution 优先尽力部署官网文档:将 Pod 指派给节点 | Kubernetes![]() https://kubernetes.io/zh-cn/docs/concepts/scheduling-eviction/assign-pod-node/
https://kubernetes.io/zh-cn/docs/concepts/scheduling-eviction/assign-pod-node/
4.1.匹配类型
In:部署在满足条件的节点上
NotIn:匹配不在条件中的节点,实现节点反亲和性
Exists:只要存在 key 名字就可以,不关心值是什么
DoesNotExist:匹配指定 key 名不存在的节点,实现节点反亲和性
Gt:value 为数值,且节点上的值小于指定的条件
Lt:value 为数值,且节点上的值大于指定条件
4.2.Node亲和
apiVersion: v1
kind: Pod
metadata:name: with-node-affinity
spec:affinity: # 亲和力配置nodeAffinity: # 节点亲和力requiredDuringSchedulingIgnoredDuringExecution: # 节点必须匹配下方配置nodeSelectorTerms: # 选择器- matchExpressions: # 匹配表达式- key: topology.kubernetes.io/zone # 匹配 label 的 keyoperator: In # 匹配方式,只要匹配成功下方的一个 value 即可values:- antarctica-east1 # 匹配的 value- antarctica-west1 # 匹配的 valuepreferredDuringSchedulingIgnoredDuringExecution: # 节点尽量匹配下方配置- weight: 1 # 权重[1,100],按照匹配规则对所有节点累加权重,最终之和会加入优先级评分,优先级越高被调度的可能性越高preference:matchExpressions: # 匹配表达式- key: another-node-label-key # label 的 keyoperator: In # 匹配方式,满足一个即可values:- another-node-label-value # 匹配的 value
#      - weight: 20......containers:- name: with-node-affinityimage: pause:2.0
4.3.Pod亲和
apiVersion: v1
kind: Pod
metadata:name: with-pod-affinity
spec:affinity: # 亲和力配置podAffinity: # pod 亲和力配置requiredDuringSchedulingIgnoredDuringExecution: # 当前 pod 必须匹配到对应条件 pod 所在的 node 上- labelSelector: # 标签选择器matchExpressions: # 匹配表达式- key: security # 匹配的 keyoperator: In # 匹配方式values: # 匹配其中的一个 value- S1topologyKey: topology.kubernetes.io/zonepodAntiAffinity: # pod 反亲和力配置preferredDuringSchedulingIgnoredDuringExecution: # 尽量不要将当前节点部署到匹配下列参数的 pod 所在的 node 上- weight: 100 # 权重podAffinityTerm: # pod 亲和力配置条件labelSelector: # 标签选择器matchExpressions: # 匹配表达式- key: security # 匹配的 keyoperator: In # 匹配的方式values:- S2 # 匹配的 valuetopologyKey: topology.kubernetes.io/zonecontainers:- name: with-pod-affinityimage: pause:2.0
七.身份认证&权限
参考文档:
安装Kubernetes(k8s)保姆级教程---无坑版 - Sunzz - 博客园 (cnblogs.com)
3.1.4_搭建k8s集群-命令行工具:在任意节点使用kubectl_哔哩哔哩_bilibili