基于原生的追踪
使用OpenCV库实现基于视频的对象追踪。通过以下步骤和Python代码,您将能够选择不同的追踪器,并对视频中的对象进行实时追踪。
步骤 1: 导入必要的库
首先,我们需要导入一些必要的Python库,包括argparse、time、cv2 (OpenCV) 和 numpy。
import argparse
import time
import cv2
import numpy as np
步骤 2: 设置参数解析
使用argparse库来解析命令行参数。我们将指定输入视频文件的路径以及选择的追踪器类型。
ap = argparse.ArgumentParser()
ap.add_argument("-v", "--video", type=str, help="path to input video file")
ap.add_argument("-t", "--tracker", type=str, default="kcf", help="OpenCV object tracker type")
args = vars(ap.parse_args())
步骤 3: 定义支持的追踪器
在OpenCV中,有多种对象追踪器可用。我们将它们存储在一个字典中,便于后续使用。
OPENCV_OBJECT_TRACKERS = {"csrt": cv2.TrackerCSRT_create,"kcf": cv2.TrackerKCF_create,"boosting": cv2.TrackerBoosting_create,"mil": cv2.TrackerMIL_create,"tld": cv2.TrackerTLD_create,"medianflow": cv2.TrackerMedianFlow_create,"mosse": cv2.TrackerMOSSE_create
}
步骤 4: 初始化追踪器和视频流
我们初始化一个多对象追踪器并打开视频文件。
trackers = cv2.MultiTracker_create()
vs = cv2.VideoCapture(args["video"])
步骤 5: 处理视频帧
接下来,我们读取视频中的每一帧,并对其进行缩放处理,然后使用追踪器更新追踪状态,并绘制追踪的边框。
while True:frame = vs.read()frame = frame[1]if frame is None:break(h, w) = frame.shape[:2]width = 600r = width / float(w)dim = (width, int(h * r))frame = cv2.resize(frame, dim, interpolation=cv2.INTER_AREA)(success, boxes) = trackers.update(frame)for box in boxes:(x, y, w, h) = [int(v) for v in box]cv2.rectangle(frame, (x, y), (x + w, y + h), (0, 255, 0), 2)cv2.imshow("Frame", frame)key = cv2.waitKey(100) & 0xFFif key == ord("s"):box = cv2.selectROI("Frame", frame, fromCenter=False, showCrosshair=True)tracker = OPENCV_OBJECT_TRACKERS[args["tracker"]]()trackers.add(tracker, frame, box)elif key == 27:break
vs.release()
cv2.destroyAllWindows()
总结
import argparse
import time
import cv2
import numpy as np# 配置参数
ap = argparse.ArgumentParser()
ap.add_argument("-v", "--video", type=str,help="path to input video file")
ap.add_argument("-t", "--tracker", type=str, default="kcf",help="OpenCV object tracker type")
args = vars(ap.parse_args())# opencv已经实现了的追踪算法OPENCV_OBJECT_TRACKERS = {"csrt": cv2.TrackerCSRT_create,"kcf": cv2.TrackerKCF_create,"boosting": cv2.TrackerBoosting_create,"mil": cv2.TrackerMIL_create,"tld": cv2.TrackerTLD_create,"medianflow": cv2.TrackerMedianFlow_create,"mosse": cv2.TrackerMOSSE_create
}# 实例化OpenCV's multi-object tracker
trackers = cv2.MultiTracker_create()
vs = cv2.VideoCapture(args["video"])# 视频流
while True:# 取当前帧frame = vs.read()# (true, data)frame = frame[1]# 到头了就结束if frame is None:break# resize每一帧(h, w) = frame.shape[:2]width=600r = width / float(w)dim = (width, int(h * r))frame = cv2.resize(frame, dim, interpolation=cv2.INTER_AREA)# 追踪结果(success, boxes) = trackers.update(frame)# 绘制区域for box in boxes:(x, y, w, h) = [int(v) for v in box]cv2.rectangle(frame, (x, y), (x + w, y + h), (0, 255, 0), 2)# 显示cv2.imshow("Frame", frame)key = cv2.waitKey(100) & 0xFFif key == ord("s"):# 选择一个区域,按sbox = cv2.selectROI("Frame", frame, fromCenter=False,showCrosshair=True)# 创建一个新的追踪器tracker = OPENCV_OBJECT_TRACKERS[args["tracker"]]()trackers.add(tracker, frame, box)# 退出elif key == 27:break
vs.release()
cv2.destroyAllWindows()
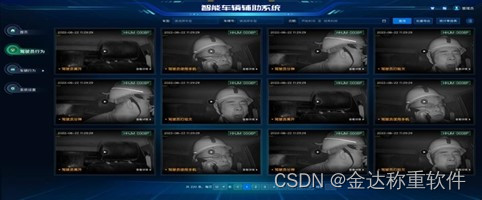
通过上述步骤和代码,可以实现一个简单的视频对象追踪应用,该应用支持多种追踪算法,并允许用户实时选择和追踪视频中的对象。这种技术在许多领域都有广泛的应用,包括安全监控、人机交互和自动驾驶车辆等。
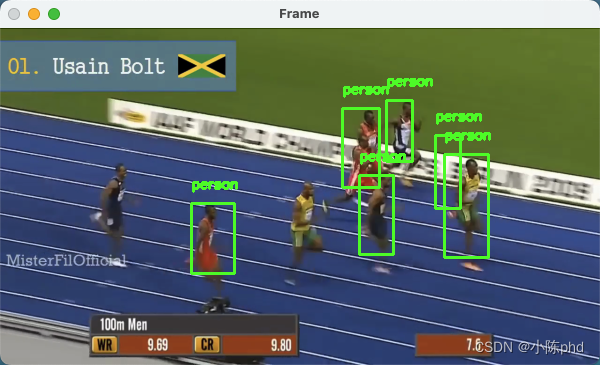
检测模型的跟踪
检测模型 使用Python、OpenCV、dlib和多进程处理视频中的实时对象跟踪。以下是具体步骤及相关代码片段:
1. 设置和参数解析
- 导入必要的库,并设置参数解析,处理输入如视频文件路径和模型配置。
from utils import FPS
import multiprocessing
import numpy as np
import argparse
import dlib
import cv2
2. 初始化深度学习模型
- 加载预训练的Caffe模型进行对象检测。
net = cv2.dnn.readNetFromCaffe(args["prototxt"], args["model"])
3. 视频流处理
- 从指定的文件开始视频捕捉,并准备处理帧。
vs = cv2.VideoCapture(args["video"])
4. 帧处理
- 调整帧大小并转换为RGB格式进行处理。
- 如果检测到的对象置信度高于阈值,则初始化对象跟踪。
rgb = cv2.cvtColor(frame, cv2.COLOR_BGR2RGB)
5. 对象检测和跟踪
- 对初次检测到的对象创建跟踪器,并使用多进程处理。
p = multiprocessing.Process(target=start_tracker, args=(bb, label, rgb, iq, oq))
p.daemon = True
p.start()
6. 追踪器更新和结果输出
- 每个跟踪器获取新的帧,更新位置并输出跟踪结果。
outputQueue.put((label, (startX, startY, endX, endY)))
7. 视频输出和显示
- 如果指定了输出文件,将处理后的帧写入视频文件。
- 显示处理后的帧并在用户按下
ESC键时停止。
writer.write(frame)
key = cv2.waitKey(1) & 0xFF
if key == 27:break
8. 清理和资源释放
- 停止FPS计时,释放视频文件和窗口资源。
fps.stop()
writer.release()
cv2.destroyAllWindows()
vs.release()
完整代码:
utils.py
import datetimeclass FPS:def __init__(self):# store the start time, end time, and total number of frames# that were examined between the start and end intervalsself._start = Noneself._end = Noneself._numFrames = 0def start(self):# start the timerself._start = datetime.datetime.now()return selfdef stop(self):# stop the timerself._end = datetime.datetime.now()def update(self):# increment the total number of frames examined during the# start and end intervalsself._numFrames += 1def elapsed(self):# return the total number of seconds between the start and# end intervalreturn (self._end - self._start).total_seconds()def fps(self):# compute the (approximate) frames per secondreturn self._numFrames / self.elapsed()
multi_object_tracking_fast.py
import datetimeclass FPS:def __init__(self):# store the start time, end time, and total number of frames# that were examined between the start and end intervalsself._start = Noneself._end = Noneself._numFrames = 0def start(self):# start the timerself._start = datetime.datetime.now()return selfdef stop(self):# stop the timerself._end = datetime.datetime.now()def update(self):# increment the total number of frames examined during the# start and end intervalsself._numFrames += 1def elapsed(self):# return the total number of seconds between the start and# end intervalreturn (self._end - self._start).total_seconds()def fps(self):# compute the (approximate) frames per secondreturn self._numFrames / self.elapsed()
multi_object_tracking_slow.py
#导入工具包
from utils import FPS
import numpy as np
import argparse
import dlib
import cv2
"""
--prototxt mobilenet_ssd/MobileNetSSD_deploy.prototxt
--model mobilenet_ssd/MobileNetSSD_deploy.caffemodel
--video race.mp4
"""
# 参数
ap = argparse.ArgumentParser()
ap.add_argument("-p", "--prototxt", default="mobilenet_ssd/MobileNetSSD_deploy.prototxt",help="path to Caffe 'deploy' prototxt file")
ap.add_argument("-m", "--model", default="mobilenet_ssd/MobileNetSSD_deploy.caffemodel",help="path to Caffe pre-trained model")
ap.add_argument("-v", "--video",default="race.mp4",help="path to input video file")
ap.add_argument("-o", "--output", type=str,help="path to optional output video file")
ap.add_argument("-c", "--confidence", type=float, default=0.2,help="minimum probability to filter weak detections")
args = vars(ap.parse_args())# SSD标签
CLASSES = ["background", "aeroplane", "bicycle", "bird", "boat","bottle", "bus", "car", "cat", "chair", "cow", "diningtable","dog", "horse", "motorbike", "person", "pottedplant", "sheep","sofa", "train", "tvmonitor"]# 读取网络模型
print("[INFO] loading model...")
net = cv2.dnn.readNetFromCaffe(args["prototxt"], args["model"])# 初始化
print("[INFO] starting video stream...")
vs = cv2.VideoCapture(args["video"])
writer = None# 一会要追踪多个目标
trackers = []
labels = []# 计算FPS
fps = FPS().start()while True:# 读取一帧(grabbed, frame) = vs.read()# 是否是最后了if frame is None:break# 预处理操作(h, w) = frame.shape[:2]width=600r = width / float(w)dim = (width, int(h * r))frame = cv2.resize(frame, dim, interpolation=cv2.INTER_AREA)rgb = cv2.cvtColor(frame, cv2.COLOR_BGR2RGB)# 如果要将结果保存的话if args["output"] is not None and writer is None:fourcc = cv2.VideoWriter_fourcc(*"MJPG")writer = cv2.VideoWriter(args["output"], fourcc, 30,(frame.shape[1], frame.shape[0]), True)# 先检测 再追踪if len(trackers) == 0:# 获取blob数据(h, w) = frame.shape[:2]blob = cv2.dnn.blobFromImage(frame, 0.007843, (w, h), 127.5)# 得到检测结果net.setInput(blob)detections = net.forward()# 遍历得到的检测结果for i in np.arange(0, detections.shape[2]):# 能检测到多个结果,只保留概率高的confidence = detections[0, 0, i, 2]# 过滤if confidence > args["confidence"]:# extract the index of the class label from the# detections listidx = int(detections[0, 0, i, 1])label = CLASSES[idx]# 只保留人的if CLASSES[idx] != "person":continue# 得到BBOX#print (detections[0, 0, i, 3:7])box = detections[0, 0, i, 3:7] * np.array([w, h, w, h])(startX, startY, endX, endY) = box.astype("int")# 使用dlib来进行目标追踪#http://dlib.net/python/index.html#dlib.correlation_trackert = dlib.correlation_tracker()rect = dlib.rectangle(int(startX), int(startY), int(endX), int(endY))t.start_track(rgb, rect)# 保存结果labels.append(label)trackers.append(t)# 绘图cv2.rectangle(frame, (startX, startY), (endX, endY),(0, 255, 0), 2)cv2.putText(frame, label, (startX, startY - 15),cv2.FONT_HERSHEY_SIMPLEX, 0.45, (0, 255, 0), 2)# 如果已经有了框,就可以直接追踪了else:# 每一个追踪器都要进行更新for (t, l) in zip(trackers, labels):t.update(rgb)pos = t.get_position()# 得到位置startX = int(pos.left())startY = int(pos.top())endX = int(pos.right())endY = int(pos.bottom())# 画出来cv2.rectangle(frame, (startX, startY), (endX, endY),(0, 255, 0), 2)cv2.putText(frame, l, (startX, startY - 15),cv2.FONT_HERSHEY_SIMPLEX, 0.45, (0, 255, 0), 2)# 也可以把结果保存下来if writer is not None:writer.write(frame)# 显示cv2.imshow("Frame", frame)key = cv2.waitKey(1) & 0xFF# 退出if key == 27:break# 计算FPSfps.update()fps.stop()
print("[INFO] elapsed time: {:.2f}".format(fps.elapsed()))
print("[INFO] approx. FPS: {:.2f}".format(fps.fps()))if writer is not None:writer.release()cv2.destroyAllWindows()
vs.release()
代码地址:多目标追踪