原项目地址:https://github.com/QwenLM/Qwen-VL/blob/master/README_CN.md
环境+本地部署(见之前博文)
【本地部署 】23.08 阿里Qwen-VL:能对图片理解、定位物体、读取文字的视觉语言模型 (推理最低12G显存+)
一、数据集格式说明
https://github.com/QwenLM/Qwen-VL/blob/master/README_CN.md#微调
所有样本放到一个列表中并存入json文件中
每个样本对应一个字典,包含id和conversation,conversation为一个列表
1.1 纯文本对话示例
为针对多样的VL任务,我们增加了一下的特殊tokens:
[{"id": "identity_0","conversations": [{"from": "user","value": "你好"},{"from": "assistant","value": "我是Qwen-VL,一个支持视觉输入的大模型。"}]},
]
1.2 图片解读+标记位置
引入特殊token,表示图片和检测框相关
<img> </img> <ref> </ref> <box> </box>.
对于带图像输入的内容可表示为
Picture id: <img>img_path</img>\n {your prompt},其中id表示对话中的第几张图片。
其中"img_path"  可以是本地的图片或网络地址。
对话中的检测框可以表示
<box>(x1,y1),(x2,y2)</box>
其中 (x1, y1) 和(x2, y2)分别对应左上角和右下角的坐标,并且被归一化到[0, 1000)的范围内
检测框对应的文本描述也可以通过<ref>text_caption</ref>表示。
示例1
{"id": "identity_1","conversations": [{"from": "user","value": "Picture 1: <img>https://qianwen-res.oss-cn-beijing.aliyuncs.com/Qwen-VL/assets/demo.jpeg</img>\n图中的狗是什么品种?"},{"from": "assistant","value": "图中是一只拉布拉多犬。"},{"from": "user","value": "框出图中的格子衬衫"},{"from": "assistant","value": "<ref>格子衬衫</ref><box>(588,499),(725,789)</box>"}]},
示例2 多图片解析
[
...{ "id": "identity_2","conversations": [{"from": "user","value": "Picture 1: <img>assets/mm_tutorial/Chongqing.jpeg</img>\nPicture 2: <img>assets/mm_tutorial/Beijing.jpeg</img>\n图中都是哪"},{"from": "assistant","value": "第一张图片是重庆的城市天际线,第二张图片是北京的天际线。"}]}...]
二、制作自己的数据集
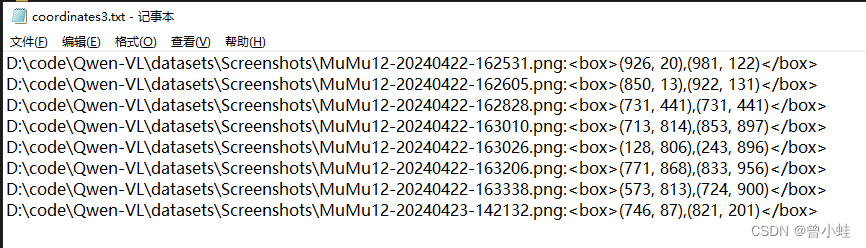
利用opencv手动对图片打标,获得box坐标
记得修改 需要打标图片路径 folder_path = r’D:\code\Qwen-VL\datasets\Screenshots’
修改保存到本地txt的
def normalize_and_save(start, end, width, height,image_path,save_txt=‘coordinates3.txt’):
# anthor  zxy+chatgpt
import cv2
import os
import numpy as np# 初始化矩形框的起始和结束点
start_point = None
end_point = None
# 标记是否正在绘制
drawing = False# 鼠标回调函数
def draw_rectangle(event, x, y, flags, param):global start_point, end_point, drawingif event == cv2.EVENT_LBUTTONDOWN:drawing = Truestart_point = (x, y)elif event == cv2.EVENT_MOUSEMOVE:if drawing:end_point = (x, y)elif event == cv2.EVENT_LBUTTONUP:drawing = Falseend_point = (x, y)# 绘制矩形cv2.rectangle(img, start_point, end_point, (0, 255, 0), 2)# 归一化并保存坐标normalize_and_save(start_point, end_point, img.shape[1], img.shape[0],image_path)# 归一化坐标并保存到txt文件
def normalize_and_save(start, end, width, height,image_path,save_txt='coordinates3.txt'):normalized_start = (int(start[0] * 1000 / width), int(start[1] * 1000 / height))normalized_end = (int(end[0] * 1000 / width), int(end[1] * 1000 / height))with open(save_txt, 'a') as file:print('image_path',image_path)file.write(f"{image_path}:<box>({normalized_start[0]}, {normalized_start[1]}),({normalized_end[0]}, {normalized_end[1]})</box>\n")# 导入图片文件夹
# opencv最好路径是中文的
folder_path = r'D:\code\Qwen-VL\datasets\Screenshots'
images = [os.path.join(folder_path, img) for img in os.listdir(folder_path) if img.endswith(('.png', '.jpg', '.jpeg'))]# 创建窗口并设置鼠标回调
cv2.namedWindow('Image')
cv2.setMouseCallback('Image', draw_rectangle)for image_path in images:print('image_path',image_path)img = cv2.imread(image_path)while True:cv2.imshow('Image', img)key = cv2.waitKey(1) & 0xFFif key == ord('n'):  # 按 'n' 键继续到下一张图片breakif key == ord('q'):cv2.destroyAllWindows()exit(0)# 清除所有绘制的矩形,准备下一张图片img = cv2.imread(image_path)  # 重新加载原图cv2.destroyAllWindows()
手动打标结果
自己的数据集 zhj_box.json(仅仅示意)
也可自己修改图片的路径
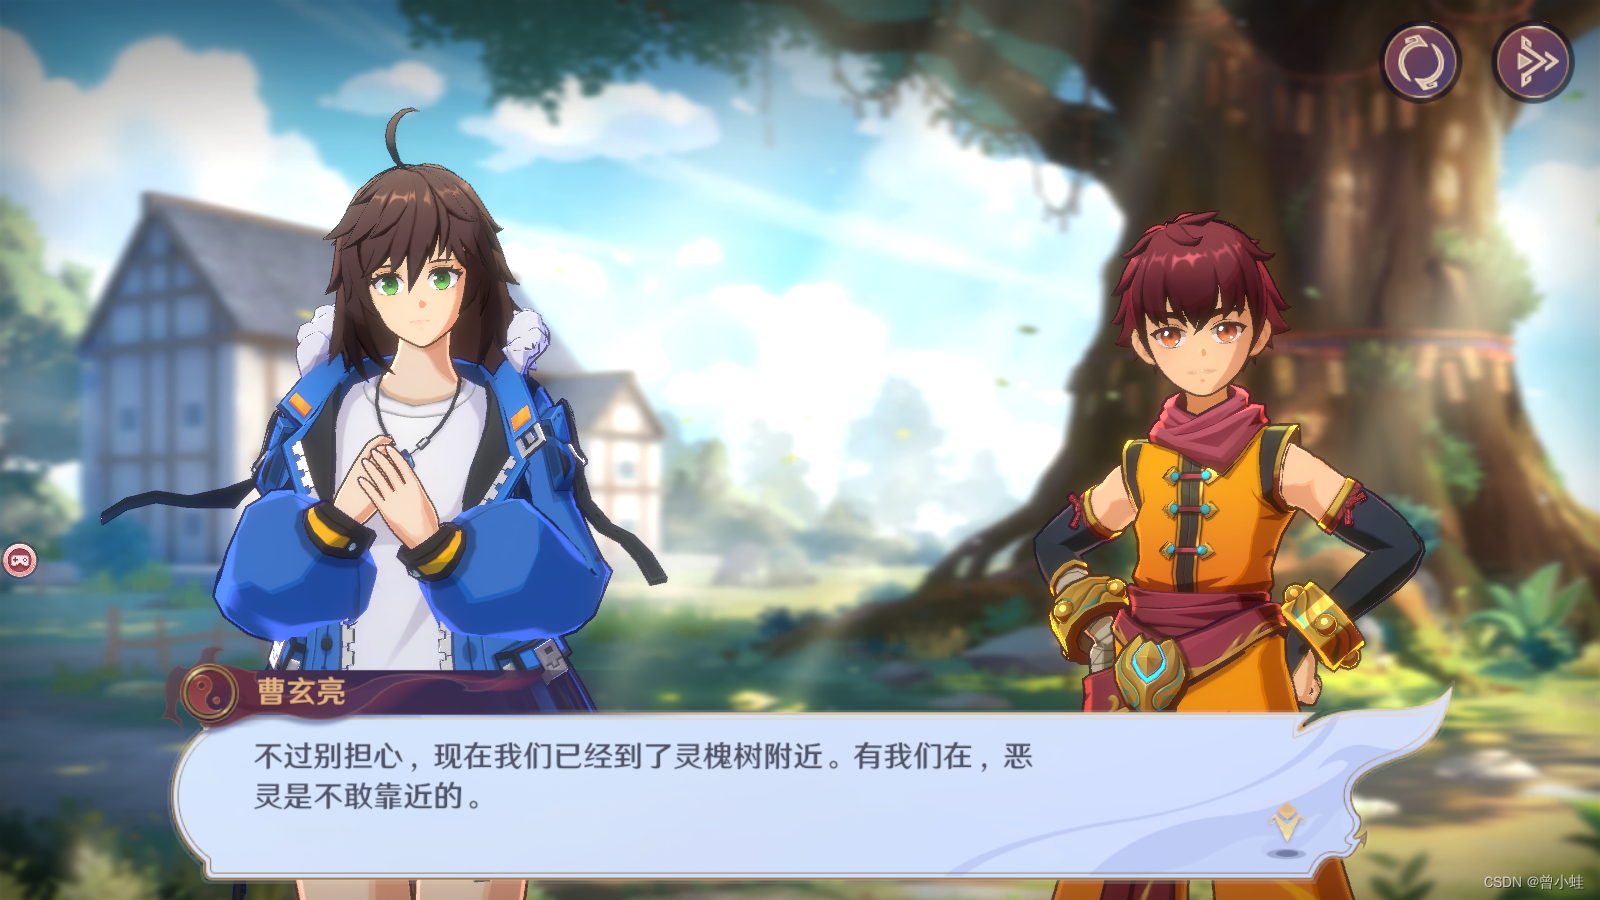
./datasets/zhj_box/162531.png
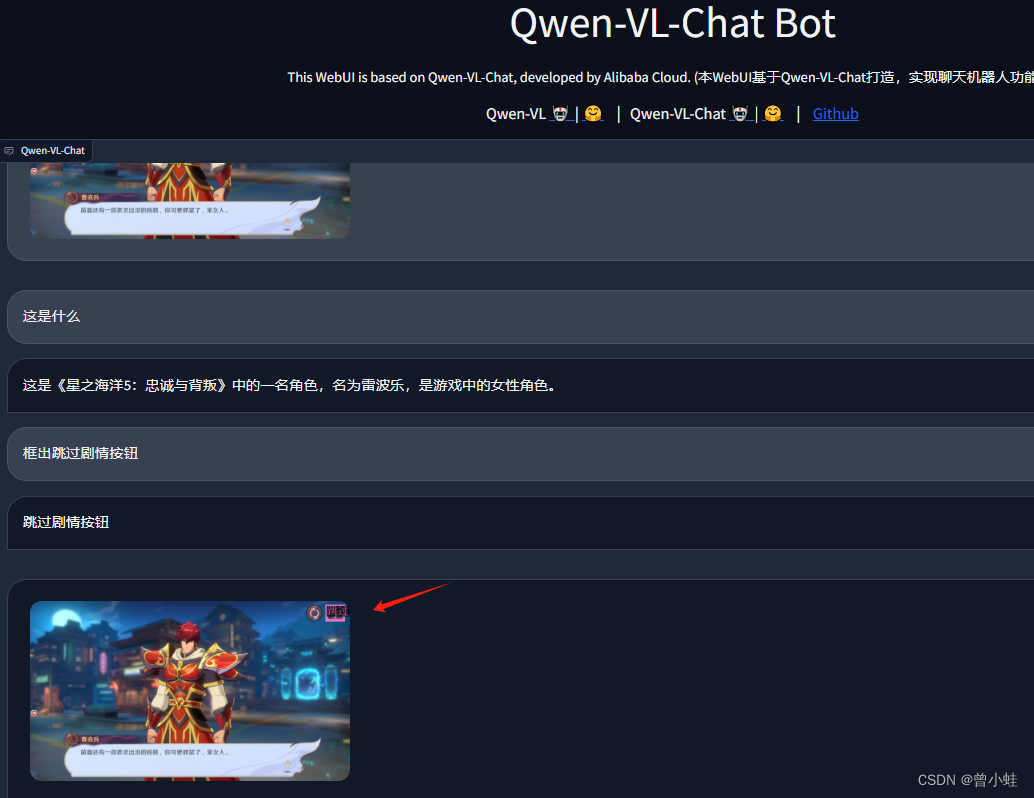
[ {"id": "000000000","conversations": [{"from": "user","value": "Picture 1: <img>./datasets/zhj_box/162531.png</img>\n这是什么?"},{"from": "assistant","value": "这是镇魂街游戏对话界面,有继续对话按钮,重新加载,跳过。"},{"from": "user","value": "框出跳过剧情按钮?"},{"from": "assistant","value": "<ref>跳过剧情按钮</ref><box>(926, 20),(981, 122)</box>"}]}]三、linux下使用3090训练
git clone https://github.com/QwenLM/Qwen-VL.git
cd QWEN-VL
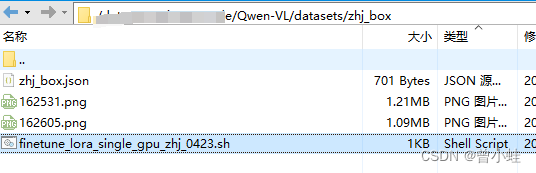
将图片放到特定路径
./datasets/zhj_box/ ,如果需要修改,请记得在json里面改,都是相对整个工程文件
并修改脚本
复制 finetune\finetune_lora_single_gpu.sh 到 finetune_lora_single_gpu_zhj_0423.sh (然后修改)
DATA=“./datasets/zhj_box.json” 表示我们制作的数据集
–output_dir output_qwen2/ 表示输出路径自己可修改
#!/bin/bash
export CUDA_DEVICE_MAX_CONNECTIONS=1
DIR=`pwd`MODEL="你自己的qwen-vl大模型地址/.cache/modelscope/hub/qwen/Qwen-VL-Chat" #"Qwen/Qwen-VL-Chat"/"Qwen/Qwen-VL"  Set the path if you do not want to load from huggingface directly
# ATTENTION: specify the path to your training data, which should be a json file consisting of a list of conversations.
# See the section for finetuning in README for more information.
DATA="./datasets/zhj_box/zhj_box.json"export CUDA_VISIBLE_DEVICES=0python finetune.py \--model_name_or_path $MODEL \--data_path $DATA \--bf16 True \--fix_vit True \--output_dir output_qwen2/ \--num_train_epochs 12 \--per_device_train_batch_size 1 \--per_device_eval_batch_size 1 \--gradient_accumulation_steps 1 \--evaluation_strategy "no" \--save_strategy "steps" \--save_steps 20 \--save_total_limit 1 \--learning_rate 2e-4 \--weight_decay 0.1 \--adam_beta2 0.95 \--warmup_ratio 0.01 \--lr_scheduler_type "cosine" \--logging_steps 1 \--report_to "none" \--model_max_length 512 \--lazy_preprocess True \--gradient_checkpointing \--use_lora
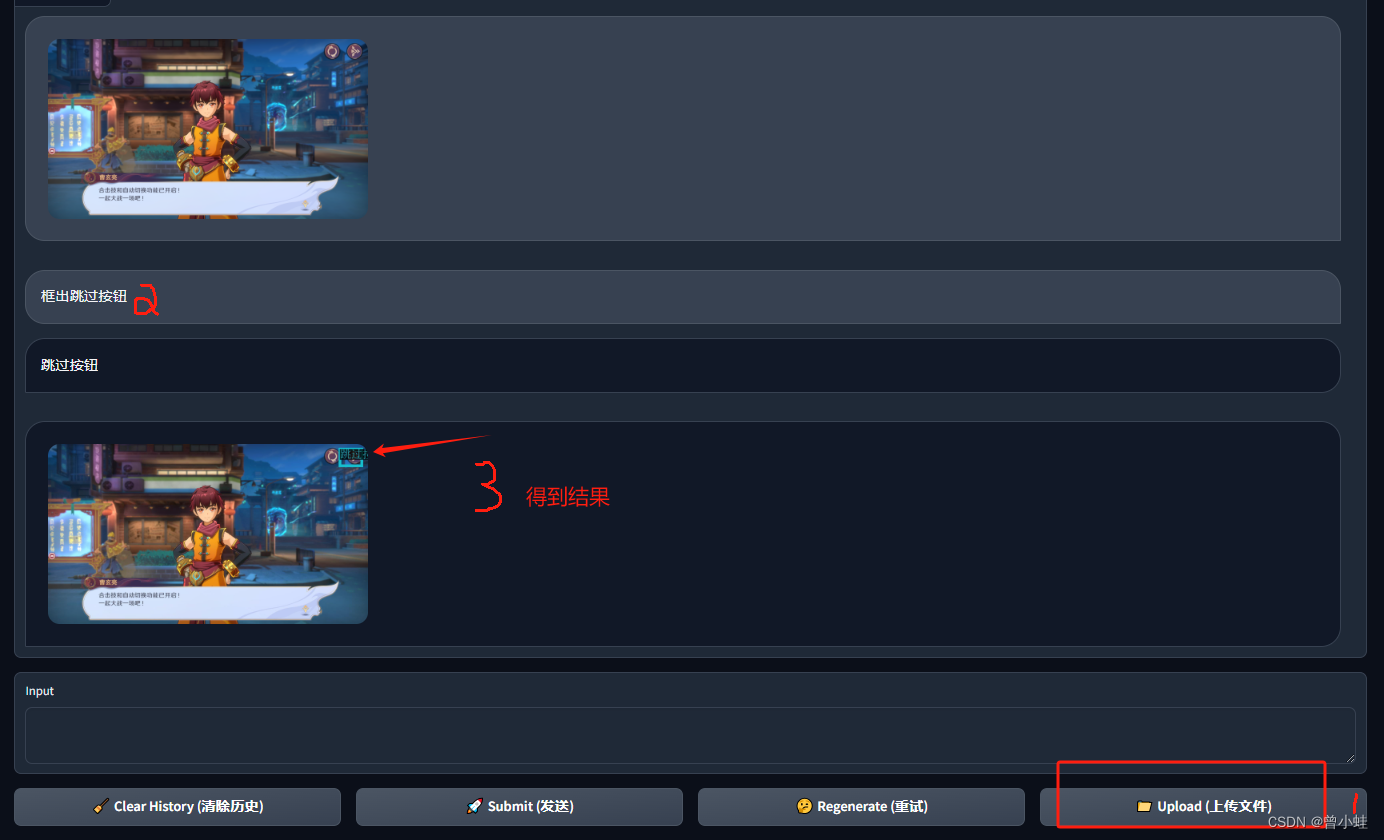
四、推理 (web_demo_mm_lora.py)
运行命令
python web_demo_mm_lora.py -c 你的绝对路径/Qwen-VL/output_qwen2 --server-name 0.0.0.0 --server-port 8002
–server-port 8000~8010随便写
-c 是训练的lora路径,记得
CUDA_VISIBLE_DEVICES=0 可用于指定显卡
4.1 web_demo_mm_lora.py
# Copyright (c) Alibaba Cloud.
#
# This source code is licensed under the license found in the
# LICENSE file in the root directory of this source tree."""A simple web interactive chat demo based on gradio."""from argparse import ArgumentParser
from pathlib import Pathimport copy
import gradio as gr
import os
import re
import secrets
import tempfile
from modelscope import (snapshot_download, AutoModelForCausalLM, AutoTokenizer, GenerationConfig
)
from peft import AutoPeftModelForCausalLMDEFAULT_CKPT_PATH = '/data/zengxingyu/code/Qwen-VL/output_qwen'
BOX_TAG_PATTERN = r"<box>([\s\S]*?)</box>"
PUNCTUATION = "!?。"#$%&'()*+,-/:;<=>@[\]^_`{|}~⦅⦆「」、、〃》「」『』【】〔〕〖〗〘〙〚〛〜〝〞〟〰〾〿–—‘’‛“”„‟…‧﹏."def _get_args():parser = ArgumentParser()parser.add_argument("-c", "--checkpoint-path", type=str, default=DEFAULT_CKPT_PATH,help="Checkpoint name or path, default to %(default)r")parser.add_argument("--cpu-only", action="store_true", help="Run demo with CPU only")parser.add_argument("--share", action="store_true", default=False,help="Create a publicly shareable link for the interface.")parser.add_argument("--inbrowser", action="store_true", default=False,help="Automatically launch the interface in a new tab on the default browser.")parser.add_argument("--server-port", type=int, default=8000,help="Demo server port.")parser.add_argument("--server-name", type=str, default="0.0.0.0",help="Demo server name.")args = parser.parse_args()return argsdef _load_model_tokenizer(args):tokenizer = AutoTokenizer.from_pretrained(args.checkpoint_path, trust_remote_code=True, resume_download=True, revision='master',)if args.cpu_only:device_map = "cpu"else:device_map = "cuda"model = AutoPeftModelForCausalLM.from_pretrained("/data/zengxingyu/code/Qwen-VL/output_qwen", # path to the output directorydevice_map="auto",trust_remote_code=True).eval()model.generation_config = GenerationConfig.from_pretrained(args.checkpoint_path, trust_remote_code=True, resume_download=True, revision='master',)return model, tokenizerdef _parse_text(text):lines = text.split("\n")lines = [line for line in lines if line != ""]count = 0for i, line in enumerate(lines):if "```" in line:count += 1items = line.split("`")if count % 2 == 1:lines[i] = f'<pre><code class="language-{items[-1]}">'else:lines[i] = f"<br></code></pre>"else:if i > 0:if count % 2 == 1:line = line.replace("`", r"\`")line = line.replace("<", "<")line = line.replace(">", ">")line = line.replace(" ", " ")line = line.replace("*", "*")line = line.replace("_", "_")line = line.replace("-", "-")line = line.replace(".", ".")line = line.replace("!", "!")line = line.replace("(", "(")line = line.replace(")", ")")line = line.replace("$", "$")lines[i] = "<br>" + linetext = "".join(lines)return textdef _remove_image_special(text):text = text.replace('<ref>', '').replace('</ref>', '')return re.sub(r'<box>.*?(</box>|$)', '', text)def _launch_demo(args, model, tokenizer):uploaded_file_dir = os.environ.get("GRADIO_TEMP_DIR") or str(Path(tempfile.gettempdir()) / "gradio")def predict(_chatbot, task_history):chat_query = _chatbot[-1][0]query = task_history[-1][0]print("User: " + _parse_text(query))history_cp = copy.deepcopy(task_history)full_response = ""history_filter = []pic_idx = 1pre = ""for i, (q, a) in enumerate(history_cp):if isinstance(q, (tuple, list)):q = f'Picture {pic_idx}: <img>{q[0]}</img>'pre += q + '\n'pic_idx += 1else:pre += qhistory_filter.append((pre, a))pre = ""history, message = history_filter[:-1], history_filter[-1][0]# response, history = model.chat(tokenizer, message, history=history)for response in model.chat_stream(tokenizer, message, history=history):_chatbot[-1] = (_parse_text(chat_query), _remove_image_special(_parse_text(response)))yield _chatbotfull_response = _parse_text(response)response = full_responsehistory.append((message, response))image = tokenizer.draw_bbox_on_latest_picture(response, history)if image is not None:temp_dir = secrets.token_hex(20)temp_dir = Path(uploaded_file_dir) / temp_dirtemp_dir.mkdir(exist_ok=True, parents=True)name = f"tmp{secrets.token_hex(5)}.jpg"filename = temp_dir / nameimage.save(str(filename))_chatbot.append((None, (str(filename),)))else:_chatbot[-1] = (_parse_text(chat_query), response)# full_response = _parse_text(response)task_history[-1] = (query, full_response)print("Qwen-VL-Chat: " + _parse_text(full_response))yield _chatbotdef regenerate(_chatbot, task_history):if not task_history:return _chatbotitem = task_history[-1]if item[1] is None:return _chatbottask_history[-1] = (item[0], None)chatbot_item = _chatbot.pop(-1)if chatbot_item[0] is None:_chatbot[-1] = (_chatbot[-1][0], None)else:_chatbot.append((chatbot_item[0], None))return predict(_chatbot, task_history)def add_text(history, task_history, text):task_text = textif len(text) >= 2 and text[-1] in PUNCTUATION and text[-2] not in PUNCTUATION:task_text = text[:-1]history = history + [(_parse_text(text), None)]task_history = task_history + [(task_text, None)]return history, task_history, ""def add_file(history, task_history, file):history = history + [((file.name,), None)]task_history = task_history + [((file.name,), None)]return history, task_historydef reset_user_input():return gr.update(value="")def reset_state(task_history):task_history.clear()return []with gr.Blocks() as demo:gr.Markdown("""\
<p align="center"><img src="https://modelscope.cn/api/v1/models/qwen/Qwen-7B-Chat/repo?
Revision=master&FilePath=assets/logo.jpeg&View=true" style="height: 80px"/><p>""")gr.Markdown("""<center><font size=8>Qwen-VL-Chat Bot</center>""")gr.Markdown("""\
<center><font size=3>This WebUI is based on Qwen-VL-Chat, developed by Alibaba Cloud. \
(本WebUI基于Qwen-VL-Chat打造,实现聊天机器人功能。)</center>""")gr.Markdown("""\
<center><font size=4>Qwen-VL <a href="https://modelscope.cn/models/qwen/Qwen-VL/summary">🤖 </a>
| <a href="https://huggingface.co/Qwen/Qwen-VL">🤗</a>  |
Qwen-VL-Chat <a href="https://modelscope.cn/models/qwen/Qwen-VL-Chat/summary">🤖 </a> |
<a href="https://huggingface.co/Qwen/Qwen-VL-Chat">🤗</a>  |
 <a href="https://github.com/QwenLM/Qwen-VL">Github</a></center>""")chatbot = gr.Chatbot(label='Qwen-VL-Chat', elem_classes="control-height", height=750)query = gr.Textbox(lines=2, label='Input')task_history = gr.State([])with gr.Row():empty_bin = gr.Button("🧹 Clear History (清除历史)")submit_btn = gr.Button("🚀 Submit (发送)")regen_btn = gr.Button("🤔️ Regenerate (重试)")addfile_btn = gr.UploadButton("📁 Upload (上传文件)", file_types=["image"])submit_btn.click(add_text, [chatbot, task_history, query], [chatbot, task_history]).then(predict, [chatbot, task_history], [chatbot], show_progress=True)submit_btn.click(reset_user_input, [], [query])empty_bin.click(reset_state, [task_history], [chatbot], show_progress=True)regen_btn.click(regenerate, [chatbot, task_history], [chatbot], show_progress=True)addfile_btn.upload(add_file, [chatbot, task_history, addfile_btn], [chatbot, task_history], show_progress=True)gr.Markdown("""\
<font size=2>Note: This demo is governed by the original license of Qwen-VL. \
We strongly advise users not to knowingly generate or allow others to knowingly generate harmful content, \
including hate speech, violence, pornography, deception, etc. \
(注:本演示受Qwen-VL的许可协议限制。我们强烈建议,用户不应传播及不应允许他人传播以下内容,\
包括但不限于仇恨言论、暴力、色情、欺诈相关的有害信息。)""")demo.queue().launch(share=args.share,inbrowser=args.inbrowser,server_port=args.server_port,server_name=args.server_name,)def main():args = _get_args()model, tokenizer = _load_model_tokenizer(args)_launch_demo(args, model, tokenizer)if __name__ == '__main__':main()4.2 成功后界面的(没有训练过的图也能框,但是不稳定)