SpringMVC - 第一个 SpringMVC 程序
MVC: 模块 视图 控制器 的简写,表示层 属于 C + V,业务层和逻辑层属于 M
SpringMVC 是对 web 使用的一套框架,可以更加快捷高效的管理 web应用
所有的请求都会经过 DispatcherServlet 这一个 Servlet
支持 IoC 和 AOP
统一处理请求
可以解析多种视图,如JSP,Freemarker
第一个简单的 SpringMVC 程序
第一步,创建一个经典的 Maven 工程模块
第二步,引入依赖
<?xml version="1.0" encoding="UTF-8"?>
<project xmlns="http://maven.apache.org/POM/4.0.0"xmlns:xsi="http://www.w3.org/2001/XMLSchema-instance"xsi:schemaLocation="http://maven.apache.org/POM/4.0.0 http://maven.apache.org/xsd/maven-4.0.0.xsd"><modelVersion>4.0.0</modelVersion><groupId>org.example</groupId><artifactId>MVC</artifactId><version>1.0-SNAPSHOT</version><dependencies><!--springmvc依赖--><dependency><groupId>org.springframework</groupId><artifactId>spring-webmvc</artifactId><version>6.1.4</version></dependency><!--servlet依赖--><dependency><groupId>jakarta.servlet</groupId><artifactId>jakarta.servlet-api</artifactId><version>6.0.0</version><!--指定该依赖的范围,provided表示这个依赖由第三方容器来提供--><!--打war包的时候,这个依赖不会打入war包内。因为这个依赖由其它容器来提供的。--><scope>provided</scope></dependency><!--logback日志依赖--><dependency><groupId>ch.qos.logback</groupId><artifactId>logback-classic</artifactId><version>1.5.3</version></dependency><!--thymeleaf和spring6的整合依赖--><dependency><groupId>org.thymeleaf</groupId><artifactId>thymeleaf-spring6</artifactId><version>3.1.2.RELEASE</version></dependency></dependencies><properties><maven.compiler.source>17</maven.compiler.source><maven.compiler.target>17</maven.compiler.target></properties></project>
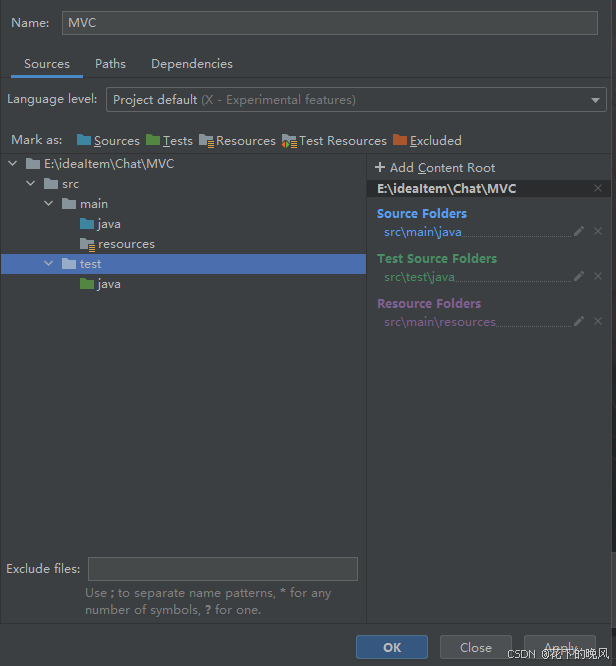
第三步,添加 webApp 文件夹
将 webApp 文件夹添加到 main 目录下,再点击构造模块,点击 + 号指定 webApp 文件夹的路径为 webApp 的根路径
修改后:

上面一栏是 webApp.xml 的地址,下面一栏是 webApp 文件夹的地址
webApp 文件夹上出现一个小蓝点则表示添加成功
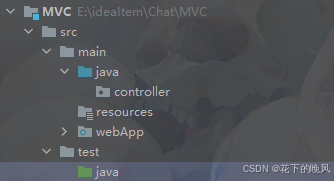
第四步,配置 xml 文件
springMVC-servlet.xml 配置到 WEB-INF 目录下
<?xml version="1.0" encoding="UTF-8"?>
<beans xmlns="http://www.springframework.org/schema/beans"xmlns:xsi="http://www.w3.org/2001/XMLSchema-instance"xmlns:context="http://www.springframework.org/schema/context"xsi:schemaLocation="http://www.springframework.org/schema/beans http://www.springframework.org/schema/beans/spring-beans.xsd http://www.springframework.org/schema/context https://www.springframework.org/schema/context/spring-context.xsd"><!--Spring MVC框架的配置文件--><!--组件扫描--><context:component-scan base-package="controller"/><!--配置视图解析器--><bean id="thymeleafViewResolver" class="org.thymeleaf.spring6.view.ThymeleafViewResolver"><!--作用于视图渲染的过程中,可以设置视图渲染后输出时采用的编码字符集--><property name="characterEncoding" value="UTF-8"/><!--如果配置多个视图解析器,它来决定优先使用哪个视图解析器,它的值越小优先级越高--><property name="order" value="1"/><!--当 ThymeleafViewResolver 渲染模板时,会使用该模板引擎来解析、编译和渲染模板--><property name="templateEngine"><bean class="org.thymeleaf.spring6.SpringTemplateEngine"><!--用于指定 Thymeleaf 模板引擎使用的模板解析器。模板解析器负责根据模板位置、模板资源名称、文件编码等信息,加载模板并对其进行解析--><property name="templateResolver"><bean class="org.thymeleaf.spring6.templateresolver.SpringResourceTemplateResolver"><!--设置模板文件的位置(前缀)--><property name="prefix" value="/WEB-INF/templates/"/><!--设置模板文件后缀(后缀),Thymeleaf文件扩展名不一定是html,也可以是其他,例如txt,大部分都是html--><!--将来要在 xxxx.thymeleaf 文件中编写符合 Thymeleaf 语法格式的字符串:Thymeleaf 模板字符串。--><property name="suffix" value=".thymeleaf"/><!--设置模板类型,例如:HTML,TEXT,JAVASCRIPT,CSS等--><property name="templateMode" value="HTML"/><!--用于模板文件在读取和解析过程中采用的编码字符集--><property name="characterEncoding" value="UTF-8"/></bean></property></bean></property></bean></beans>
web.xml 指定所有路径到 DispatcherServlet 这个 Servlet 下 (jsp 底层会走自己的 Servlet 无法指定)
<?xml version="1.0" encoding="UTF-8"?>
<web-app xmlns="http://xmlns.jcp.org/xml/ns/javaee"xmlns:xsi="http://www.w3.org/2001/XMLSchema-instance"xsi:schemaLocation="http://xmlns.jcp.org/xml/ns/javaee http://xmlns.jcp.org/xml/ns/javaee/web-app_4_0.xsd"version="4.0"><!--前端控制器,SpringMVC中最核心的类。--><servlet><servlet-name>springmvc</servlet-name><servlet-class>org.springframework.web.servlet.DispatcherServlet</servlet-class></servlet><servlet-mapping><servlet-name>springmvc</servlet-name><!--/ 表示:除xxx.jsp结尾的请求路径之外所有的请求路径。/* 表示:所有的请求路径。如果是xxx.jsp请求路径,那么就走自己JSP对应的Servlet,不走SpringMVC的前端控制器。--><url-pattern>/</url-pattern></servlet-mapping></web-app>
访问任意非 JSP 路径都会执行 DispatcherServlet 这个 Servlet
第五步,编写前端视图页面
这里用的是 thymeleaf 作为视图页面
在 WEB-INF 目录下创建 templates 文件夹用于存放页面,我这里命名的是 hello.thymeleaf
<!doctype html>
<html lang="en" xmlns:th="http://www.thymeleaf.org"><head><title>First Spring MVC</title></head><body><h1>Your first Spring MVC succeeds running!</h1><a th:href="@{/heihei}">heihei</a></body>
</html>
第六步,编写 Servlet 方法指向视图页面
@Controller
public class HelleCotroller {@RequestMapping("/a")//浏览器中访问的地址public String hello(){return "hello";}}
当浏览器输入该地址后,该注解会给返回的这个字符串自动拼接前缀和后缀,使得其能够与前端的视图文件匹配上,这里我的视图页面的的名称为 hello 故返回 hello。底层会自动凭借前面的路径以及结尾的 .thyemleaf
第七步,引入 Tomcat ,启动
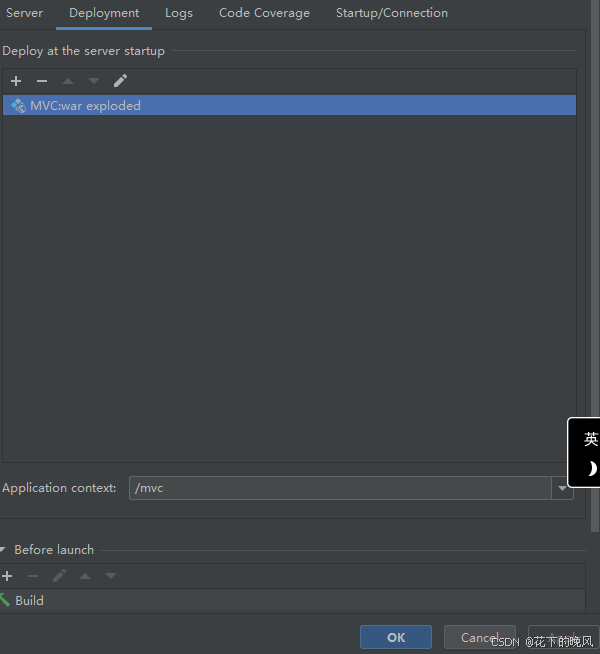
引入 tomcat ,并加入对应工程的 war 包
如果没有,可以手动创建,在如下界面点击 + 号,选择如下的选项后,找到自己的模块添加即可
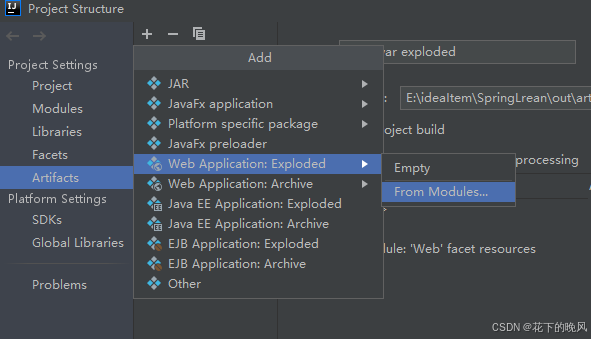
添加 Tomcat 10 ,并启动(注意,低于 10 的Tomcat 会报 500 错误,亲测)
如果之前配置了 Tomcat 9 可能会占用 8080 和 1099 端口,我们将它们都 -1 即可
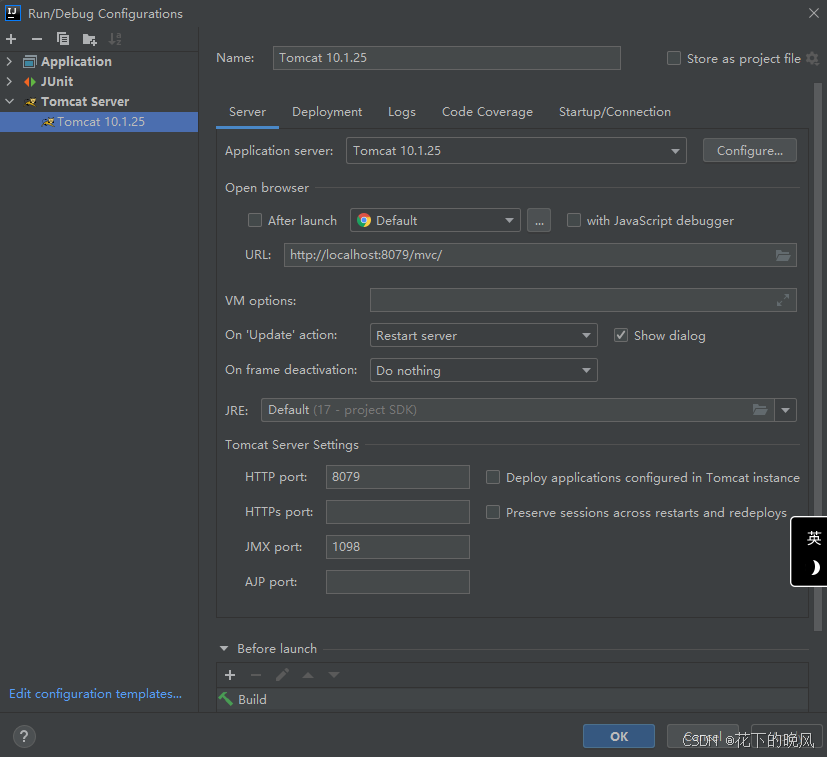
添加 war 包,设置根路径为/mvc
最后,访问 localhost:8079/mvc/a

