使用 Python和 FFmpeg 批量截图视频到各自文件夹中
在这篇博客中,我们将创建一个简单的图形用户界面 (GUI) 工具,利用 wxPython 和 FFmpeg 来从视频文件中批量生成截图。这个工具能够让用户选择一个文件夹,遍历其中的所有视频文件,按照视频长度将其分为四等分,然后为每个视频生成四张截图。所有生成的截图将保存在一个以视频名称命名的文件夹中,并在截图完成后自动打开该文件夹。
C:\pythoncode\new\multivideofilescreenshot.py
工具介绍
- wxPython:用于创建桌面应用程序的图形界面。
- FFmpeg:一个强大的多媒体处理工具,用于提取视频帧。
所有代码
import wx
import os
import subprocess
import threading
import datetime
import sysclass VideoScreenshotApp(wx.Frame):def __init__(self):wx.Frame.__init__(self, None, title="视频截图工具", size=(600, 400))# 创建面板panel = wx.Panel(self)# 创建路径选择控件self.path_label = wx.StaticText(panel, label="请选择文件夹:")self.path_textctrl = wx.TextCtrl(panel, style=wx.TE_READONLY)self.path_button = wx.Button(panel, label="选择路径")self.path_button.Bind(wx.EVT_BUTTON, self.on_select_path)# 创建文件列表控件,使用 CheckListBox 以支持多选self.file_list_ctrl = wx.CheckListBox(panel)# 创建截图按钮self.capture_button = wx.Button(panel, label="截图")self.capture_button.Bind(wx.EVT_BUTTON, self.on_capture)# 布局sizer = wx.BoxSizer(wx.VERTICAL)sizer.Add(self.path_label, 0, wx.ALL, 5)sizer.Add(self.path_textctrl, 0, wx.EXPAND | wx.ALL, 5)sizer.Add(self.path_button, 0, wx.ALL, 5)sizer.Add(self.file_list_ctrl, 1, wx.EXPAND | wx.ALL, 5)sizer.Add(self.capture_button, 0, wx.ALL | wx.ALIGN_CENTER, 5)panel.SetSizer(sizer)self.current_path = ""def on_select_path(self, event):dlg = wx.DirDialog(self, "选择文件夹", style=wx.DD_DEFAULT_STYLE)if dlg.ShowModal() == wx.ID_OK:self.current_path = dlg.GetPath()self.path_textctrl.SetValue(self.current_path)self.update_file_list()dlg.Destroy()def update_file_list(self):self.file_list_ctrl.Clear()if not self.current_path:returnfile_list = self.search_video_files(self.current_path)for filename, file_path, duration in file_list:self.file_list_ctrl.Append(f"{filename} - {str(datetime.timedelta(seconds=int(duration)))}", file_path)def search_video_files(self, directory):video_extensions = ['.mp4', '.avi', '.mkv', '.mov', '.wmv', '.flv', '.webm']file_list = []for root, dirs, files in os.walk(directory):for file in files:if os.path.splitext(file)[1].lower() in video_extensions:file_path = os.path.join(root, file)duration = self.get_video_duration(file_path)file_list.append((file, file_path, duration))return file_listdef get_video_duration(self, file_path):cmd = ['ffprobe','-v', 'error','-select_streams', 'v:0','-show_entries', 'stream=duration','-of', 'default=noprint_wrappers=1:nokey=1',file_path]try:result = subprocess.run(cmd, stdout=subprocess.PIPE, stderr=subprocess.PIPE, text=True, check=True)duration_str = result.stdout.strip()if not duration_str:raise ValueError("ffprobe output is empty")return float(duration_str)except subprocess.CalledProcessError as e:wx.LogError(f"ffprobe error: {e.stderr}")raiseexcept ValueError as e:wx.LogError(f"Value error: {e}")raisedef on_capture(self, event):selected_indices = self.file_list_ctrl.GetCheckedItems()if selected_indices:for index in selected_indices:file_path = self.file_list_ctrl.GetClientData(index)file_name = os.path.basename(file_path)duration = self.get_video_duration(file_path)thread = threading.Thread(target=self.capture_screenshots, args=(file_path, duration))thread.start()else:wx.MessageBox("请先选择一个或多个视频文件", "提示", wx.OK | wx.ICON_INFORMATION)def capture_screenshots(self, file_path, duration):output_dir = os.path.join(self.current_path, os.path.splitext(os.path.basename(file_path))[0])if not os.path.exists(output_dir):os.makedirs(output_dir)# 计算每张截图的时间点intervals = [duration * i / 4 for i in range(1, 5)]# 生成截图for i, timestamp in enumerate(intervals):cmd = ['ffmpeg','-ss', str(datetime.timedelta(seconds=int(timestamp))),'-i', file_path,'-vframes', '1',os.path.join(output_dir, f'screenshot_{i+1}.jpg')]subprocess.run(cmd, check=True)# 截图完成后,自动打开文件夹if sys.platform.startswith('win'):subprocess.Popen(['explorer', output_dir])elif sys.platform.startswith('darwin'):subprocess.Popen(['open', output_dir])elif sys.platform.startswith('linux'):subprocess.Popen(['xdg-open', output_dir])if __name__ == "__main__":app = wx.App(False)frame = VideoScreenshotApp()frame.Show()app.MainLoop()
代码实现
下面是我们的工具实现代码:
import wx
import os
import subprocess
import threading
import datetime
import sysclass VideoScreenshotApp(wx.Frame):def __init__(self):wx.Frame.__init__(self, None, title="视频截图工具", size=(600, 400))# 创建面板panel = wx.Panel(self)# 创建路径选择控件self.path_label = wx.StaticText(panel, label="请选择文件夹:")self.path_textctrl = wx.TextCtrl(panel, style=wx.TE_READONLY)self.path_button = wx.Button(panel, label="选择路径")self.path_button.Bind(wx.EVT_BUTTON, self.on_select_path)# 创建文件列表控件,使用 CheckListBox 以支持多选self.file_list_ctrl = wx.CheckListBox(panel)# 创建截图按钮self.capture_button = wx.Button(panel, label="截图")self.capture_button.Bind(wx.EVT_BUTTON, self.on_capture)# 布局sizer = wx.BoxSizer(wx.VERTICAL)sizer.Add(self.path_label, 0, wx.ALL, 5)sizer.Add(self.path_textctrl, 0, wx.EXPAND | wx.ALL, 5)sizer.Add(self.path_button, 0, wx.ALL, 5)sizer.Add(self.file_list_ctrl, 1, wx.EXPAND | wx.ALL, 5)sizer.Add(self.capture_button, 0, wx.ALL | wx.ALIGN_CENTER, 5)panel.SetSizer(sizer)self.current_path = ""def on_select_path(self, event):dlg = wx.DirDialog(self, "选择文件夹", style=wx.DD_DEFAULT_STYLE)if dlg.ShowModal() == wx.ID_OK:self.current_path = dlg.GetPath()self.path_textctrl.SetValue(self.current_path)self.update_file_list()dlg.Destroy()def update_file_list(self):self.file_list_ctrl.Clear()if not self.current_path:returnfile_list = self.search_video_files(self.current_path)for filename, file_path, duration in file_list:self.file_list_ctrl.Append(f"{filename} - {str(datetime.timedelta(seconds=int(duration)))}", file_path)def search_video_files(self, directory):video_extensions = ['.mp4', '.avi', '.mkv', '.mov', '.wmv', '.flv', '.webm']file_list = []for root, dirs, files in os.walk(directory):for file in files:if os.path.splitext(file)[1].lower() in video_extensions:file_path = os.path.join(root, file)duration = self.get_video_duration(file_path)file_list.append((file, file_path, duration))return file_listdef get_video_duration(self, file_path):cmd = ['ffprobe','-v', 'error','-select_streams', 'v:0','-show_entries', 'stream=duration','-of', 'default=noprint_wrappers=1:nokey=1',file_path]try:result = subprocess.run(cmd, stdout=subprocess.PIPE, stderr=subprocess.PIPE, text=True, check=True)duration_str = result.stdout.strip()if not duration_str:raise ValueError("ffprobe output is empty")return float(duration_str)except subprocess.CalledProcessError as e:wx.LogError(f"ffprobe error: {e.stderr}")raiseexcept ValueError as e:wx.LogError(f"Value error: {e}")raisedef on_capture(self, event):selected_indices = self.file_list_ctrl.GetCheckedItems()if selected_indices:for index in selected_indices:file_path = self.file_list_ctrl.GetClientData(index)file_name = os.path.basename(file_path)duration = self.get_video_duration(file_path)thread = threading.Thread(target=self.capture_screenshots, args=(file_path, duration))thread.start()else:wx.MessageBox("请先选择一个或多个视频文件", "提示", wx.OK | wx.ICON_INFORMATION)def capture_screenshots(self, file_path, duration):output_dir = os.path.join(self.current_path, os.path.splitext(os.path.basename(file_path))[0])if not os.path.exists(output_dir):os.makedirs(output_dir)# 计算每张截图的时间点intervals = [duration * i / 4 for i in range(1, 5)]# 生成截图for i, timestamp in enumerate(intervals):cmd = ['ffmpeg','-ss', str(datetime.timedelta(seconds=int(timestamp))),'-i', file_path,'-vframes', '1',os.path.join(output_dir, f'screenshot_{i+1}.jpg')]subprocess.run(cmd, check=True)# 截图完成后,自动打开文件夹if sys.platform.startswith('win'):subprocess.Popen(['explorer', output_dir])elif sys.platform.startswith('darwin'):subprocess.Popen(['open', output_dir])elif sys.platform.startswith('linux'):subprocess.Popen(['xdg-open', output_dir])if __name__ == "__main__":app = wx.App(False)frame = VideoScreenshotApp()frame.Show()app.MainLoop()
代码解释
-
创建主窗口:
- 使用
wx.Frame创建主窗口,添加路径选择控件、文件列表控件以及截图按钮。
- 使用
-
路径选择:
on_select_path方法允许用户选择一个文件夹,并更新文件列表。
-
文件列表更新:
update_file_list方法遍历所选文件夹中的视频文件,获取每个视频的时长,并将信息显示在CheckListBox中。
-
视频时长获取:
get_video_duration方法使用ffprobe命令来获取视频时长。
-
截图生成:
on_capture方法处理截图请求,使用多线程来生成截图,以避免阻塞主线程。capture_screenshots方法使用ffmpeg命令生成四张截图,并将截图保存在以视频名称命名的文件夹中。
-
自动打开文件夹:
- 截图完成后,自动在文件浏览器中打开保存截图的文件夹。
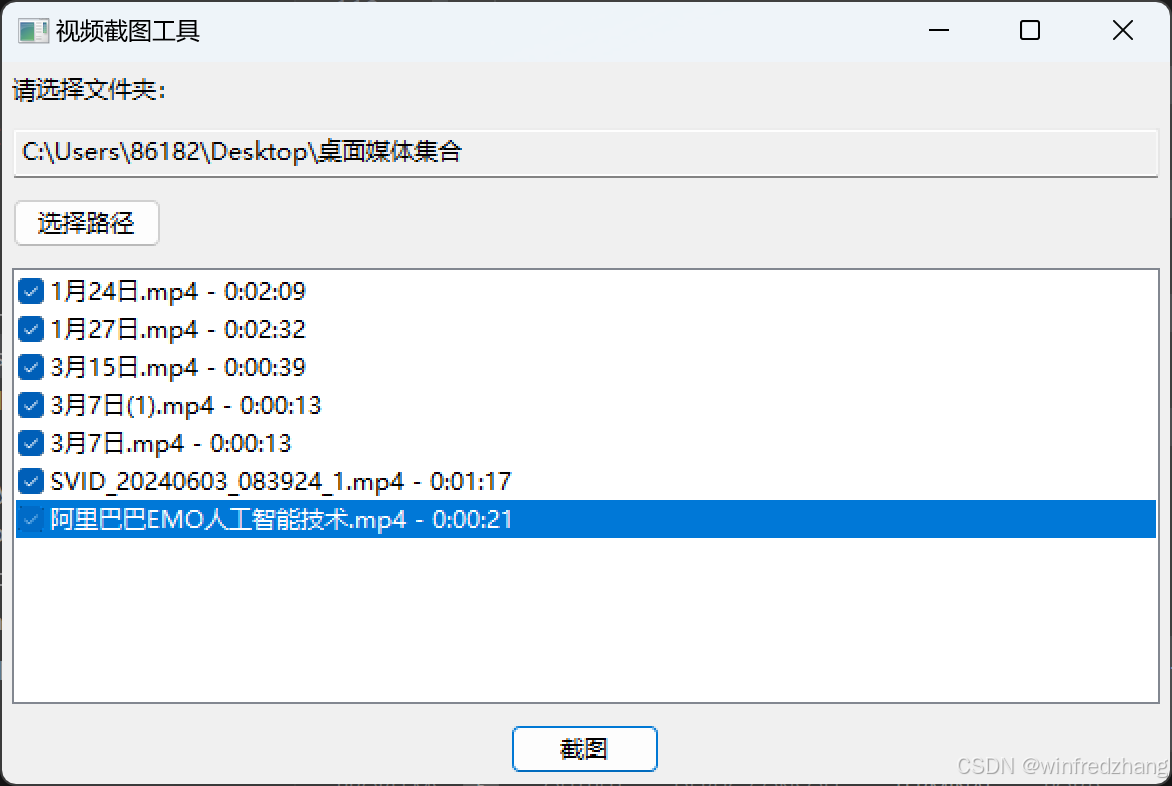
效果如下
总结
通过这个工具,你可以轻松地从多个视频文件中生成截图,而无需手动操作。wxPython 提供了一个简单易用的界面,而 FFmpeg 则负责处理视频帧的提取。这个工具不仅对视频编辑工作有帮助,也为批量处理视频文件提供了极大的便利。