pytorch 快速入门-方法篇
文章目录
- 1. 什么是Pytorch
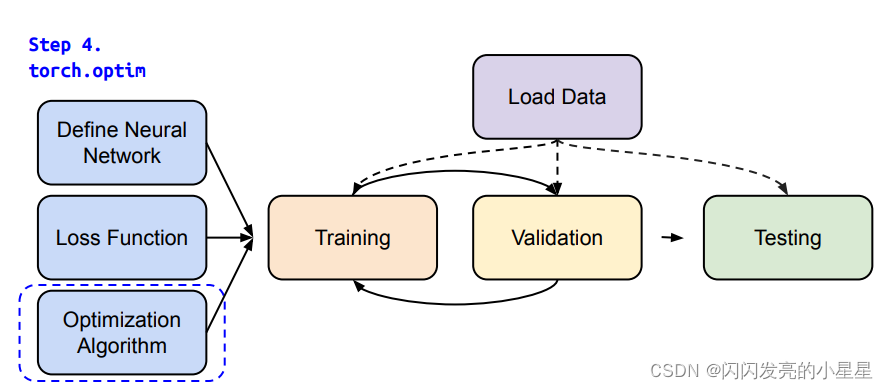
- 2. 训练神经网络的流程
- 3. Training & Testing Neural Networks -in Pytorch
- 3.1 Step1 Load Data (Dataset &^ Dataloader)
- 3.1.1 Dataset
- 1)Loading a Dataset
- 2) Creating a Custom Dataset for your files
- 3.1.2 Dataloader
- 1) Preparing your data for training with DataLoaders
- 2) Iterate through the DataLoader
- 3.2 Bulid the Neural Network
- 3.2.1 Define Neural Network
- 1) Get Device for Training
- 2) Define the Class
- 3.3 Loss function
- 3.4 Optimization
- 3.5 Entire Procedure
- 1) Training Setup
- 2)Traning Loop
- 3) Validation Loop
- 4) Testing Loop
- 3.5 Save and Load THE MODEL
- 3.5.1 Saving and Loading Model Weights
- 3.5.2 Saving and Loading Models with Shapes
- 主要参考:
1. 什么是Pytorch
- 一种基于Python的机器学习框架
- 2个主要特点:
*在GPU上计算 N维Tensor
*在训练DNN时自动微分
2. 训练神经网络的流程
- Training Neural Networks

- Training & Testing Neural Networks

3. Training & Testing Neural Networks -in Pytorch
3.1 Step1 Load Data (Dataset &^ Dataloader)
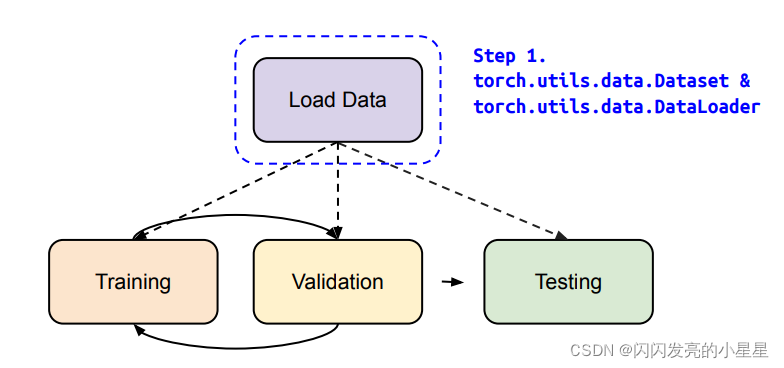
- Dataset: 存储样本以及相应的标签。
- DataLoader:wraps an iterable around the Dataset to enable easy access to the samples
- dataset = MyDataset(file)
- dataloader = DataLoader(dataset, batch_size, shuffle=True)
3.1.1 Dataset
1)Loading a Dataset
PyTorch domain libraries provide a number of pre-loaded datasets (such as FashionMNIST) that subclass torch.utils.data.Dataset and implement functions specific to the particular data.
Here is an example of how to load the Fashion-MNIST dataset from TorchVision. Fashion-MNIST is a dataset of Zalando’s article images consisting of 60,000 training examples and 10,000 test examples. Each example comprises a 28×28 grayscale image and an associated label from one of 10 classes.
We load the FashionMNIST Dataset with the following parameters:
- root is the path where the train/test data is stored,
- train specifies training or test dataset,
- download=True downloads the data from the internet if it’s not available at root.
- transform and target_transform specify the feature and label transformations
import torch
from torch.utils.data import Dataset
from torchvision import datasets
from torchvision.transforms import ToTensor
import matplotlib.pyplot as plttraining_data = datasets.FashionMNIST(root="data",train=True,download=True,transform=ToTensor()
)test_data = datasets.FashionMNIST(root="data",train=False,download=True,transform=ToTensor()
)
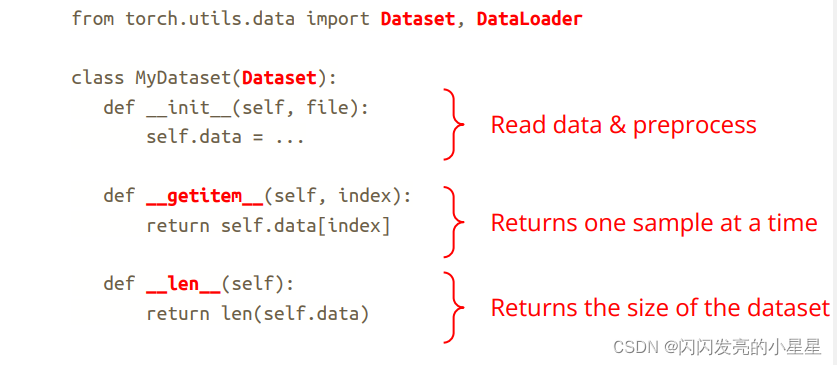
2) Creating a Custom Dataset for your files
一个Dataser类必须包含3个函数:: init, len, and getitem
比如:
Take a look at this implementation; the FashionMNIST images are stored in a directory img_dir, and their labels are stored separately in a CSV file annotations_file
import os
import pandas as pd
from torchvision.io import read_imageclass CustomImageDataset(Dataset):def __init__(self, annotations_file, img_dir, transform=None, target_transform=None):self.img_labels = pd.read_csv(annotations_file)self.img_dir = img_dirself.transform = transformself.target_transform = target_transformdef __len__(self):return len(self.img_labels)def __getitem__(self, idx):img_path = os.path.join(self.img_dir, self.img_labels.iloc[idx, 0])image = read_image(img_path)label = self.img_labels.iloc[idx, 1]if self.transform:image = self.transform(image)if self.target_transform:label = self.target_transform(label)return image, label
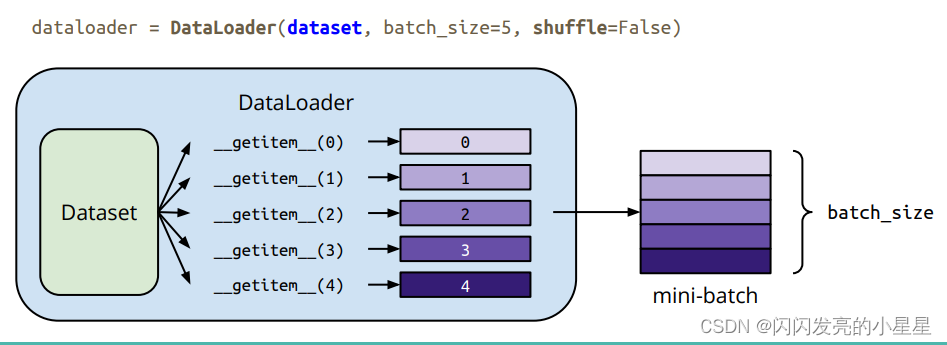
3.1.2 Dataloader
1) Preparing your data for training with DataLoaders
Dataset 从数据集中一次取回一个样本。当训练时,我们希望能够一次拿取“minibatches”个样本,并且为了防止过拟合,每次都进行打乱后再取出,并且使用python的多线程来加速数据检索。Dataloader就是处理该问题的迭代器。
from torch.utils.data import DataLoadertrain_dataloader = DataLoader(training_data, batch_size=64, shuffle=True)
test_dataloader = DataLoader(test_data, batch_size=64, shuffle=True)
batch_size: 一次训练所抓取的数据样本数量
2) Iterate through the DataLoader
We have loaded that dataset into the DataLoader and can iterate through the dataset as needed. Each iteration below returns a batch of train_features and train_labels (containing batch_size=64 features and labels respectively). Because we specified shuffle=True, after we iterate over all batches the data is shuffled (for finer-grained control over the data loading order, take a look at Samplers).
# Display image and label.
train_features, train_labels = next(iter(train_dataloader))
print(f"Feature batch shape: {train_features.size()}")
print(f"Labels batch shape: {train_labels.size()}")
img = train_features[0].squeeze()
label = train_labels[0]
plt.imshow(img, cmap="gray")
plt.show()
print(f"Label: {label}")
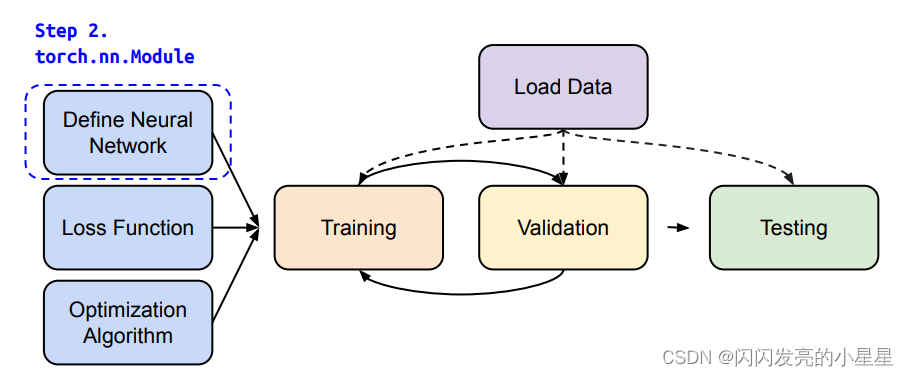
3.2 Bulid the Neural Network
3.2.1 Define Neural Network
1) Get Device for Training
device = "cuda" if torch.cuda.is_available() else "cpu"
print(f"Using {device} device")
2) Define the Class
经典格式:
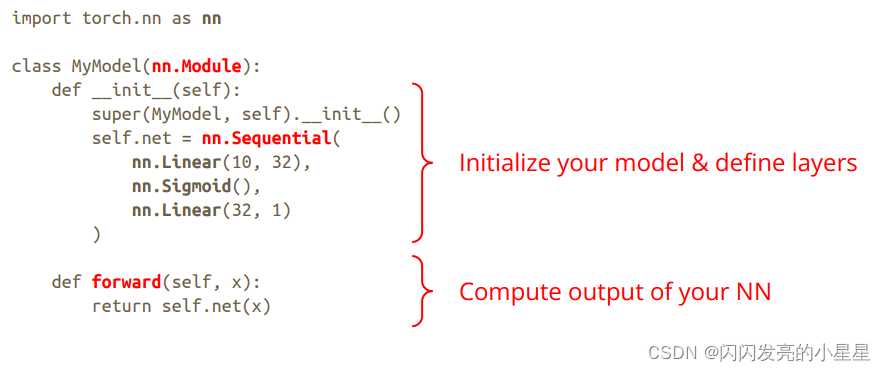
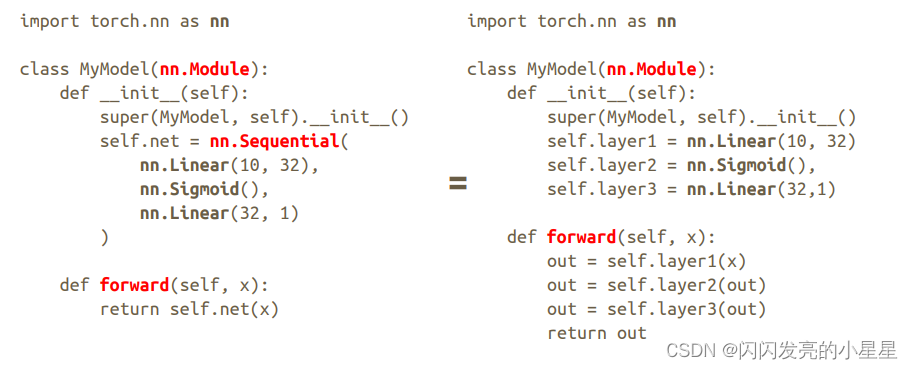
example:
class NeuralNetwork(nn.Module):def __init__(self):super(NeuralNetwork, self).__init__()self.flatten = nn.Flatten()self.linear_relu_stack = nn.Sequential(nn.Linear(28*28, 512),nn.ReLU(),nn.Linear(512, 512),nn.ReLU(),nn.Linear(512, 10),)def forward(self, x):x = self.flatten(x)logits = self.linear_relu_stack(x)return logits
实例化:
model = NeuralNetwork().to(device)
print(model)
out:
NeuralNetwork((flatten): Flatten(start_dim=1, end_dim=-1)(linear_relu_stack): Sequential((0): Linear(in_features=784, out_features=512, bias=True)(1): ReLU()(2): Linear(in_features=512, out_features=512, bias=True)(3): ReLU()(4): Linear(in_features=512, out_features=10, bias=True))
)
To use the model, we pass it the input data. This executes the model’s forward, along with some background operations. Do not call model.forward() directly!
Calling the model on the input returns a 10-dimensional tensor with raw predicted values for each class. We get the prediction probabilities by passing it through an instance of the nn.Softmax module.
X = torch.rand(1, 28, 28, device=device)
logits = model(X)
pred_probab = nn.Softmax(dim=1)(logits)
y_pred = pred_probab.argmax(1)
print(f"Predicted class: {y_pred}")
out:
Predicted class: tensor([8], device='cuda:0')
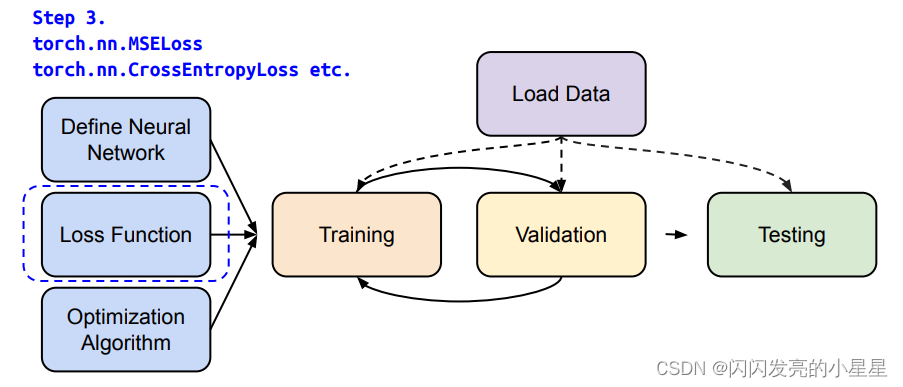
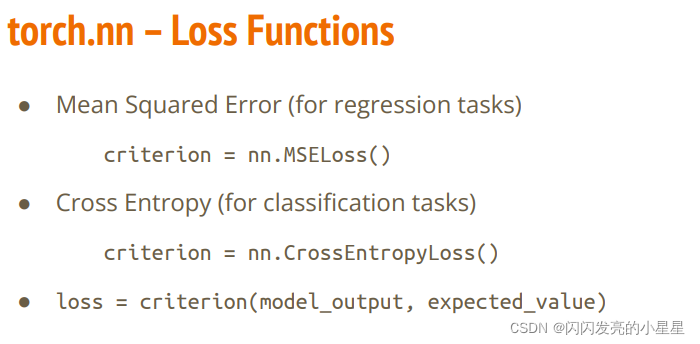
3.3 Loss function
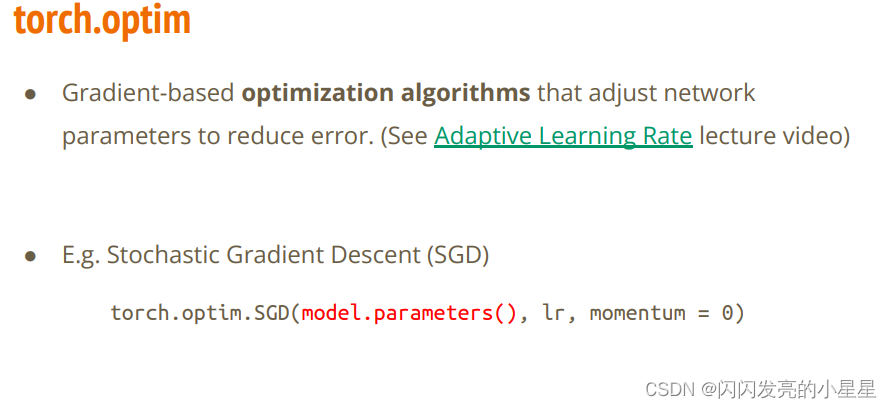
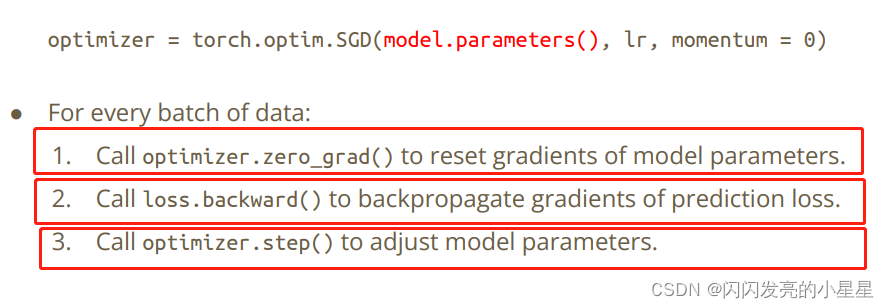
3.4 Optimization
3.5 Entire Procedure

1) Training Setup
dataset = MyDataset(file)  # read data via MyDataset
tr_set = DataLoader(dataset, 16, shuffle=True)  #put dataset into Dataloader
model = MyModel().to(device)  #construct model and move to device (cpu/cuda)
criterion = nn.MSELoss()  #set loss function
optimizer = torch.optim.SGD(model.parameters(), 0.1) #set optimizer
2)Traning Loop
for epoch in range(n_epochs): #iterate n_epochsmodel.train() #set model to train modefor x, y in tr_set: #iterate through the dataloaderoptimizer.zero_grad() #set gradient to zerox, y = x.to(device), y.to(device) #move data to device (cpu/cuda)pred = model(x) #forward pass (compute output)loss = criterion(pred, y) #compute lossloss.backward() #compute gradient (backpropagation)optimizer.step() #update model with optimizer
3) Validation Loop
model.eval()   #set model to evaluation mode
total_loss = 0
for x, y in dv_set:  #iterate through the dataloaderx, y = x.to(device), y.to(device) #move data to device (cpu/cuda)with torch.no_grad():  #disable gradient calculationpred = model(x)  #forward pass (compute output)loss = criterion(pred, y) #compute losstotal_loss += loss.cpu().item() * len(x) #accumulate lossavg_loss = total_loss / len(dv_set.dataset) #compute averaged loss
4) Testing Loop
model.eval()  #set model to evaluation mode
preds = []
for x in tt_set:  #iterate through the dataloaderx = x.to(device) #move data to device (cpu/cuda)with torch.no_grad(): #disable gradient calculationpred = model(x)   #forward pass (compute output)preds.append(pred.cpu()) #collect prediction
3.5 Save and Load THE MODEL
import torch
import torchvision.models as models
3.5.1 Saving and Loading Model Weights
PyTorch models store the learned parameters in an internal state dictionary, called state_dict. These can be persisted via the torch.save method:
model = models.vgg16(pretrained=True)
torch.save(model.state_dict(), 'model_weights.pth')
To load model weights, you need tocreate an instance of the same model first, andthen load the parameters using load_state_dict() method.
model = models.vgg16() # we do not specify pretrained=True, i.e. do not load default weights
model.load_state_dict(torch.load('model_weights.pth'))
model.eval()
3.5.2 Saving and Loading Models with Shapes
When loading model weights, we needed to instantiate the model class first, because the class defines the structure of a network. We might want to save the structure of this class together with the model, in which case we can pass model (and not model.state_dict()) to the saving function:
torch.save(model, 'model.pth')
We can then load the model like this:
model = torch.load('model.pth')
model.eval()
with torch.no_grad()
主要参考:
- 官网
- 李宏毅机器学习课程-pytorch-tutorial