Tauri应用开发实践指南(6)— Tauri 主题多语言设置开发
前言
在现代应用开发中,用户界面的主题和多语言支持是提升用户体验的关键因素。本文将介绍如何在Tauri应用中实现窗口主题设置和多语言设置的开发,并提供更多实用的技巧和最佳实践。
我们在上一节中实现了集成本地数据库的操作,现在通过这个能力再实现主题&多语言的变更,可以充分的理解和实践Tauri。
主题设置的两种方式
在 Tauri 应用中,窗口主题可以通过两种方式进行设置:静态设置和动态设置。这里的静态和动态指的是原生窗口的动态和静态,不是 DOM 层面主题颜色的动态和静态。
静态设置
静态设置是指在应用初始化时就定义好的主题,不会在运行时发生变化。这种方式适用于那些不需要频繁更改主题的应用。
实现方法是在Tauri的配置文件 tauri.conf.json 中设置主题相关参数:
{"tauri": {"windows": [{"theme": "Light"}]}
}
具体可参考:https://tauri.app/v1/api/config/#theme
动态设置
动态设置允许用户在应用运行时更改主题。这种方式提供了更高的灵活性,适用于需要根据用户偏好或系统设置自动调整主题的应用。
当然,为了更好的体验,我们一般都是动态设置主题的方案,不过在 <font style="color:rgb(38, 38, 38);">Tauri</font> 中暂时没有提供相应的 API,然后作者通过查询资料,发现了一个开源插件可以实现,下面就详细讲解一下如何动态实现主题的变更。
主题变更的具体实现
整体思路如下所示:
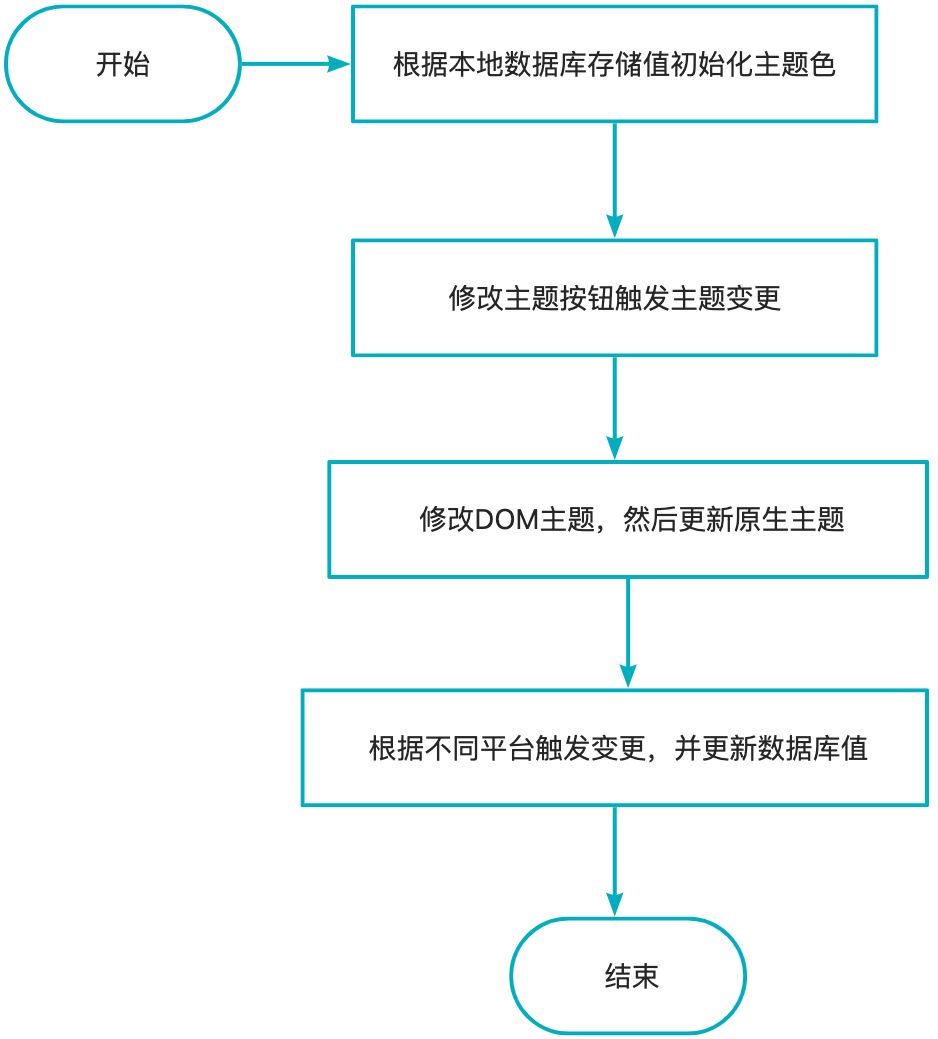
这个流程是循环往复的,闭合整个主题变更的流程,下面就是细节实现了:
倒入插件tauri-plugin-theme
具有参考:https://github.com/wyhaya/tauri-plugin-theme
需要注意的是:tauri1 和 tauri2 在使用的时候有所区别,引入的版本也会不一样,作者的版本是 V1,因为 V2 现在还是 beta 版本。
依赖添加:
tauri-plugin-theme = "0.2.0"
主进程代码修改:
引入 tauri_plugin_theme,然后在 plugin 里面添加并注册上下文。
// Prevents additional console window on Windows in release, DO NOT REMOVE!!
#![cfg_attr(not(debug_assertions), windows_subsystem = "windows")]use tauri_plugin_theme::ThemePlugin; // Learn more about Tauri commands at https://tauri.app/v1/guides/features/command
#[tauri::command]
fn greet(name: &str) -> String {format!("Hello, {}! You've been greeted from Rust!", name)
}fn main() {let mut ctx = tauri::generate_context!();tauri::Builder::default().plugin(tauri_plugin_sql::Builder::default().build()).plugin(ThemePlugin::init(ctx.config_mut())).invoke_handler(tauri::generate_handler![greet]).run(ctx).expect("error while running tauri application");
}
主题修改核心逻辑
App.tsx 中需要和框架联动注册全局 DOM 主题色。
import { HashRouter } from "react-router-dom";
import { ConfigProvider, theme } from "antd";
import { ConfigProvider as SemiConfigProvider } from '@douyinfe/semi-ui';
import { useEffect, useState } from "react";
import Router from './routes';
import GlobalContext from "./context/global";
import { getStore, setStore } from "./bridge";function App() {const [themeData, setThemeData] = useState('')// 修改主题const changeTheme = (val: 'darkAlgorithm' | 'defaultAlgorithm') => {setThemeData(val)setStore('theme', val)const body = document.body;if (val === 'darkAlgorithm') {body.setAttribute('theme-mode', 'dark');} else {body.removeAttribute('theme-mode');}}useEffect(() => {// 初始化主题  const initData = async () => {try {const theme = await getStore('theme')if (theme) {changeTheme(theme as "defaultAlgorithm" | "darkAlgorithm")} else {changeTheme('defaultAlgorithm')}} catch (error) {console.error(error)changeTheme('defaultAlgorithm')}}initData()}, [])return themeData ? <ConfigProvider theme={{ algorithm: themeData === 'darkAlgorithm' ? theme.darkAlgorithm : theme.defaultAlgorithm }}><SemiConfigProvider><GlobalContext.Provider value={{changeTheme,themeData}}><HashRouter><Router /></HashRouter></GlobalContext.Provider></SemiConfigProvider></ConfigProvider> : null
}export default App;
ThemeIcon 组件实现整体的主题手动切换逻辑。
import GlobalContext from "@/context/global";
import { IconMoon, IconSun } from "@douyinfe/semi-icons";
import { Button, Modal } from "@douyinfe/semi-ui";
import { invoke } from "@tauri-apps/api/tauri";
import { useContext } from "react";
import { platform } from '@tauri-apps/api/os';
import { useTranslation } from "react-i18next";type Theme = "auto" | "light" | "dark";const setNativeTheme = (theme: Theme) => {setTimeout(() => {invoke("plugin:theme|set_theme", {theme,}).catch((err) => {alert(err.toString());});}, 100)
};const ThemeIcon = () => {const { changeTheme, themeData } = useContext(GlobalContext);const [modal, contextHolder] = Modal.useModal();const {t} = useTranslation()const changeThemeAction = async () => {const doAction = () => {if (themeData === "darkAlgorithm") {changeTheme("defaultAlgorithm");setNativeTheme("light")} else {changeTheme("darkAlgorithm");setNativeTheme("dark")}}const platformName = await platform();if (platformName === 'win32') {modal.confirm({title:t('SwitchTheme'),content: t('Switching themes requires restarting the application. Do you want to continue?'),okText: t('Confirm'),cancelText: t('Cancel'),onOk: () => {doAction()},});} else {doAction()}};return <><Buttontheme="borderless"style={{color: "var(--semi-color-text-2)",}}icon={themeData === "darkAlgorithm" ? <IconSun /> : <IconMoon />}onClick={() => changeThemeAction()}></Button>{contextHolder}</>
}export default ThemeIcon;
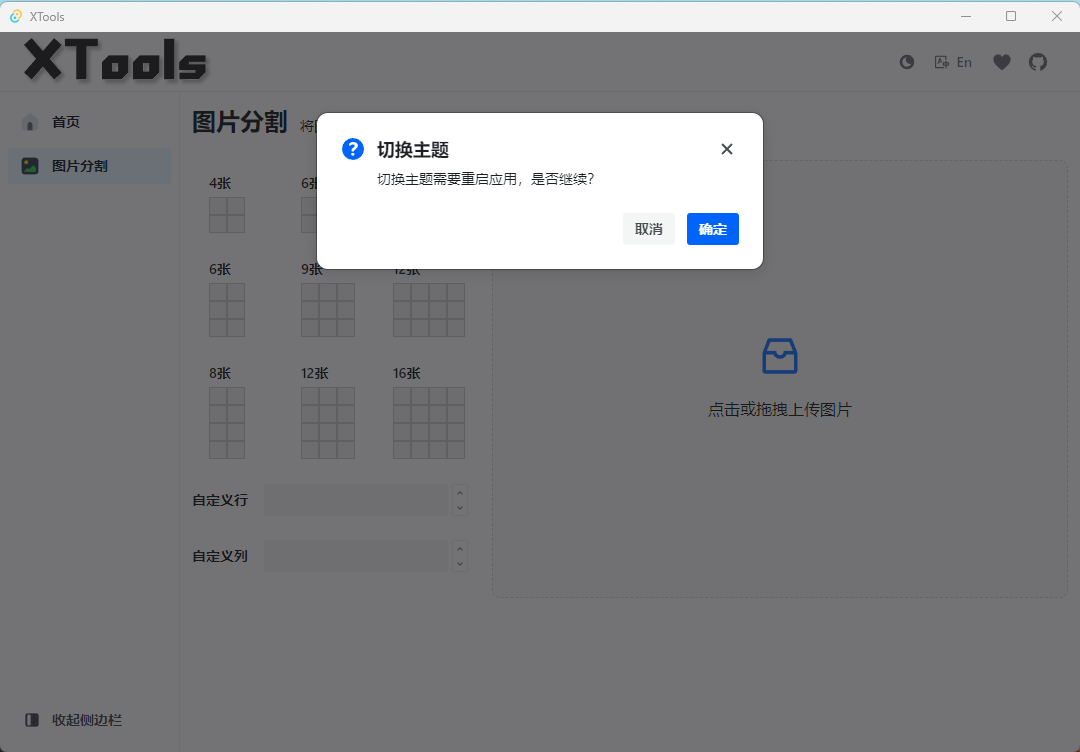
这里需要注意,windows 在切换主题的时候是需要重启应用的,为了更好的体验,我们需要提醒一下用户,如果是 Mac 端的话可以丝滑切换。
多语言设置的具体实现
这里多语言的设置其实也是分两块,一个是页面上的多语言,一个是原生标题和窗口的多语言,我们这里先实现页面上的多语言,窗口菜单的多语言会单独来讲,因为他涉及到整个菜单模块的改变。
页面上的多语言跟传统的 web端 的多语言没有太大区别,核心就是利用 i18n 实现。即安装相关依赖 ——》创建多语言配置文件——》多语言初始化——》利用 <font style="color:rgb(38, 38, 38);">i18n</font> 切换多语言。
核心代码如下:
多语言文件初始化。
import i18n from "i18next";
import { initReactI18next } from 'react-i18next';
import enUsTrans from "./en-us.json";
import zhCnTrans from "./zh-cn.json";i18n
.use(initReactI18next)
.init({resources: {en: {translation: enUsTrans,},zh: {translation: zhCnTrans,},},detection: {order: ['queryString', 'cookie'],caches: ['cookie']},fallbackLng: 'zh', debug: false,interpolation: {escapeValue: false,},
})export default i18n
切换多语言。
const changeLang = (lang?: string) => {if (lang) {setStore('lang', lang)setCurrentLang(lang);i18n.changeLanguage(lang);} else {if (currentLang === "zh") {setStore('lang', "en")setCurrentLang("en");i18n.changeLanguage("en");} else {setStore('lang', "zh")setCurrentLang("zh");i18n.changeLanguage("zh");}}};
到这里基本的多语言就差不多实现了。
源码
https://github.com/Xutaotaotao/XTools/tree/feature-theme-lang
总结
通过以上的详细介绍,我们了解了如何在Tauri应用中实现窗口主题和多语言设置。从静态和动态主题设置,到多语言支持的实现,这些内容涵盖了Tauri开发过程中的多个重要方面。
实现好的主题和语言支持不仅能够提升用户体验,还能扩大应用的受众群体。在实际开发中,可能还需要根据具体项目的需求进行调整和优化。希望本文能为你的Tauri应用开发提供有价值的参考和启发!
如果你在实现过程中遇到任何问题,欢迎进一步讨论和交流。祝你开发顺利!