深度学习入门-04
基于小土堆视频学习
Transforms的使用一
Transforms主要对图片进行变换
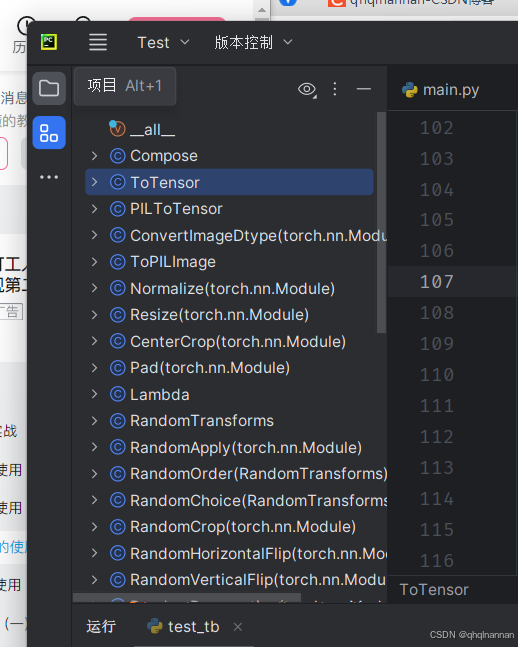
在结构里面可以看到当前Transforms的所有类,及其类的用途
以其中一个类作为举例:
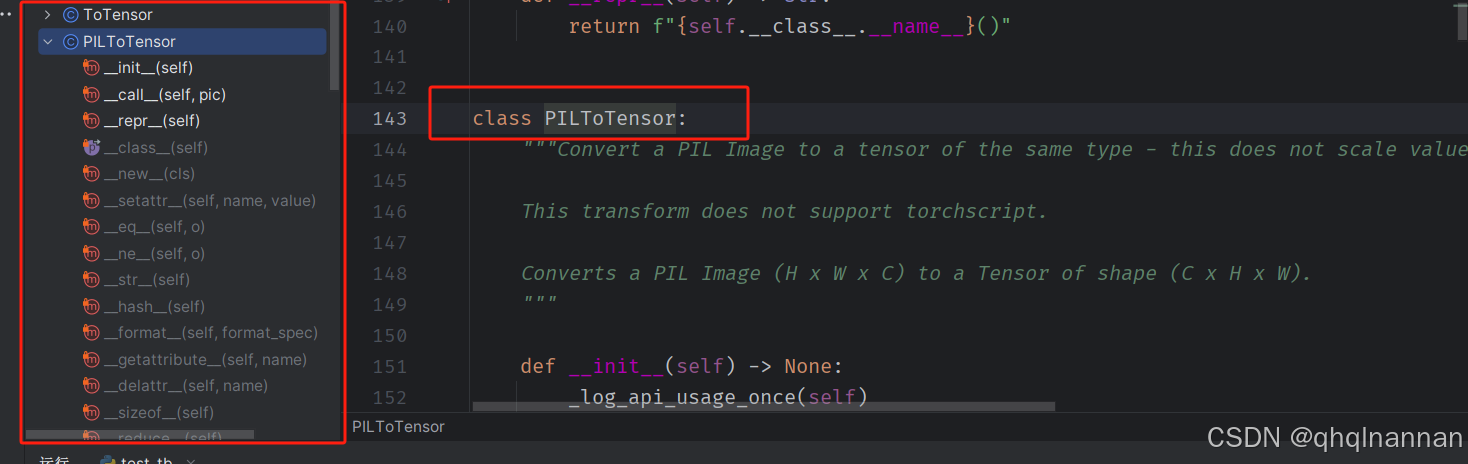
PILToTensor是将PIL的图像转换为Tensor格式的图像;
要将一个PIL Image转换为同类型的tensor,且不进行值的缩放,同时保证tensor的形状为(C x H x W),你可以使用torchvision.transforms模块中的ToTensor类。这个操作不会支持torchscript。
from PIL import Image
import torchvision.transforms as transforms  # 打开一个PIL图像
image = Image.open('path_to_your_image.jpg')  # 创建一个transform,将PIL图像转换为tensor
transform = transforms.ToTensor()  # 应用transform
tensor_image = transform(image)  # 打印结果tensor的形状
print(tensor_image.shape)
这段代码会打开一个PIL图像,然后创建一个ToTensor的transform,将这个transform应用到图像上,从而得到一个形状为(C x H x W)的tensor,其中C是通道数,H是高度,W是宽度。这个tensor的类型与原始PIL图像的数据类型相同,且没有进行值的缩放。
Compose类
Compose 类是一个用于组合多个图像变换操作的类。它将多个变换操作组合成一个单一的操作,使得在图像处理过程中可以方便地应用多个变换。需要注意的是,这个类不支持torchscript,如果你需要将变换操作转换为torchscript,建议使用torch.nn.Sequential。
Compose类的构造函数接收一个变换对象列表作为参数。这些变换对象将按照列表中的顺序应用到图像上。
示例代码中展示了如何使用Compose类来组合三个变换操作:CenterCrop、PILToTensor和ConvertImageDtype。这些操作将依次应用到输入的图像上。
注意部分提到了如果你需要将变换操作转换为torchscript,你应该使用torch.nn.Sequential来组合变换,并确保使用的变换操作都是可脚本化的,即它们需要能够处理torch.Tensor对象,并且不能使用lambda函数或PIL.Image对象。示例中也展示了如何使用torch.nn.Sequential和torch.jit.script来创建和脚本化变换操作。
class Compose:"""Composes several transforms together. This transform does not support torchscript.Please, see the note below.Args:transforms (list of ``Transform`` objects): list of transforms to compose.Example:>>> transforms.Compose([>>> transforms.CenterCrop(10),>>> transforms.PILToTensor(),>>> transforms.ConvertImageDtype(torch.float),>>> ]).. note::In order to script the transformations, please use ``torch.nn.Sequential`` as below.>>> transforms = torch.nn.Sequential(>>> transforms.CenterCrop(10),>>> transforms.Normalize((0.485, 0.456, 0.406), (0.229, 0.224, 0.225)),>>> )>>> scripted_transforms = torch.jit.script(transforms)Make sure to use only scriptable transformations, i.e. that work with ``torch.Tensor``, does not require`lambda` functions or ``PIL.Image``."""def __init__(self, transforms):if not torch.jit.is_scripting() and not torch.jit.is_tracing():_log_api_usage_once(self)self.transforms = transformsdef __call__(self, img):for t in self.transforms:img = t(img)return imgdef __repr__(self) -> str:format_string = self.__class__.__name__ + "("for t in self.transforms:format_string += "\n"format_string += f" {t}"format_string += "\n)"return format_string这段代码定义了一个名为Compose的类,它用于将多个图像变换操作组合成一个单一的操作。这个类的主要目的是方便地在图像处理过程中应用多个变换。
Compose类的构造函数接收一个变换对象列表作为参数,并将这个列表存储在实例变量self.transforms中。构造函数还检查当前是否正在进行torchscript的脚本化或追踪,如果不是,则记录一次API的使用情况。
__call__方法定义了当Compose实例被调用时应该执行的操作。它遍历self.transforms中的每个变换对象,并将它们依次应用到输入的图像img上。最后,它返回经过所有变换处理后的图像。
__repr__方法定义了Compose实例的字符串表示形式。它生成一个字符串,其中包含类名和所有组合的变换对象的字符串表示形式,每个变换对象前面都有缩进和换行符,以便于阅读。
需要注意的是,Compose类不支持torchscript。如果你需要将变换操作转换为torchscript,你应该使用torch.nn.Sequential来组合变换,并确保使用的变换操作都是可脚本化的,即它们需要能够处理torch.Tensor对象,并且不能使用lambda函数或PIL.Image对象(除非这些操作在torchscript中有相应的实现)。示例代码中也展示了如何使用torch.nn.Sequential和torch.jit.script来创建和脚本化变换操作。
构造函数是一个特殊的方法,用于在创建对象时初始化该对象的状态。构造函数的名称是 init,它会在对象被创建时自动调用。
在你提供的Compose类中,构造函数 init 接收一个参数 transforms,这是一个变换对象列表。构造函数的任务是将这个列表保存到实例变量 self.transforms 中,以便后续的方法可以使用这些变换对象。
此外,构造函数还检查当前是否正在进行torchscript的脚本化或追踪。这是通过调用 torch.jit.is_scripting() 和 torch.jit.is_tracing() 来实现的。如果这些函数返回 False,表示当前不在进行脚本化或追踪,那么构造函数会调用 _log_api_usage_once(self) 来记录一次API的使用情况。这可能是为了跟踪或统计API的使用频率,但具体的实现细节并没有在代码片段中给出。
总的来说,Compose类的构造函数负责接收变换对象列表,将其保存到实例变量中,并根据需要进行一些额外的检查或操作。
transforms的结构与用法
transforms.py可以看做一个工具箱,里面有不同的工具,比如totensor(将数据转换为totensor),resize(描述的是一个图像缩放的功能,它可以将输入的图像调整到给定的大小)
class Resize(torch.nn.Module):"""Resize the input image to the given size.If the image is torch Tensor, it is expectedto have [..., H, W] shape, where ... means a maximum of two leading dimensionsArgs:size (sequence or int): Desired output size. If size is a sequence like(h, w), output size will be matched to this. If size is an int,smaller edge of the image will be matched to this number.i.e, if height > width, then image will be rescaled to(size * height / width, size)... note::In torchscript mode size as single int is not supported, use a sequence of length 1: ``[size, ]``.interpolation (InterpolationMode): Desired interpolation enum defined by:class:`torchvision.transforms.InterpolationMode`. Default is ``InterpolationMode.BILINEAR``.If input is Tensor, only ``InterpolationMode.NEAREST``, ``InterpolationMode.NEAREST_EXACT``,``InterpolationMode.BILINEAR`` and ``InterpolationMode.BICUBIC`` are supported.The corresponding Pillow integer constants, e.g. ``PIL.Image.BILINEAR`` are accepted as well.max_size (int, optional): The maximum allowed for the longer edge ofthe resized image. If the longer edge of the image is greaterthan ``max_size`` after being resized according to ``size``,``size`` will be overruled so that the longer edge is equal to``max_size``.As a result, the smaller edge may be shorter than ``size``. Thisis only supported if ``size`` is an int (or a sequence of length1 in torchscript mode).antialias (bool, optional): Whether to apply antialiasing.It only affects **tensors** with bilinear or bicubic modes and it isignored otherwise: on PIL images, antialiasing is always applied onbilinear or bicubic modes; on other modes (for PIL images andtensors), antialiasing makes no sense and this parameter is ignored.Possible values are:- ``True`` (default): will apply antialiasing for bilinear or bicubic modes.Other mode aren't affected. This is probably what you want to use.- ``False``: will not apply antialiasing for tensors on any mode. PILimages are still antialiased on bilinear or bicubic modes, becausePIL doesn't support no antialias.- ``None``: equivalent to ``False`` for tensors and ``True`` forPIL images. This value exists for legacy reasons and you probablydon't want to use it unless you really know what you are doing.The default value changed from ``None`` to ``True`` inv0.17, for the PIL and Tensor backends to be consistent.
描述的是一个图像缩放的功能,它可以将输入的图像调整到给定的大小。以下是关于这个函数参数的详细解释:
size (序列或整数):
- 期望的输出大小。 如果size是一个序列,如(h, w),则输出图像的大小将与此匹配。
如果size是一个整数,则图像的较小边将被匹配到这个数值,即如果高度大于宽度,图像将被重新缩放到(size * height /
width, size)。 注意事项:在torchscript模式下,不支持单个整数作为size,应使用长度为1的序列,如[size,
]。
interpolation (InterpolationMode):
- 期望的插值枚举,由torchvision.transforms.InterpolationMode类定义。
默认值是InterpolationMode.BILINEAR。
如果输入是Tensor,则只支持InterpolationMode.NEAREST、InterpolationMode.NEAREST_EXACT、InterpolationMode.BILINEAR和InterpolationMode.BICUBIC。
也接受Pillow的整数常量,如PIL.Image.BILINEAR。
max_size (整数,可选):
- 调整大小后图像的较长边的最大允许值。
如果图像的较长边在根据size调整大小后大于max_size,则size将被覆盖,以使较长边等于max_size。
因此,较短边可能会短于size。 这仅在size为整数(或在torchscript模式下为长度为1的序列)时支持。
antialias (布尔值,可选):
-
是否应用抗锯齿。 它只影响具有双线性或双三次模式的张量,并且对PIL图像或其他模式没有影响。 可选值:
- True(默认):将对双线性或双三次模式应用抗锯齿。其他模式不受影响。 False:不会对任何模式的张量应用抗锯齿。PIL图像在双线性或双三次模式下仍然应用抗锯齿,因为PIL不支持无抗锯齿。
None:对于张量相当于False,对于PIL图像相当于True。这个值存在是为了遗留原因,除非你真的知道你在做什么,否则你可能不想使用它。
默认值在v0.17中从None更改为True,以使PIL和张量后端保持一致。
- True(默认):将对双线性或双三次模式应用抗锯齿。其他模式不受影响。 False:不会对任何模式的张量应用抗锯齿。PIL图像在双线性或双三次模式下仍然应用抗锯齿,因为PIL不支持无抗锯齿。
使用示例:
import torch
import torchvision.transforms as transforms
from torchvision.transforms.functional import InterpolationMode
然后,你可以创建一个Resize类的实例,并指定你想要的目标大小、插值方法等参数:
# 创建一个Resize实例,将图像调整到256x256的大小
resize_transform = Resize(size=(256, 256), interpolation=InterpolationMode.BILINEAR)  # 或者,如果你想要根据较小边来缩放图像,你可以这样做:
resize_transform_min = Resize(size=256, interpolation=InterpolationMode.BILINEAR)
现在,你可以使用这个变换来调整图像的大小了。假设你有一个PyTorch张量表示的图像img_tensor:
# 假设img_tensor是一个形状为[C, H, W]的张量,其中C是通道数,H是高度,W是宽度
# 使用resize_transform来调整图像大小
resized_img = resize_transform(img_tensor)  # 使用resize_transform_min来调整图像大小,根据较小边来缩放
resized_img_min = resize_transform_min(img_tensor)
resized_img和resized_img_min现在分别是调整大小后的图像张量。你可以将它们用作模型输入或进行其他处理。
请注意,这个Resize类是为了在PyTorch模型内部使用而设计的,它继承自torch.nn.Module。如果你只是想要在数据预处理阶段调整图像大小,而不是作为模型的一部分,那么你可能想要使用torchvision.transforms中的Resize变换,而不是这个自定义的Resize类。
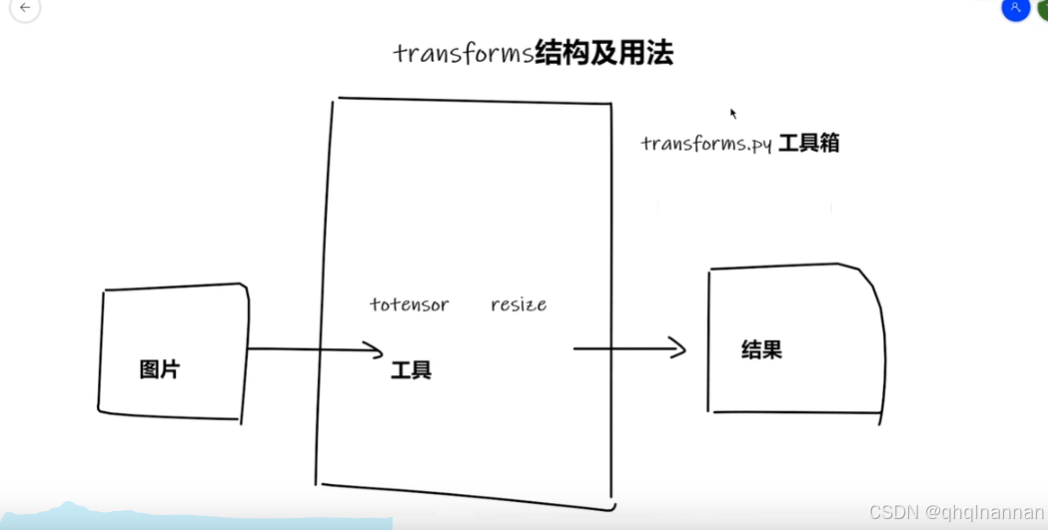
图片 经过不同的工具处理后,形成结果
1、Transforms如何使用
class ToTensor:"""Convert a PIL Image or ndarray to tensor and scale the values accordingly.This transform does not support torchscript.Converts a PIL Image or numpy.ndarray (H x W x C) in the range[0, 255] to a torch.FloatTensor of shape (C x H x W) in the range [0.0, 1.0]if the PIL Image belongs to one of the modes (L, LA, P, I, F, RGB, YCbCr, RGBA, CMYK, 1)or if the numpy.ndarray has dtype = np.uint8In the other cases, tensors are returned without scaling... note::Because the input image is scaled to [0.0, 1.0], this transformation should not be used whentransforming target image masks. See the `references`_ for implementing the transforms for image masks... _references: https://github.com/pytorch/vision/tree/main/references/segmentation"""def __init__(self) -> None:_log_api_usage_once(self)def __call__(self, pic):#调用代码的时候,传入的数据是pic"""Args:pic (PIL Image or numpy.ndarray): Image to be converted to tensor.Returns:Tensor: Converted image."""return F.to_tensor(pic)def __repr__(self) -> str:return f"{self.__class__.__name__}()"具体使用示例:
from PIL import Image
from torchvision import transforms
# from PIL import Image
img_path = "dataset/train/ants/0013035.jpg"
img = Image.open(img_path)
print(img)
tensor_trans = transforms.ToTensor()
tensor_img = tensor_trans(img)
print(tensor_img)
输出结果:第一行结果为PIL的JPRG格式,后面经过tensor_trans = transforms.ToTensor()、
tensor_img = tensor_trans(img)处理后,输出结果为tensor格式
C:\Anaconda3\envs\pytorch_test\python.exe H:\Python\Test\P9_Transforms.py
<PIL.JpegImagePlugin.JpegImageFile image mode=RGB size=768x512 at 0x21EA6A2E1D0>
tensor([[[0.3137, 0.3137, 0.3137,  ..., 0.3176, 0.3098, 0.2980],[0.3176, 0.3176, 0.3176,  ..., 0.3176, 0.3098, 0.2980],[0.3216, 0.3216, 0.3216,  ..., 0.3137, 0.3098, 0.3020],...,[0.3412, 0.3412, 0.3373,  ..., 0.1725, 0.3725, 0.3529],[0.3412, 0.3412, 0.3373,  ..., 0.3294, 0.3529, 0.3294],[0.3412, 0.3412, 0.3373,  ..., 0.3098, 0.3059, 0.3294]],[[0.5922, 0.5922, 0.5922,  ..., 0.5961, 0.5882, 0.5765],[0.5961, 0.5961, 0.5961,  ..., 0.5961, 0.5882, 0.5765],[0.6000, 0.6000, 0.6000,  ..., 0.5922, 0.5882, 0.5804],...,[0.6275, 0.6275, 0.6235,  ..., 0.3608, 0.6196, 0.6157],[0.6275, 0.6275, 0.6235,  ..., 0.5765, 0.6275, 0.5961],[0.6275, 0.6275, 0.6235,  ..., 0.6275, 0.6235, 0.6314]],[[0.9137, 0.9137, 0.9137,  ..., 0.9176, 0.9098, 0.8980],[0.9176, 0.9176, 0.9176,  ..., 0.9176, 0.9098, 0.8980],[0.9216, 0.9216, 0.9216,  ..., 0.9137, 0.9098, 0.9020],...,[0.9294, 0.9294, 0.9255,  ..., 0.5529, 0.9216, 0.8941],[0.9294, 0.9294, 0.9255,  ..., 0.8863, 1.0000, 0.9137],[0.9294, 0.9294, 0.9255,  ..., 0.9490, 0.9804, 0.9137]]])进程已结束,退出代码0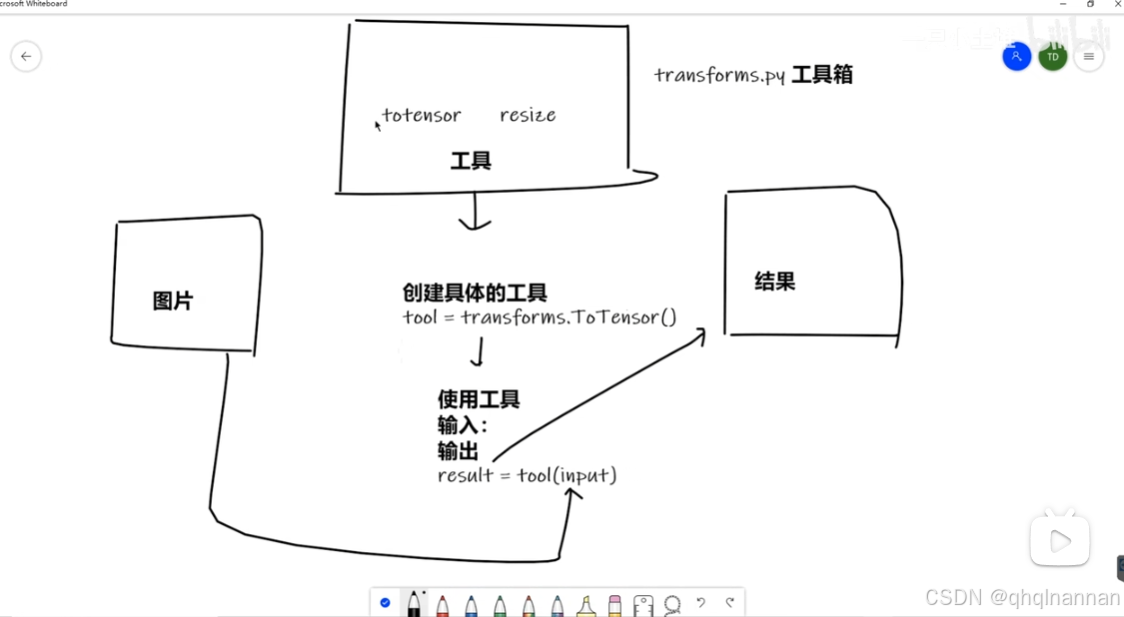
2、tensor数据类型
from PIL import Image
from torch.utils.tensorboard import SummaryWriter
from torchvision import transforms
import cv2
# from PIL import Image
img_path = "dataset/train/ants/0013035.jpg"
img = Image.open(img_path)
print(img)write = SummaryWriter("logs1")img_path1 = "dataset/train/bees/21399619_3e61e5bb6f.jpg"
img1 = Image.open(img_path1)tensor_trans = transforms.ToTensor()
tensor_img = tensor_trans(img)
print(tensor_img)
tensor_trans = transforms.ToTensor()
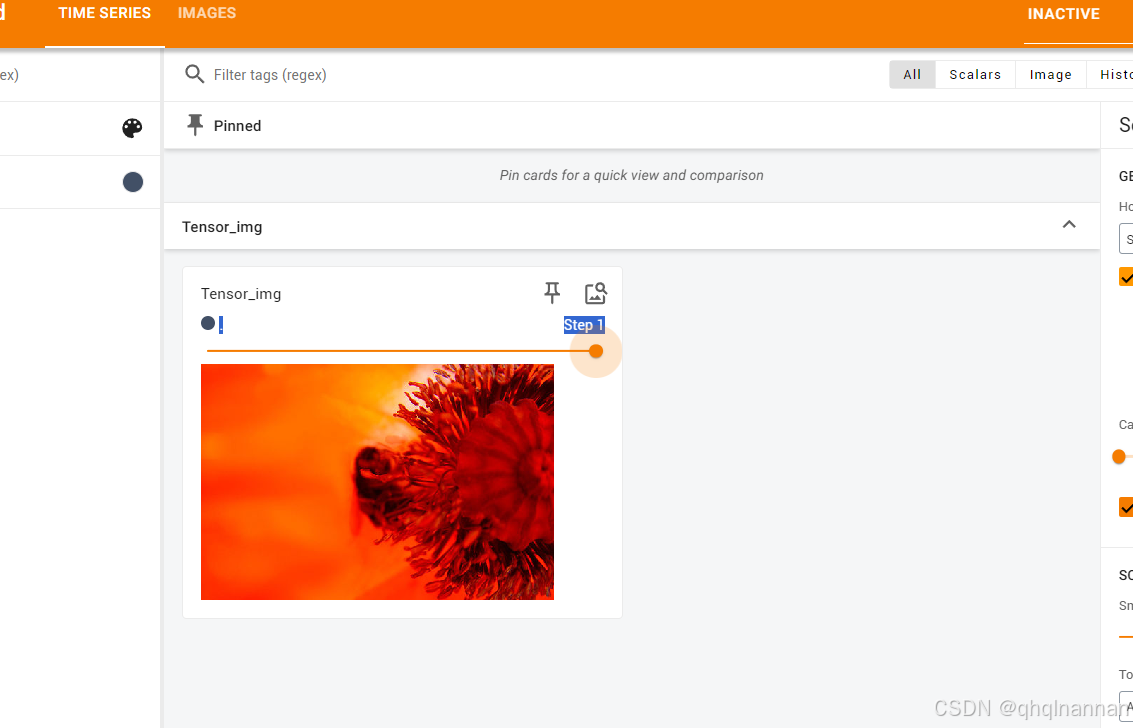
tensor_img1 = tensor_trans(img1)write.add_image("Tensor_img",tensor_img1,1)
write.close()
在local里面输入代码:
tensorboard --logdir logs1 --port=6007单击网址
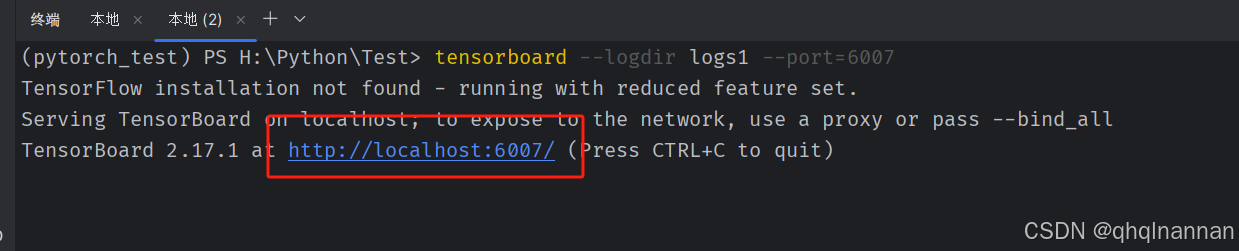
结果为: